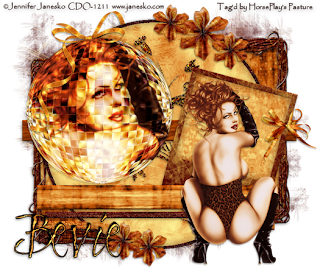
Supplies
1 tube of choice - I used the artwork of Jennifer which can be purchased from CDO. You must have a license to use.
Font of choice - I used Clive Barker here
Weescotlass Mask 297 here
Divine Intentionz Template 355 here
Xerox - Porcelain
“Rusted Boots ” is a tagger size scrap kit created by Terry of Treasures by Terry and can be purchased from Butterfly Blush Designs. You can visit her blog here. Thank you Terry for a most brilliant kit that really brings out the beauty in rust!
This tutorial was written assuming you have a working knowledge of PSP.
~♥~ Let’s get started ~♥~
Open up the template.
Shift + D.
Close out the original.
Delete the top 2 layers and Transparent Circle Edge layer.
Image/Canvas Size:
700 x 600
Ok.
Flood fill the background layer white.
Highlight Shape 1 layer.
Click on it with your Magic Wand.
New Raster layer.
Copy and paste Frame 6 Into Selection.
Deselect.
Delete the template layer.
In your layers pallet bring the frame up to the top (so you can see it better to work on).
Use your Freehand Selection Tool and outline the frame -
Reason for this is because there are very tiny gaps in the vine you don’t want to miss:
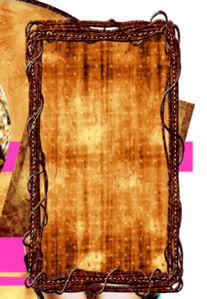
New Raster layer below the frame.
Copy and paste Paper 14 Into Selection.
Deselect.
In your layers pallet move the frame and paper just above the background layer.
Highlight Shape 2 layer.
Repeat the above step.
Highlight Circle Background layer.
Click on it with your Magic Wand.
New Raster layer.
Copy and paste Paper 11 Into Selection.
Adjust/Add Remove Noise/Add Noise:
Gaussian and Monochrome checked
Noise: 53%
OK
Deselect.
Delete the template layer.
Highlight Thin Rectangle 4 layer.
Click on it with your Magic Wand.
New Raster layer.
Copy and paste Paper 8 Into Selection.
Deselect.
Delete the template layer.
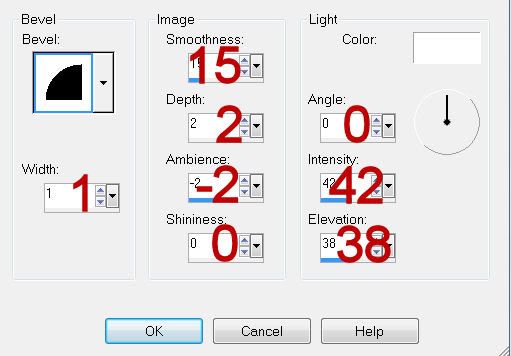
Give it a slight Inner Bevel:
Apply the same Noise effect.
Highlight Circle layer.
Click on it with your Magic Wand.
New Raster layer.
Copy and paste Paper 1 Into Selection.
Deselect.
Delete the template layer.
Highlight Thin Rectangle 2 layer.
Click on it with your Magic Wand.
New Raster layer.
Copy and paste Paper 6 Into Selection.
Deselect.
Delete the template layer.
Give it the same slight Inner Bevel.
Highlight Polaroid layer.
Click on the white area with your Magic Wand.
New Raster layer.
Copy and paste Paper 23 Into Selection.
Deselect.
Give it the same slight Inner Bevel.
Highlight Polaroid layer again.
Click on the black area with your Magic Wand.
New Raster layer above the Polaroid paper layer.
Copy and paste Paper 16 Into Selection.
Deselect.
Delete the Polaroid template layer.
Highlight Small Circle layer.
Click on it with your Magic Wand.
New Raster layer.
Copy and paste Ball 2 Into Selection.
Copy and paste your tube as a new layer.
Resize larger and position over the ball.
Selections/Invert
Tap the delete key.
Deselect.
Delete the template layer.
Apply Xero-Porcelain to the tube layer.
Use default settings accept move the blue channel down to 0.
Change the Properties to Hard Light.
Highlight Thin Rectangle 3 layer.
Click on it with your Magic Wand.
New Raster layer.
Copy and paste Paper 21 Into Selection.
Deselect.
Delete the template layer.
Give it the same slight Inner Bevel.
Apply the same noise effect.
Highlight Thin Rectangle layer.
Click on it with your Magic Wand.
New Raster layer.
Copy and paste Paper 14 Into Selection.
Deselect.
Delete the template layer.
Give it the same slight Inner Bevel.
Add your embellishments. I used:
Doodle 2: Resize 75%
Bow 3: Resize 30%
Flower 1: Resize 40%/Duplicate/Resize 70%/Duplicate 3 more times.
Bow 5: Resize 50%/Mirror
Highlight your white canvas.
New Raster layer.
Select All.
Copy and paste 21 Into Selection.
Deselect.
Apply the mask.
Merge Group.
Add your copyrights.
Add your name:
Color Pallet:
Foreground: #1d0d0a
Background: Pattern/Paper 16 from the kit
Stroke: 1.50
Type your name.
Type your name.
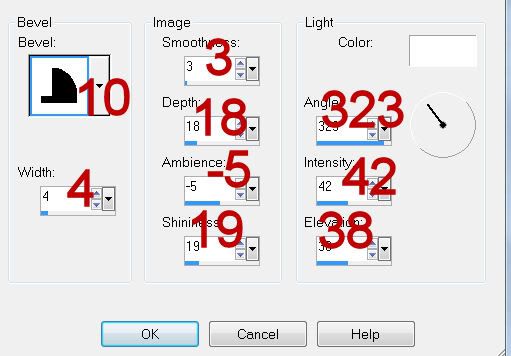
Give it a slight Inner Bevel:
Resize all layers 80%.
I hope you enjoyed this tutorial.
I’d love to see your results and show it off in my gallery.
Email me!
Hugs,
Bev
1 tube of choice - I used the artwork of Jennifer which can be purchased from CDO. You must have a license to use.
Font of choice - I used Clive Barker here
Weescotlass Mask 297 here
Divine Intentionz Template 355 here
Xerox - Porcelain
“Rusted Boots ” is a tagger size scrap kit created by Terry of Treasures by Terry and can be purchased from Butterfly Blush Designs. You can visit her blog here. Thank you Terry for a most brilliant kit that really brings out the beauty in rust!
This tutorial was written assuming you have a working knowledge of PSP.
~♥~ Let’s get started ~♥~
Open up the template.
Shift + D.
Close out the original.
Delete the top 2 layers and Transparent Circle Edge layer.
Image/Canvas Size:
700 x 600
Ok.
Flood fill the background layer white.
Highlight Shape 1 layer.
Click on it with your Magic Wand.
New Raster layer.
Copy and paste Frame 6 Into Selection.
Deselect.
Delete the template layer.
In your layers pallet bring the frame up to the top (so you can see it better to work on).
Use your Freehand Selection Tool and outline the frame -
Reason for this is because there are very tiny gaps in the vine you don’t want to miss:

New Raster layer below the frame.
Copy and paste Paper 14 Into Selection.
Deselect.
In your layers pallet move the frame and paper just above the background layer.
Highlight Shape 2 layer.
Repeat the above step.
Highlight Circle Background layer.
Click on it with your Magic Wand.
New Raster layer.
Copy and paste Paper 11 Into Selection.
Adjust/Add Remove Noise/Add Noise:
Gaussian and Monochrome checked
Noise: 53%
OK
Deselect.
Delete the template layer.
Highlight Thin Rectangle 4 layer.
Click on it with your Magic Wand.
New Raster layer.
Copy and paste Paper 8 Into Selection.
Deselect.
Delete the template layer.
Give it a slight Inner Bevel:

Apply the same Noise effect.
Highlight Circle layer.
Click on it with your Magic Wand.
New Raster layer.
Copy and paste Paper 1 Into Selection.
Deselect.
Delete the template layer.
Highlight Thin Rectangle 2 layer.
Click on it with your Magic Wand.
New Raster layer.
Copy and paste Paper 6 Into Selection.
Deselect.
Delete the template layer.
Give it the same slight Inner Bevel.
Highlight Polaroid layer.
Click on the white area with your Magic Wand.
New Raster layer.
Copy and paste Paper 23 Into Selection.
Deselect.
Give it the same slight Inner Bevel.
Highlight Polaroid layer again.
Click on the black area with your Magic Wand.
New Raster layer above the Polaroid paper layer.
Copy and paste Paper 16 Into Selection.
Deselect.
Delete the Polaroid template layer.
Highlight Small Circle layer.
Click on it with your Magic Wand.
New Raster layer.
Copy and paste Ball 2 Into Selection.
Copy and paste your tube as a new layer.
Resize larger and position over the ball.
Selections/Invert
Tap the delete key.
Deselect.
Delete the template layer.
Apply Xero-Porcelain to the tube layer.
Use default settings accept move the blue channel down to 0.
Change the Properties to Hard Light.
Highlight Thin Rectangle 3 layer.
Click on it with your Magic Wand.
New Raster layer.
Copy and paste Paper 21 Into Selection.
Deselect.
Delete the template layer.
Give it the same slight Inner Bevel.
Apply the same noise effect.
Highlight Thin Rectangle layer.
Click on it with your Magic Wand.
New Raster layer.
Copy and paste Paper 14 Into Selection.
Deselect.
Delete the template layer.
Give it the same slight Inner Bevel.
Add your embellishments. I used:
Doodle 2: Resize 75%
Bow 3: Resize 30%
Flower 1: Resize 40%/Duplicate/Resize 70%/Duplicate 3 more times.
Bow 5: Resize 50%/Mirror
Highlight your white canvas.
New Raster layer.
Select All.
Copy and paste 21 Into Selection.
Deselect.
Apply the mask.
Merge Group.
Add your copyrights.
Add your name:
Color Pallet:
Foreground: #1d0d0a
Background: Pattern/Paper 16 from the kit
Stroke: 1.50
Type your name.
Type your name.
Give it a slight Inner Bevel:

Resize all layers 80%.
I hope you enjoyed this tutorial.
I’d love to see your results and show it off in my gallery.
Email me!
Hugs,
Bev

No comments:
Post a Comment