Supplies
1 tube of choice - I used the artwork of Carrie Hall and can be purchased from Up Your Art. You must have a license to use.
Font of Choice - I used Aquarelle here
Amy and Leah mask 2 here
“Pieces of April” is a FTU tagger size scrap kit created by Jessica of Gothic Inspirations and can be downloaded from her blog here. Please leave a thank you when downloading. It’s a small gesture for hard work given freely.
Thank you Jess. You know how much I love your pretties!
This tutorial was written assuming you have a working knowledge of PSP.
~♥~ Let’s get started ~♥~
Open up a 700 x 700 blank canvas.
Flood fill white.
Copy and paste Frame as a new layer.
Resize 65%
Click inside of it with your Magic Wand. Be sure to click inside the little slits on each side as well.
Selections/Modify/Expand by 6.
New Raster layer below the frame.
Copy and paste Paper 3 Into Selection.
Copy and paste your tube as a new layer below the frame.
Change the Properties to Soft Light and move toward the upper left corner.
Selections/Invert
Tap the delete key.
Deselect.
Copy and paste your tube as a new layer.
Position in front of the frame.
Add your embellishments. I used:
Ribbon Wrap: Resize 52%
Foliage: Resize 70%/Position at right side of frame.
Foliage again: Resize 65%/Flip/Mirror/Position behind the right side of the frame.
Bling: Resize 70%
Highlight your white background.
New Raster layer.
Select All.
Copy and paste Paper 1 Into Selection.
Deselect.
Apply the mask.
Merge Group.
Duplicate
Add your copyrights.
Add your name.
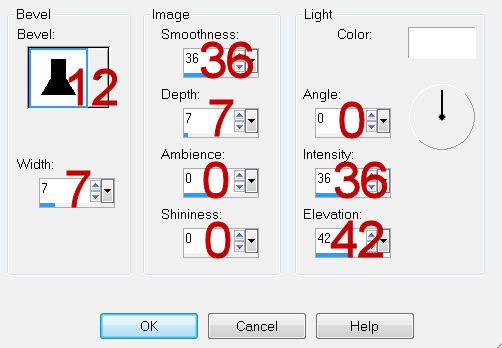
Give it a slight Inner Bevel:

Resize all layers 85%.
I hope you enjoyed this tutorial.
I’d love to see your results and show it off in my gallery.
Email me!
Hugs,
Bev
1 tube of choice - I used the artwork of Carrie Hall and can be purchased from Up Your Art. You must have a license to use.
Font of Choice - I used Aquarelle here
Amy and Leah mask 2 here
“Pieces of April” is a FTU tagger size scrap kit created by Jessica of Gothic Inspirations and can be downloaded from her blog here. Please leave a thank you when downloading. It’s a small gesture for hard work given freely.
Thank you Jess. You know how much I love your pretties!
This tutorial was written assuming you have a working knowledge of PSP.
~♥~ Let’s get started ~♥~
Open up a 700 x 700 blank canvas.
Flood fill white.
Copy and paste Frame as a new layer.
Resize 65%
Click inside of it with your Magic Wand. Be sure to click inside the little slits on each side as well.
Selections/Modify/Expand by 6.
New Raster layer below the frame.
Copy and paste Paper 3 Into Selection.
Copy and paste your tube as a new layer below the frame.
Change the Properties to Soft Light and move toward the upper left corner.
Selections/Invert
Tap the delete key.
Deselect.
Copy and paste your tube as a new layer.
Position in front of the frame.
Add your embellishments. I used:
Ribbon Wrap: Resize 52%
Foliage: Resize 70%/Position at right side of frame.
Foliage again: Resize 65%/Flip/Mirror/Position behind the right side of the frame.
Bling: Resize 70%
Highlight your white background.
New Raster layer.
Select All.
Copy and paste Paper 1 Into Selection.
Deselect.
Apply the mask.
Merge Group.
Duplicate
Add your copyrights.
Add your name.
Give it a slight Inner Bevel:

Resize all layers 85%.
I hope you enjoyed this tutorial.
I’d love to see your results and show it off in my gallery.
Email me!
Hugs,
Bev

That is so gorgeous Bev!! Thank you so much. Amazing what you can do with just a few pieces! Hugs, Jess
ReplyDeleteThanks Jess! I just loved your portion of that blog train.
ReplyDelete