Supplies
Font of Choice - I used CAC Shishoni here
Becky Mask 22 here
VanDerLee Snowflakes
Animation Shop
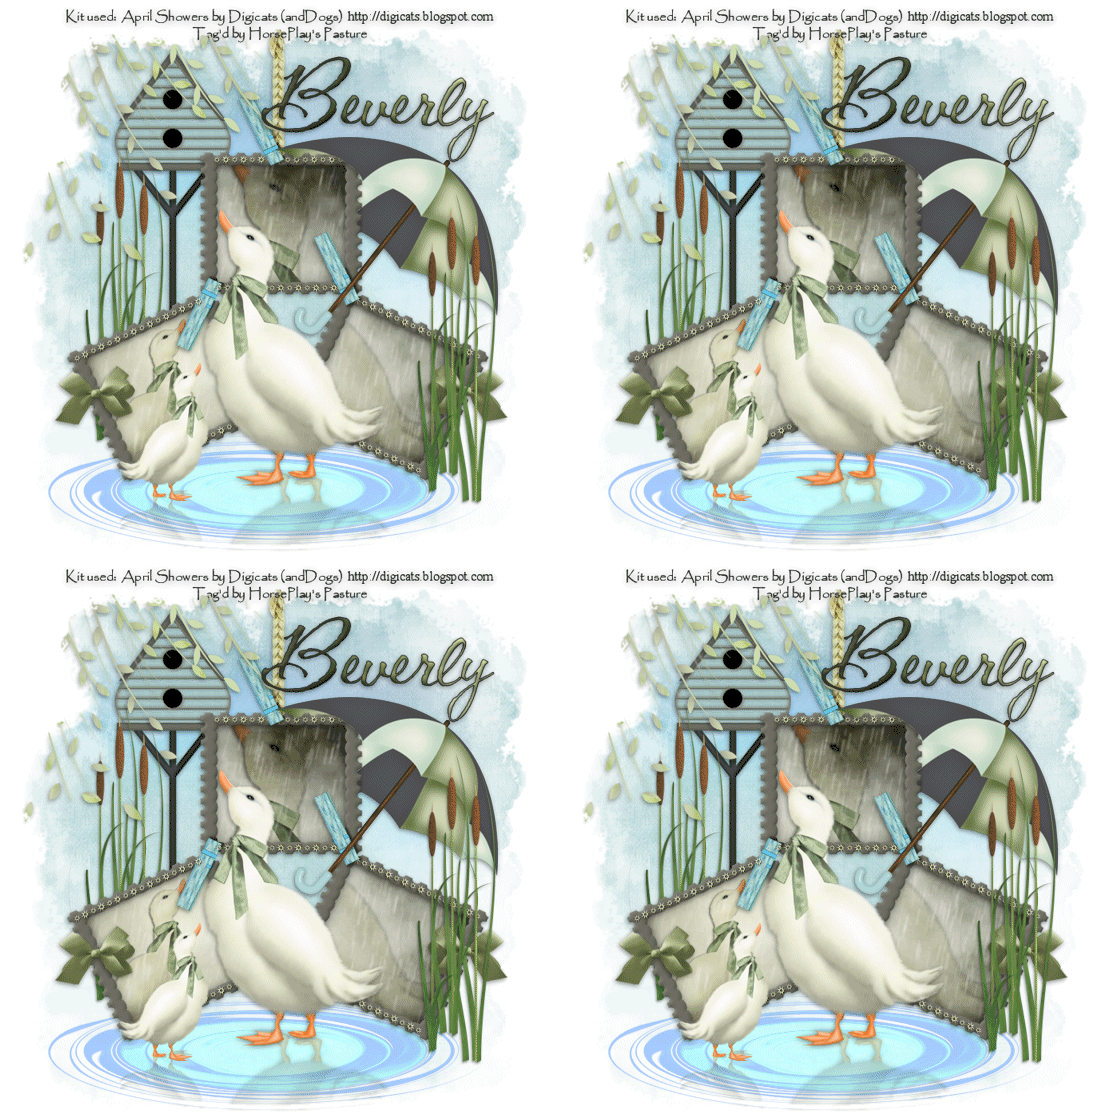
“April Showers” is a PTU tagger size scrap kit created by Dianna of Digicats (and Dogs) and can be purchased from Butterfly Blush Designs. You can visit her blog here.
Thank you Dianna, this kit is amazing!!
This tutorial was written assuming you have a working knowledge of PSP.
~♥~ Let’s get started ~♥~
Open up a 700 x 700 blank canvas.
Flood fill white.
Copy and paste Frame 4 as a new layer.
Resize 80%
Copy and paste Border as a new layer.
Resize 45%
Adjust/Sharpen
Position over the top of the top frame.
Erase whatever overhangs.
Duplicate/Flip
Position at the bottom of the top frame.
Highlight the original border layer.
Duplicate/Free rotate Left 25 degrees/Duplicate
Position over the top of the bottom left frame.
Duplicate/Mirror/Position over the top of the right frame.
Mirror the other duplicated layer and position at the bottom of the right frame.
Close out your white canvas.
Merge Visible.
Reopen your white canvas.
Click inside of each frame with your Magic Wand.
New Raster layer below the frame.
Copy and paste Paper 2 Into Selection.
Copy and paste Goose below the frame - move into position - see my tag for reference.
Selections/Invert
Tap the delete key.
Deselect.
Paste the goose again below the frame.
Resize 45%.Mirror
Move into position.
Highlight the paper layer.
Click anywhere outside of it with your Magic Wand.
Highlight the small goose layer.
Tap the delete key.
Change the Properties of both goose layers to Multiply.
Selection/Invert
Now we’re going to add the rain layers.
Highlight the layer that’s just below the frame layer.
Create 4 new Raster layers.
Rename them Rain 1, 2, 3, and 4.
Highlight Rain 1 layer.
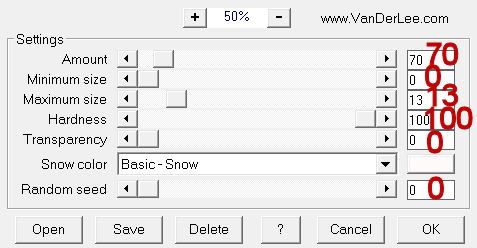
Apply VanDerLee Snowflakes:
Match your settings to mine:

OK
Highlight Rain 2 layer.
Apply the same snowflake effect accept move the Random Seed button to the right a bit.
Highlight Rain 3 layer.
Apply the same snowflake effect accept move the Random Seed button to the right a bit.
Highlight Rain 4 layer.
Apply the same snowflake effect accept move the Random Seed button to the right a bit.
Continue to keep it selected.
Highlight Rain 1 layer.
Adjust/Blur/Motion Blur:
Angle: 191
Strength: 40
OK
Repeat the above step with Rain 2, 3, and 4 layers.
Deselect.
Close out Rain 2, 3, and 4.
Copy and paste Puddle as a new layer.
Move into position - see my tag for reference.
Copy and paste Goose as a new layer.
Resize 70%
Paste goose again.
Resize 35%/Mirror
Move both geese into exact position - see my tag for reference.
Merge Visible both geese layers.
Duplicate/Flip
Move the duplicated layer below the original layer in your layers pallet and position just below the geese feet so that it looks like their image in the puddle.
Change the Properties to Multiply.
Lower the Opacity to about 38.
Highlight the puddle layer.
Click anywhere outside of it with your Magic Wand.
Highlight the mirrored image of the geese and tap the delete key.
Deselect.
I hope I didn’t lose you at all through this tutorial!
I tried to make it as painless as possible and I promise you the worst is over!
Add your embellishments. I used:
Birdhouse: Resize 70%
Cattails: Duplicate
Umbrella 1: Resize 70%
Bow 3; Resize 25%/Duplicate/Mirror
Highlight your white canvas.
New Raster layer.
Select All.
Copy and paste Paper 11 Into Selection.
Deselect.
Copy and paste Aurora as a new layer just above the paper.
Merge Down.
Apply the mask.
Merge Group.
Copy and paste Leaves as a new layer.
Mirror
Position at the top of your layers pallet.
Highlight the mask layer.
Click anywhere outside of it with your Magic Wand.
Highlight the leaves layer.
Tap the delete key.
Deselect.
Add your copyrights.
Add your name.
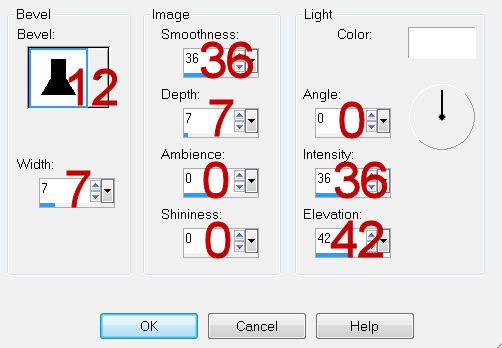
Give it a slight Inner Bevel:

Resize all layers 80%.
Copy Merge
~Time to Animate~
Open up Animation Shop.
Edit/Paste/As New Animation.
Back in PSP.
Close out Rain 1.
Open up Rain 2.
Copy Merge.
Carry into AS.
Edit/Paste/After Current Frame.
Back in PSP.
Close out Rain 2.
Open up Rain 3.
Copy Merge.
Back in AS.
Edit/Paste/After Current Frame.
Back in PSP.
Close out Rain 3.
Open up Rain 4.
Copy Merge.
Back in AS.
Edit/Paste/After Current Frame.
View your animation.
If you’re happy then save.
I hope you enjoyed this tutorial.
I’d love to see your results and show it off in my gallery.
Email me!
Hugs,
Bev

No comments:
Post a Comment