

Supplies
1 tube of choice - I used the awesome artwork of Russ Platt which can be purchased from Up Your Art. You must have a license to use.
Font of Choice - I used Deng Thick here
Gem Mask 57 here - or you can use the one I made with the mask that I’ve supplied here
Divine Intentionz Template 264 here
DSB flux - Bright Noise
Eyecandy 3.1 - glow
Xenofex 1.0 - Shower Door (You won’t need if you use the mask I’ve provided)
“Moonlight Dreams” is a PTU art kit created by Kat of KatNKDA and can be purchased from her store NK Art Shop. You can visit her blog here.
Such a beautiful and rich kit, Kat!
This tutorial was written assuming you have a working knowledge of PSP.
~♥~ Let’s get started ~♥~
Open up the template.
Shift + D.
Close out the original.
Delete the top 9 layers.
Highlight the background layer.
Open it up.
Image/Canvas Size:
700 x 550
OK
Flood fill white.
Highlight Oval layer.
Click on it with your Magic Wand.
New Raster layer.
Copy and paste Paper 32 Into Selection.
Copy and paste your tube as a new layer.
Move into position over the paper - see my tag for reference.
Selections/Invert
Tap the delete key.
Change the Properties to Soft Light.
Deselect.
Delete the template layer.
Highlight the paper layer.
Apply Eyecandy 3.1 - Glow
Width: 3
Opacity: 100
Opacity Dropoff: Fat
Color: White
OK
Highlight Glittered Oval Half layer.
Click outside of it with your Magic Wand.
Copy and paste Paper 22 as a new layer.
Move into a position you like over the template layer.
Tap the delete key.
Deselect.
Apply DSB Flux - Bright Noise:
Intensity: 29
Mix checked
OK
Apply Eyecandy 3.1 Glow - same settings
Highlight Circle 1 layer.
Click on it with your Magic Wand.
New Raster layer.
Copy and paste Paper 40 Into Selection.
Deselect.
Delete the template layer.
Highlight Circle 2 layer.
Click on it with your Magic Wand.
New Raster layer.
Copy and Paste Paper 14 Into Selection.
Deselect.
Delete the template layer.
Apply the same glow effect.
Highlight Shape layer.
Click on it with your Magic Wand.
New Raster layer.
Copy and paste Paper 40 Into Selection.
Paste your tube as a new layer.
Move into position over the paper.
Selections/Invert
Tap the delete key.
Deselect.
Delete the template layer.
Change the Properties to Soft Light.
Give the paper layer the same Glow Effect.
Copy and paste your tube as a new layer.
Add your embellishments. I used:
Element 59: Resize 25% and 40%/Flip/Free rotate Right 90 degrees
Element 6: Resize 25%, 25%, and 70%/Mirror
Element 7: Resize 25%, 25%, and 70%
Apply the mask that I’ve provided or if you choose to make your own:
Highlight your white canvas.
New Raster layer.
Select All.
Copy and paste Paper 39 Into Selection.
Apply the mask
Merge Group.
New Raster layer.
Copy and paste Paper 37 Into Selection.
Apply the mask.
Merge Group.
Deselect.
Use your Pick Tool on each mask layer and pull the sides out slightly.
Highlight the mask layer just above the white canvas.
Adjust/Blur/Gaussian blur:
Radius: 20
Apply Xenofext 1.0 - Shower Door:
Default settings.
OK
Highlight the other mask layer.
Apply the same shower door effect.
Add your copyrights.
Add your name.
Choose your colors but be sure to have stroke set at 2.
Type your name.
Convert to Raster layer.
Select All/Float/Defloat
Selections/Modify/Contract by 2.
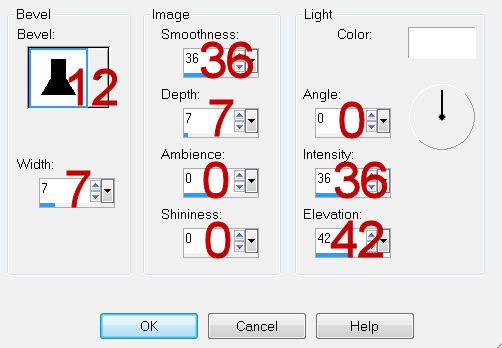
Give it a slight Inner Bevel:
Deselect.
Apply the same glow effect.
Resize all layers 80%.
I hope you enjoyed this tutorial.
I’d love to see your results and show it off in my gallery.
Email me!
Hugs,
Bev
No comments:
Post a Comment