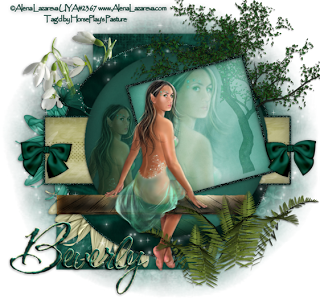
Supplies
1 tube of choice - I used the beautiful artwork of Alena Lazareva and can be purchased from Up Your Art. You must have a license to use.
Font of Choice - I used CAC Shishoni Brush here
Monti Circular mask here
Divine Intentionz Template 313 here
“Emerald Dreams” is a tagger size scrap kit created by Shellez Creations and can be purchased from Aussie Scrap Designs. You can visit her blog here.
Thank you so much Shelle for an amazingly beautiful kit!
This tutorial was written assuming you have a working knowledge of PSP.
~♥~ Let’s get started ~♥~
Open up the template.
Shift + D.
Close out the original.
Delete the top 2 layers, Small Circle 1 layer, and Small Circle 2 layer.
Highlight the Background layer.
Image/Canvas Size
750 x 700
Flood fill white.
If you do my tutorials regularly please pay attention that the canvas width is 750 rather than my usual width of 700. I needed the extra space for the bow…lol
First we’re going to add papers to all the template layers and then go back to add the tube and elements.
Highlight Square 1 layer.
Click on it with your Magic Wand.
New Raster layer.
Copy and paste Paper 2 Into Selection.
Deselect.
Delete the template layer.
Highlight Square 2 layer.
Repeat the above step.
Highlight Glittered Circle.
Click anywhere outside of it with your Magic Wand.
Selections/Invert
New Raster layer.
Copy and paste Paper 10 Into Selection.
Adjust/Add Remove Noise/Add Noise:
Uniform and Monochrom checked
Noise: 89%
OK
Deselect.
Delete the template layer.
Repeat the above step with the following layers:
Glittered Rectangle and Frame
Highlight Large Circle 1 layer.
Click on it with your Magic Wand.
New Raster layer.
Copy and pate Paper 10 Into Selection.
Deselect.
Delete the template layer.
Highlight Rectangle layer.
Click on it with your Magic Wand.
New Raster layer.
Copy and paste Paper 3 Into Selection.
Deselect.
Delete the template layer.
Highlight Large Circle 2 layer.
Click on it with your Magic Wand.
New Raster layer.
Copy and paste Paper 9 Into Selection.
Deselect.
Close out the template layer for now.
Highlight Background Frame layer.
Click on it with your Magic Wand.
New Raster layer.
Copy and paste Paper 8 Into Selection.
Deselect.
Close out the template layer for now.
Copy and paste your tube as a new layer.
Move it into the exact position.
Paste your tube again.
Move it just above the Frame Background paper layer.
Resize larger if you like.
Change the Properties to Soft Light.
I realize the tube is hanging over the edges of the paper. That’s OK. We’re not going to do any more with this tube for now.
Copy and paste Element 20 as a new layer.
Mirror
Move into position just above the background frame paper layer.
Change the Properties to Soft Light.
You can move the tube that’s just above the tree into a better position if you choose.
Once you have both the tube and tree into exact position, duplicate the tree.
Move the duplicate tree layer just above the Large Circle 2 paper layer.
Change the Properties to Normal.
Highlight the tube layer that’s just above the tree layer.
Click anywhere outside of it.
Selections/Invert
Highlight the tree layer that’s just below the tube layer and tap the delete key.
Deselect.
Highlight the Frame Background paper layer.
Click anywhere outside of it with your Magic Wand.
Highlight the tube layer that’s just above the paper layer and tap the delete key.
Highlight the tree layer that’s just above the paper layer and tap the delete key.
Deselect.
Delete the frame background template layer.
Use your Eraser Tool to erase the base of the tree layers if you don’t want it to be seen.
Paste your tube again.
This time move it just above the Large Circle 2 paper layer.
Resize it a bit smaller if you choose.
Move into exact position.
Change the Properties to Soft Light.
Highlight the Large Circle 2 Template layer.
Click anywhere outside of it with your Magic Wand.
Highlight the tube layer and tap the delete key.
Deselect.
Delete the template layer.
Add your embellishments. I used:
Element 5: Resize 65%
Element 6: Resize 55%
Element 12: Resize 25%/Duplicate/Mirror
Element 24: Resize 50%/Duplicate/Resize 90%
Element 21
Element 4: Resize 25%
Element 19: Duplicate/Mirror
Highlight your white background.
New Raster layer.
Select All.
Copy and paste Paper 2 Into Selection.
Apply the mask.
Merge Group.
Duplicate
Add your copyrights.
Add your name.
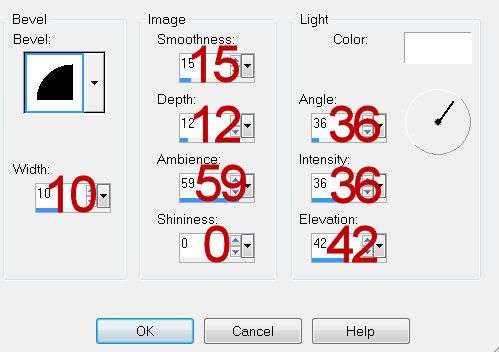
Give it a slight Inner Bevel:

Resize all layers 75%.
I hope you enjoyed this tutorial.
I’d love to see your results and show it off in my gallery.
Email me!
Hugs,
Bev
1 tube of choice - I used the beautiful artwork of Alena Lazareva and can be purchased from Up Your Art. You must have a license to use.
Font of Choice - I used CAC Shishoni Brush here
Monti Circular mask here
Divine Intentionz Template 313 here
“Emerald Dreams” is a tagger size scrap kit created by Shellez Creations and can be purchased from Aussie Scrap Designs. You can visit her blog here.
Thank you so much Shelle for an amazingly beautiful kit!
This tutorial was written assuming you have a working knowledge of PSP.
~♥~ Let’s get started ~♥~
Open up the template.
Shift + D.
Close out the original.
Delete the top 2 layers, Small Circle 1 layer, and Small Circle 2 layer.
Highlight the Background layer.
Image/Canvas Size
750 x 700
Flood fill white.
If you do my tutorials regularly please pay attention that the canvas width is 750 rather than my usual width of 700. I needed the extra space for the bow…lol
First we’re going to add papers to all the template layers and then go back to add the tube and elements.
Highlight Square 1 layer.
Click on it with your Magic Wand.
New Raster layer.
Copy and paste Paper 2 Into Selection.
Deselect.
Delete the template layer.
Highlight Square 2 layer.
Repeat the above step.
Highlight Glittered Circle.
Click anywhere outside of it with your Magic Wand.
Selections/Invert
New Raster layer.
Copy and paste Paper 10 Into Selection.
Adjust/Add Remove Noise/Add Noise:
Uniform and Monochrom checked
Noise: 89%
OK
Deselect.
Delete the template layer.
Repeat the above step with the following layers:
Glittered Rectangle and Frame
Highlight Large Circle 1 layer.
Click on it with your Magic Wand.
New Raster layer.
Copy and pate Paper 10 Into Selection.
Deselect.
Delete the template layer.
Highlight Rectangle layer.
Click on it with your Magic Wand.
New Raster layer.
Copy and paste Paper 3 Into Selection.
Deselect.
Delete the template layer.
Highlight Large Circle 2 layer.
Click on it with your Magic Wand.
New Raster layer.
Copy and paste Paper 9 Into Selection.
Deselect.
Close out the template layer for now.
Highlight Background Frame layer.
Click on it with your Magic Wand.
New Raster layer.
Copy and paste Paper 8 Into Selection.
Deselect.
Close out the template layer for now.
Copy and paste your tube as a new layer.
Move it into the exact position.
Paste your tube again.
Move it just above the Frame Background paper layer.
Resize larger if you like.
Change the Properties to Soft Light.
I realize the tube is hanging over the edges of the paper. That’s OK. We’re not going to do any more with this tube for now.
Copy and paste Element 20 as a new layer.
Mirror
Move into position just above the background frame paper layer.
Change the Properties to Soft Light.
You can move the tube that’s just above the tree into a better position if you choose.
Once you have both the tube and tree into exact position, duplicate the tree.
Move the duplicate tree layer just above the Large Circle 2 paper layer.
Change the Properties to Normal.
Highlight the tube layer that’s just above the tree layer.
Click anywhere outside of it.
Selections/Invert
Highlight the tree layer that’s just below the tube layer and tap the delete key.
Deselect.
Highlight the Frame Background paper layer.
Click anywhere outside of it with your Magic Wand.
Highlight the tube layer that’s just above the paper layer and tap the delete key.
Highlight the tree layer that’s just above the paper layer and tap the delete key.
Deselect.
Delete the frame background template layer.
Use your Eraser Tool to erase the base of the tree layers if you don’t want it to be seen.
Paste your tube again.
This time move it just above the Large Circle 2 paper layer.
Resize it a bit smaller if you choose.
Move into exact position.
Change the Properties to Soft Light.
Highlight the Large Circle 2 Template layer.
Click anywhere outside of it with your Magic Wand.
Highlight the tube layer and tap the delete key.
Deselect.
Delete the template layer.
Add your embellishments. I used:
Element 5: Resize 65%
Element 6: Resize 55%
Element 12: Resize 25%/Duplicate/Mirror
Element 24: Resize 50%/Duplicate/Resize 90%
Element 21
Element 4: Resize 25%
Element 19: Duplicate/Mirror
Highlight your white background.
New Raster layer.
Select All.
Copy and paste Paper 2 Into Selection.
Apply the mask.
Merge Group.
Duplicate
Add your copyrights.
Add your name.
Give it a slight Inner Bevel:

Resize all layers 75%.
I hope you enjoyed this tutorial.
I’d love to see your results and show it off in my gallery.
Email me!
Hugs,
Bev

No comments:
Post a Comment