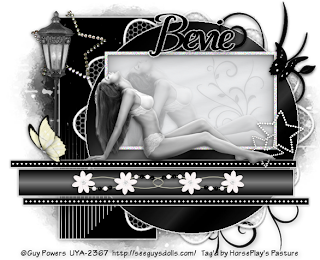
Clicking on the image will allow you to enlarge for bigger view.
Supplies
1 tube of choice - I used the artwork of Joerg Warda and was purchased from MPT. I’m sorry but I don’t know where this artist sells at present.
Font of Choice - I used Hitalica here
Vix mask 452 here
Divine Intentionz Template 259 here
Eyecandy 3.1 - Glow
“Just a Memory” is a PTU tagger size scrap kit created by Shelle of Shellez Creations and can be purchased at TKO Scraps Please visit her blog here.
Thank you Shelle for a kit that screams "class" all the way!
This tutorial was written assuming you have a working knowledge of PSP.
~♥~ Let’s get started ~♥~
Open up the template.
Shift + D.
Close out the original.
Delete By Missy and Words layers.
Highlight Rectangle with Filter layer.
Click on it with your Magic Wand.
New Raster layer.
Copy and paste Paper 3 Into Selection.
Deselect.
Delete the template layer.
Apply Eyecandy 3.1 - Glow:
Width: 3
Opacity: 100
Opacity Dropoff: Fat
Color: White
OK
Highlight Circle layer.
Click on it with your Magic Wand.
New Raster layer.
Copy and paste Paper 10 Into Selection.
Deselect.
Delete the template layer.
Apply Eyecandy 3.1 - Glow:
Same Settings
Color Pallet:
Foreground: #000000
Background: #808080
Gradient Settings;
Style: Linear
Angle: 0
Repeats: 1
OK
Highlight Thin Rectangle 1 layer.
Click on it with your Magic Wand.
New Raster layer.
Flood fill with your gradient.
Deselect.
Delete the template layer.
Apply Eyecandy 3.1 - Glow:
Same Settings
Highlight Thin Rectangle 3 layer.
Merge Down.
Apply Eyecandy 3.1 - Glow:
Same Settings
Highlight Dotted Line 2 layer.
Merge Down.
Select All/Float/Defloat
New Raster layer.
Flood fill with #ffffff
Deselect.
Delete the template layer.
Highlight Frame layer.
Adjust/Add Remove Noise/Add Noise:
Uniform checked
Noise: 73%
OK
Highlight Frame Background layer.
Click on it with your Magic Wand.
New Raster layer.
Copy and paste Paper 1 Into Selection.
Deselect.
Delete the template layer.
Copy and paste your tube as a new layer.
Copy and paste Element 44 as a new layer.
Resize 25%
Shift + L
Hue: 0
Saturation: 0
OK
Move into position.
Add your embellishments. I used:
49: Resize 120% and 110%
27: Resize 40%/Flip
23: Resize 50%
28: Resize 40%
22: Resize 40%
21: Resize 25%/Duplicate/Resize 70%/Flip
20: Resize 40%
19: Resize 25% and 80%
Highlight your white canvas.
New Raster layer.
Select All.
Copy and paste Paper 2 Into Selection.
Deselect.
Apply the mask.
Use your Pick tool to pull the right side out and bottom down just a little.
Merge Group.
Add your copyrights.
Add your name.
Apply the same glow effect.
Resize all layers 80%.
I hope you enjoyed this tutorial.
I’d love to see your results and show it off in my gallery.
Email me!
Hugs,
Bev

Gorgeous hunnie!!!!
ReplyDeleteThank you Shelle. The kit was gorgeous!!
ReplyDelete