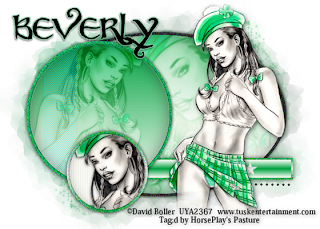
Clicking on the image will allow you to enlarge for bigger view.
Supplies
1 tube of choice - I used the amazing artwork of David Boller and can be purchased from Up Your Art. Please do not use without a license.
Font of Choice - I used Party Business here
Weescotlass Mask 161 here
Toxic Desirez Template 137 here
Xenofex 1.0 - Shower Door (optional)
Eyecandy 3.1 - Glow
This tutorial was written assuming you have a working knowledge of PSP.
~♥~ Let’s get started ~♥~
Open up the template.
Shift + D.
Close out the original.
Delete the following layers:
Credits
Words
Pixel Words
Highlight the background layer.
Image/Canvas size
700 x 500
OK
Flood fill white.
Highlight Glitter Oval layer.
Select All/Float/Defloat
New Raster layer.
Flood fill with #202020
Adjust/Add Remove Noise/Add Noise:
Uniform checked
Noise: 75%
OK
Deselect.
Delete the template layer.
Color pallet:
Foreground: #00a241
Background: #fcfcf6
Set the foreground to gradient:
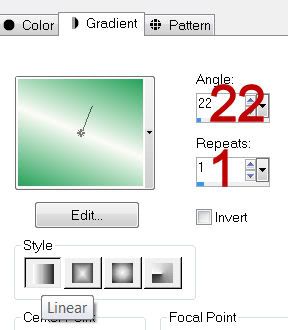
Highlight Oval layer.
Select All/Float/Defloat
New Raster layer.
Flood fill with your gradient.
Duplicate
Adjust/Blur/Gaussian blur:
Radius: 20
OK
Copy and paste your tube as a new layer.
Resize much large and move into position - see my tag for reference.
Deselect.
Change the Properties to Soft Light.
Highlight Glitter Rectangle layer.
Select All/Float/Defloat
New Raster layer.
Change your Gradient to match mine:
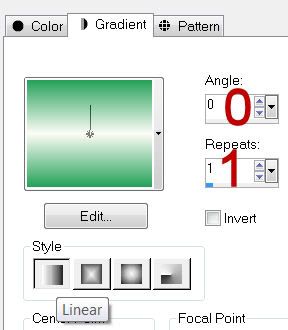
Apply the same Noise.
Highlight Sm Glitter Circle.
Repeat the above step.
Highlight Rectangle layer.
Click on it with your Magic Wand.
New Raster layer.
Change your gradient by just clicking Invert this time.
Flood fill the rectangle.
Deselect.
Highlight Stars layer.
Select All/Float/Defloat
New Raster layer.
Flood fill with your background color.
Give it the same Noise.
Deselect.
Delete the template layer.
Highlight Dotted Line layer.
Select All/Float/Defloat
New Raster layer.
Flood fill with #202020
Deselect.
Delete the template layer.
Highlight Lrg Glitter Circle layer.
Select All/Float/Defloat
New Raster layer.
Flood fill with #00a241
Apply the same Noise.
Deselect.
Delete the template layer.
Highlight Teal Circle layer.
Select All/Float/Defloat
New Raster layer.
Flood fill with the following Gradient:
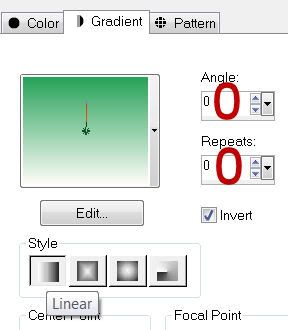
Duplicate
Effects/Edge Effects/Enhance More
Selections/Invert
Selections/Modify/Inside Outside Feather:
Both checked
Feather amount: 43
OK
Tap the delete key.
Copy and paste your tube as a new layer over the gradient.
Tap the delete key.
Deselect.
Change the Properties to Soft Light.
Duplicate/Lower the Opacity to 48
Adjust/Sharpen/Sharpen More
Highlight Pink Circle layer.
Select All/Float/Defloat
New Raster layer.
Flood fill with #fcfcf6
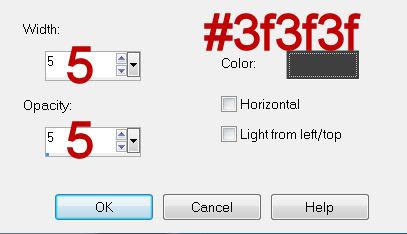
Effect/Text Effects/Blinds:
Copy and paste your tube as a new layer over the blinds layer.
Move into position.
Selections/Invert
Tap the delete key.
Deselect.
Delete the template layer.
Color pallet:
Foreground: #26a259
Make your Target Tool active.
Highlight Glitter layer.
Recolor using your Target Tool.
Close out the glitter and background layers.
Merge Visible.
Duplicate
Adjust/Blur/Gaussian Blur:
Same settings
Reopen your white background.
Highlight the merged layer.
Apply Xenofex 1 - Show Door:
Default Settings.
If you don’t have Xenofex 1 then apply the mask.
Use your Pick Tool to pull the sides out a little.
Merge Group.
Copy and paste your tube as a new layer.
Add your copyrights.
Add your name.
Apply Eyecandy 3.1 - Glow:
Width: 3
Opacity: 100
Opacity Dropoff: Fat
Color: #93daae
Resize all layers 80%.
I hope you enjoyed this tutorial.
I’d love to see your results and show it off in my gallery.
Email me!
Hugs,
Bev
Supplies
1 tube of choice - I used the amazing artwork of David Boller and can be purchased from Up Your Art. Please do not use without a license.
Font of Choice - I used Party Business here
Weescotlass Mask 161 here
Toxic Desirez Template 137 here
Xenofex 1.0 - Shower Door (optional)
Eyecandy 3.1 - Glow
This tutorial was written assuming you have a working knowledge of PSP.
~♥~ Let’s get started ~♥~
Open up the template.
Shift + D.
Close out the original.
Delete the following layers:
Credits
Words
Pixel Words
Highlight the background layer.
Image/Canvas size
700 x 500
OK
Flood fill white.
Highlight Glitter Oval layer.
Select All/Float/Defloat
New Raster layer.
Flood fill with #202020
Adjust/Add Remove Noise/Add Noise:
Uniform checked
Noise: 75%
OK
Deselect.
Delete the template layer.
Color pallet:
Foreground: #00a241
Background: #fcfcf6
Set the foreground to gradient:

Highlight Oval layer.
Select All/Float/Defloat
New Raster layer.
Flood fill with your gradient.
Duplicate
Adjust/Blur/Gaussian blur:
Radius: 20
OK
Copy and paste your tube as a new layer.
Resize much large and move into position - see my tag for reference.
Deselect.
Change the Properties to Soft Light.
Highlight Glitter Rectangle layer.
Select All/Float/Defloat
New Raster layer.
Change your Gradient to match mine:

Apply the same Noise.
Highlight Sm Glitter Circle.
Repeat the above step.
Highlight Rectangle layer.
Click on it with your Magic Wand.
New Raster layer.
Change your gradient by just clicking Invert this time.
Flood fill the rectangle.
Deselect.
Highlight Stars layer.
Select All/Float/Defloat
New Raster layer.
Flood fill with your background color.
Give it the same Noise.
Deselect.
Delete the template layer.
Highlight Dotted Line layer.
Select All/Float/Defloat
New Raster layer.
Flood fill with #202020
Deselect.
Delete the template layer.
Highlight Lrg Glitter Circle layer.
Select All/Float/Defloat
New Raster layer.
Flood fill with #00a241
Apply the same Noise.
Deselect.
Delete the template layer.
Highlight Teal Circle layer.
Select All/Float/Defloat
New Raster layer.
Flood fill with the following Gradient:

Duplicate
Effects/Edge Effects/Enhance More
Selections/Invert
Selections/Modify/Inside Outside Feather:
Both checked
Feather amount: 43
OK
Tap the delete key.
Copy and paste your tube as a new layer over the gradient.
Tap the delete key.
Deselect.
Change the Properties to Soft Light.
Duplicate/Lower the Opacity to 48
Adjust/Sharpen/Sharpen More
Highlight Pink Circle layer.
Select All/Float/Defloat
New Raster layer.
Flood fill with #fcfcf6
Effect/Text Effects/Blinds:

Copy and paste your tube as a new layer over the blinds layer.
Move into position.
Selections/Invert
Tap the delete key.
Deselect.
Delete the template layer.
Color pallet:
Foreground: #26a259
Make your Target Tool active.
Highlight Glitter layer.
Recolor using your Target Tool.
Close out the glitter and background layers.
Merge Visible.
Duplicate
Adjust/Blur/Gaussian Blur:
Same settings
Reopen your white background.
Highlight the merged layer.
Apply Xenofex 1 - Show Door:
Default Settings.
If you don’t have Xenofex 1 then apply the mask.
Use your Pick Tool to pull the sides out a little.
Merge Group.
Copy and paste your tube as a new layer.
Add your copyrights.
Add your name.
Apply Eyecandy 3.1 - Glow:
Width: 3
Opacity: 100
Opacity Dropoff: Fat
Color: #93daae
Resize all layers 80%.
I hope you enjoyed this tutorial.
I’d love to see your results and show it off in my gallery.
Email me!
Hugs,
Bev

No comments:
Post a Comment