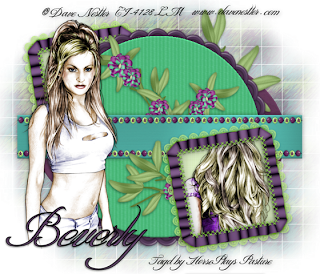
Clicking on the image will allow you to enlarge for bigger view.
Supplies
2 tubes of choice - I used the artwork of Dave Nester which can now be purchased at CDO
Font of Choice - I used Shit Happens (Yes, that is the name of the font!) here
Designs by Vayvs mask 72 here
Essence of Creativity Template 112 here
Mura’s Meister - Copies
Brush Strokes - Sprayed Strokes
“Cute as a Button” is a PTU tagger size scrap kit created by Nancy of GeoGirl Designs and can be purchased from Butterfly Blush Designs. You can visit her blog here.
This tutorial was written assuming you have a working knowledge of PSP.
~♥~ Let’s get started ~♥~
Open up a the template.
Shift + D.
Close out the original.
Delete Credit, Text, and Stars layers.
Highlight the background layer and open it up.
Image/Canvas size:
700 x 600 OK
Flood fill white.
Highlight Black Oval layer.
Click on it with your Magic Wand.
New Raster layer.
Copy and paste Paper 2 Into Selection.
Deselect.
Delete the template layer.
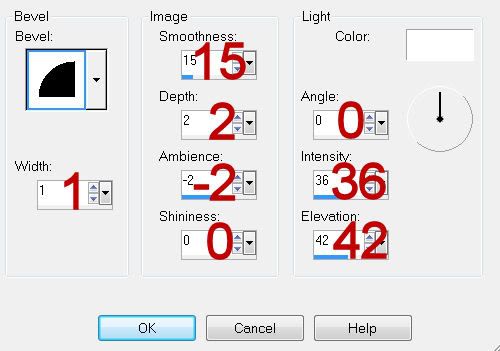
Give it a slight Inner Bevel:

Highlight Pink Circle layer.
Click on it with your Magic Wand.
New Raster layer.
Copy and paste Paper 4 Into Selection.
Deselect.
Delete the template layer.
Give it the same Inner Bevel.
Highlight Rectangle layer.
Click on it with your Magic Wand.
New Raster layer.
Copy and paste Paper 3 Into Selection.
Deselect.
Delete the template layer.
Give it the same inner Bevel.
Copy and paste Frame 1 as a new layer.
Resize 50%
Free rotate Left 10 degrees.
Move into position over Frame 1 template layer.
Delete Frame 1 and Square 1 template layers.
Duplicate the frame and move into position over Frame 2 template layer.
Delete Frame 2 and Square 2 template layers.
Click inside the frame with your Magic Wand.
Selections/Modify/Expand by 4.
New Raster layer below the frame.
Copy and paste Paper 9 Into Selection.
Deselect.
Highlight the bottom frame.
Click inside of it with your Magic Wand.
Selections/Modify/Expand by 4.
New Raster layer below the frame.
Copy and paste the same paper Into Selection.
Copy and paste a tube above the paper as a new layer.
Selections/Invert
Tap the delete key.
Deselect.
Copy and paste Element 14 as a new layer.
Resize 35%
Duplicate/Move to the end of the original to create one long line of beads.
Make Pick Tool active and move the sides in so that it’s the same length as the rectangle.
Move into position at the top of the rectangle - see my tag for reference.
Duplicate/Mirror/Move into position at the bottom of the rectangle.
Copy and paste Element 8 as a new layer.
Resize 25%
Apply Mura’s Mesiter - Copies:
Encircle
Change Number to 35
OK
Move into position behind the circle paper.
Use your Pick Tool to bring the bottom down and the sides in a bit so that it’s centered evenly around the circle.
Copy and paste Flower 4 as a new layer.
Resize 75%
Position behind the rectangle.
Duplicate/Mirror/Erase what you don’t want of the element.
Paste the element again.
Free rotate Left 10 degrees.
Position behind the button circle.
Erase what you don’t want of the element.
Highlight your white canvas.
New Raster layer.
Select All.
Copy and paste Paper 7 as a new layer.
Adjust/Blur/Gaussian Blur:
Radius: 5
OK
Apply Brush Strokes - Sprayed Strokes:
Stroke Length: 12
Spray Radius: 21
Stroke Direction: Right Diag
Apply the mask.
Merge Group.
Duplicate
Add your copyrights.
Add your name
Give it the same inner bevel accept change the bevel shape to 12.
Apply the bevel once more.
Resize all layers 80%.
I hope you enjoyed this tutorial.
I’d love to see your results and show it off in my gallery.
Email me!
Hugs,
Bev
Supplies
2 tubes of choice - I used the artwork of Dave Nester which can now be purchased at CDO
Font of Choice - I used Shit Happens (Yes, that is the name of the font!) here
Designs by Vayvs mask 72 here
Essence of Creativity Template 112 here
Mura’s Meister - Copies
Brush Strokes - Sprayed Strokes
“Cute as a Button” is a PTU tagger size scrap kit created by Nancy of GeoGirl Designs and can be purchased from Butterfly Blush Designs. You can visit her blog here.
This tutorial was written assuming you have a working knowledge of PSP.
~♥~ Let’s get started ~♥~
Open up a the template.
Shift + D.
Close out the original.
Delete Credit, Text, and Stars layers.
Highlight the background layer and open it up.
Image/Canvas size:
700 x 600 OK
Flood fill white.
Highlight Black Oval layer.
Click on it with your Magic Wand.
New Raster layer.
Copy and paste Paper 2 Into Selection.
Deselect.
Delete the template layer.
Give it a slight Inner Bevel:

Highlight Pink Circle layer.
Click on it with your Magic Wand.
New Raster layer.
Copy and paste Paper 4 Into Selection.
Deselect.
Delete the template layer.
Give it the same Inner Bevel.
Highlight Rectangle layer.
Click on it with your Magic Wand.
New Raster layer.
Copy and paste Paper 3 Into Selection.
Deselect.
Delete the template layer.
Give it the same inner Bevel.
Copy and paste Frame 1 as a new layer.
Resize 50%
Free rotate Left 10 degrees.
Move into position over Frame 1 template layer.
Delete Frame 1 and Square 1 template layers.
Duplicate the frame and move into position over Frame 2 template layer.
Delete Frame 2 and Square 2 template layers.
Click inside the frame with your Magic Wand.
Selections/Modify/Expand by 4.
New Raster layer below the frame.
Copy and paste Paper 9 Into Selection.
Deselect.
Highlight the bottom frame.
Click inside of it with your Magic Wand.
Selections/Modify/Expand by 4.
New Raster layer below the frame.
Copy and paste the same paper Into Selection.
Copy and paste a tube above the paper as a new layer.
Selections/Invert
Tap the delete key.
Deselect.
Copy and paste Element 14 as a new layer.
Resize 35%
Duplicate/Move to the end of the original to create one long line of beads.
Make Pick Tool active and move the sides in so that it’s the same length as the rectangle.
Move into position at the top of the rectangle - see my tag for reference.
Duplicate/Mirror/Move into position at the bottom of the rectangle.
Copy and paste Element 8 as a new layer.
Resize 25%
Apply Mura’s Mesiter - Copies:
Encircle
Change Number to 35
OK
Move into position behind the circle paper.
Use your Pick Tool to bring the bottom down and the sides in a bit so that it’s centered evenly around the circle.
Copy and paste Flower 4 as a new layer.
Resize 75%
Position behind the rectangle.
Duplicate/Mirror/Erase what you don’t want of the element.
Paste the element again.
Free rotate Left 10 degrees.
Position behind the button circle.
Erase what you don’t want of the element.
Highlight your white canvas.
New Raster layer.
Select All.
Copy and paste Paper 7 as a new layer.
Adjust/Blur/Gaussian Blur:
Radius: 5
OK
Apply Brush Strokes - Sprayed Strokes:
Stroke Length: 12
Spray Radius: 21
Stroke Direction: Right Diag
Apply the mask.
Merge Group.
Duplicate
Add your copyrights.
Add your name
Give it the same inner bevel accept change the bevel shape to 12.
Apply the bevel once more.
Resize all layers 80%.
I hope you enjoyed this tutorial.
I’d love to see your results and show it off in my gallery.
Email me!
Hugs,
Bev

No comments:
Post a Comment