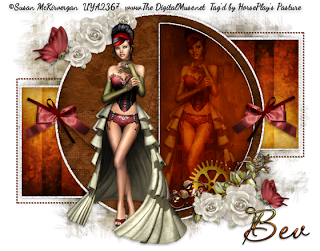
Clicking on the tag will allow you to enlarge for bigger view.
Supplies
1 tube of choice - I used the artwork of Susan McKirvergan which can be purchased from Up Your Art. You must obtain a license to use.
Font of Choice - I used Aquarelle here
Weescotlass Mask 297 here
Scrap Rebellion Template 40 here
Greg’s Factory Output Vol. II - Pool Shadow
“Steampunk Romance” is a FS scrap kit created by Heppy of HF Projekte and can be purchased from Butterfly Blush Designs. You can visit his blog here to see more of his amazing talent.
Thank you Heppy for such a beautiful steam punk kit. This one is absolutely brilliant!
This tutorial was written assuming you have a working knowledge of PSP.
~♥~ Let’s get started ~♥~
Open up the template.
Shift + D.
Close out the original.
Delete the top 5 layers.
Highlight and open up the background layer.
Highlight Dotted Lines layer.
Select All/Float/Defloat.
New Raster layer.
Copy and paste Paper 11 Into Selection.
Deselect
Delete the template layer.
Highlight Left Square layer.
Click on it with your Magic Wand.
New Raster layer,
Copy and paste Paper 1 Into Selection.
Deselect.
Delete the template layer.
Highlight the paper from the kit.
Flip.
Copy.
Highlight RSquare layer.
Click on it with your Magic Wand.
New Raster layer.
Paste the paper Into Selection.
Deselect.
Delete the template layer.
Highlight Black Circle layer.
Click on it with your Magic Wand.
New Raster layer.
Copy and paste Paper 12 Into Selection.
Deselect.
Delete the template layer.
Highlight Shape layer.
Click on it with your Magic Wand.
New Raster layer.
Copy and paste Paper 11 Into Selection.
Apply Greg’s Factory Output Vol. II - Pool Shadow:
Use Default Settings accept change the Intensity bar to 53.
OK
Deselect.
Delete the template layer.
Copy and paste your tube as a new layer.
Position it in front of the left side of the circle.
Duplicate.
Use your right arrow key on your keyboard and move the tube over the shape on the right side of the circle - see my tag for reference.
In your layers pallet, move it just above the shape paper layer.
Highlight the shape paper layer.
Click anywhere outside of it with your Magic Wand.
Highlight the duplicated tube layer.
Tap the delete key.
Deselect.
Change the Properties to Soft Light.
Add your embellishments. I used:
32: Resize 25% and 80%
4: Resize 25% and 50%/Duplicate/Mirror
10: Resize 25% and 35%/Duplicate/Resize 70%
22: Resize 25% and 35%
Highlight your white background.
New Raster layer.
Select All.
Copy and paste Paper 6 Into Selection.
Deselect.
Apply the mask.
Merge Group.
Add your copyrights.
Add your name.
Resize all layers 80%.
I hope you enjoyed this tutorial.
I’d love to see your results and show it off in my gallery.
Email me!
Hugs,
Bev

wonderful Tutorial
ReplyDeleteThank you
Hugs Heppy
Thank you so much Heppy. It was a stunning kit.
ReplyDelete