

Clicking on the image will allow you to enlarge for bigger view.
Supplies
1 tube of choice - I used the beautiful artwork of Rachael Tallamy which can be purchased from Up Your Art. You must obtain a license to use.
Font of Choice - I used Fortunaschwein here
My Mask 27 here
Scrap Rebellion Template 38 here
“Kitty Kat” is a FTU scrap kit created by Funky of WishingonaStarr and can be downloaded from her blog here.
Please leave a thank you when downloading as it’s a small gesture for hard work given freely.
Thank you Funky for yet another beautiful as well as generous freebie!! You rock chickadee!
This tutorial was written assuming you have a working knowledge of PSP.
~♥~ Let’s get started ~♥~
Open up the template.
Shift + D.
Close out the original.
Delete the top 6 layers.
Highlight the background layer and open it up.
Image/Canvas Size
700 x 650
OK
Flood fill white.
Highlight Color Rectangles layer.
Select All/Float/Defloat
New Raster layer.
Copy and paste Paper 18 Into Selection.
Deselect.
Highlight Glitterback 1 layer.
Click anywhere outside of it with your Magic Wand.
Seletions/Invert
New Raster layer.
Copy and paste Paper 6 Into Selection.
Adjust/Add Remove Noise/Add Noise:
Random and Monochrome checked
Noise: 65%
OK
Deselect.
Delete the template layer.
Highlight Blacksquare 1 layer.
Click on it with your Magic Wand.
New Raster layer.
Copy and paste Paper 17 Into Selection.
Deselect.
Delete the template layer.
Highlight Glitterback 2 layer.
Click anywhere outside of it with your Magic Wand.
Selections/Invert
New Raster layer.
Copy and paste Paper 2 Into Selection.
Apply the same noise effect.
Deselect.
Delete the template layer.
Highlight Blacksquare 2 layer.
Click on it with your Magic Wand.
New Raster layer.
Copy and paste Paper 6 Into Selection.
Copy and paste your tube as a new layer.
Resize larger and position near the top left corner of the square - see my tag for reference.
Selections/Invert
Tap the delete key.
Deselect.
Change the Properties to Soft Light.
Delete the template layer.
Highlight Glitter Circle 1 layer.
Click anywhere outside of it with your Magic Wand.
Selections/Invert
New Raster layer.
Flood fill with #ffffff
Apply the same noise effect.
Deselect.
Repeat the above step with Glitter circle 2 layer.
Highlight Purple Circle 1 layer.
Click on it with your Magic Wand.
Copy and paste Paper 18 as a new layer.
Resize 35%
Position over the circle.
Selections/Invert
Tap the delete key.
Deselect.
Repeat the above step with Purple circle 2 layer.
Copy and paste your tube as a new layer.
Add your embellishments. I used:
Border: Resize 50%
Blue Star: Resize 50%
Bird: Resize 25%
Bow: Resize 25%
Décor: Resize 40%
Sparkle
Painted Butterfly: Resize 25% and 70%/Free rotate Right 25 degrees
Highlight your white background.
New Raster layer.
Select All.
Copy and paste Paper 6 Into Selection.
Deselect.
Apply the mask.
Resize 110%
Merge Group.
Duplicate
Add your copyrights.
Add your name.
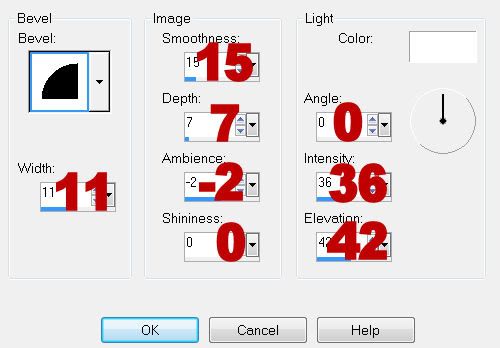
Give it a slight Inner Bevel:
Resize all layers 80%.
I hope you enjoyed this tutorial.
I’d love to see your results and show it off in my gallery.
Email me!
Hugs,
Bev
Supplies
1 tube of choice - I used the beautiful artwork of Rachael Tallamy which can be purchased from Up Your Art. You must obtain a license to use.
Font of Choice - I used Fortunaschwein here
My Mask 27 here
Scrap Rebellion Template 38 here
“Kitty Kat” is a FTU scrap kit created by Funky of WishingonaStarr and can be downloaded from her blog here.
Please leave a thank you when downloading as it’s a small gesture for hard work given freely.
Thank you Funky for yet another beautiful as well as generous freebie!! You rock chickadee!
This tutorial was written assuming you have a working knowledge of PSP.
~♥~ Let’s get started ~♥~
Open up the template.
Shift + D.
Close out the original.
Delete the top 6 layers.
Highlight the background layer and open it up.
Image/Canvas Size
700 x 650
OK
Flood fill white.
Highlight Color Rectangles layer.
Select All/Float/Defloat
New Raster layer.
Copy and paste Paper 18 Into Selection.
Deselect.
Highlight Glitterback 1 layer.
Click anywhere outside of it with your Magic Wand.
Seletions/Invert
New Raster layer.
Copy and paste Paper 6 Into Selection.
Adjust/Add Remove Noise/Add Noise:
Random and Monochrome checked
Noise: 65%
OK
Deselect.
Delete the template layer.
Highlight Blacksquare 1 layer.
Click on it with your Magic Wand.
New Raster layer.
Copy and paste Paper 17 Into Selection.
Deselect.
Delete the template layer.
Highlight Glitterback 2 layer.
Click anywhere outside of it with your Magic Wand.
Selections/Invert
New Raster layer.
Copy and paste Paper 2 Into Selection.
Apply the same noise effect.
Deselect.
Delete the template layer.
Highlight Blacksquare 2 layer.
Click on it with your Magic Wand.
New Raster layer.
Copy and paste Paper 6 Into Selection.
Copy and paste your tube as a new layer.
Resize larger and position near the top left corner of the square - see my tag for reference.
Selections/Invert
Tap the delete key.
Deselect.
Change the Properties to Soft Light.
Delete the template layer.
Highlight Glitter Circle 1 layer.
Click anywhere outside of it with your Magic Wand.
Selections/Invert
New Raster layer.
Flood fill with #ffffff
Apply the same noise effect.
Deselect.
Repeat the above step with Glitter circle 2 layer.
Highlight Purple Circle 1 layer.
Click on it with your Magic Wand.
Copy and paste Paper 18 as a new layer.
Resize 35%
Position over the circle.
Selections/Invert
Tap the delete key.
Deselect.
Repeat the above step with Purple circle 2 layer.
Copy and paste your tube as a new layer.
Add your embellishments. I used:
Border: Resize 50%
Blue Star: Resize 50%
Bird: Resize 25%
Bow: Resize 25%
Décor: Resize 40%
Sparkle
Painted Butterfly: Resize 25% and 70%/Free rotate Right 25 degrees
Highlight your white background.
New Raster layer.
Select All.
Copy and paste Paper 6 Into Selection.
Deselect.
Apply the mask.
Resize 110%
Merge Group.
Duplicate
Add your copyrights.
Add your name.
Give it a slight Inner Bevel:
Resize all layers 80%.
I hope you enjoyed this tutorial.
I’d love to see your results and show it off in my gallery.
Email me!
Hugs,
Bev
Hello sweetiepie.
ReplyDeleteJust wanted to say what a beautiful job you've done with this tag & to say thanks sooooo very much for using my kittykat kit.
I've posted it to my blog. :)
Love n huggles Funky xxxxx
Hello Funky!
ReplyDeleteThank you for giving such a wonderful freebie!
I couldn't get the Kit
ReplyDeleteIt said i was blocked
I don't have a Blogger Account or something
Was so looking forward to doing this Tut
Oh well never mind
Love to all for the wonderful work you do
Hugs
Catlady