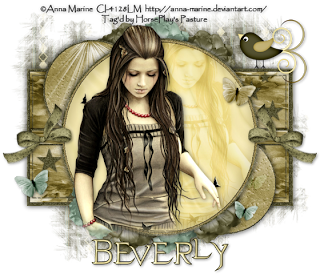
Clicking on the image will allow you to enlarge for bigger view.
Supplies
1 tube of your choice - I used the artwork of Anna Marine and can be purchased at CILM
Font of Choice - Evanescenct here
Template by Marieke here - You’ll find it under August 29, 2010 under her name. Just click the image to download.
Weescotlass Mask 297 here
“Country Life” is a PTU tagger size scrap kit created by Mystical Illusionz and can be purchased at Twilight Scraps. You can visit her blog here.
Thank you Kristen for such a lovely kit. Having an affinity for country life I certainly enjoyed this kit very much♥
This tutorial was written assuming you have a working knowledge of PSP.
~♥~ Let’s get started ~♥~
Open up the template.
Shift + D.
Close out the original.
Resize all layers 85%
Image/Canvas Size
700 x 600
Delete the top 4 layers and Raster 10 layer.
Highlight Raster 4 layer.
Click on it with our Magic Wand.
New Raster layer.
Flood fill with #504d2e
Deselect.
Delete the template layer.
Highlight Raster 13 layer.
Click on it with your Magic Wand.
New Raster layer.
Copy and paste PP9 Into Selection.
Deselect.
Delete the template layer.
Adjust/Add Remove Noise/Add Noise
Monochrome and Gaussian checked
Noise: 33%
OK
Highlight Raster 14 layer.
Click on it with your Magic Wand.
New Ratser layer.
Copy and paste PP1 Into Selection.
Deselect.
Delete the template layer.
Highlight Raster 15 layer.
Select All/Float/Defloat
New Raster layer.
Copy and paste PP9 Into Selection.
Deselect.
Delete the template layer.
Highlight Raster 2 layer.
Click on it with your Magic Wand.
New Raster layer.
Copy and paste PP 9 Into Selection.
Deselect.
Delete the template layer.
Highlight Kopie Van Raster 2 layer.
Repeat the above step.
Highlight Raster 12 layer.
Click on it with your Magic Wand.
Copy and paste PP1 as a new layer.
Selections/Invert
Tap the delete key.
Deselect.
Delete the template layer.
Highlight Raster 11 layer.
Repeat the above step.
Highlight Raster 3 layer.
Click on it with your Magic Wand.
New Raster layer.
Flood fill with #504d2e.
Deselect.
Delete the template layer.
Add the same noise as before.
Highlight Raster 5 layer.
Click on it with your Magic Wand.
New Raster layer.
Copy and paste PP 3 Into Selection.
Deselect.
Delete the template layer.
Apply the same noise.
Move Raster 7 below the largest circle paper layer in your layers pallet.
Move Raster 8 just above Raster 7.
Highlight Raster 7 layer.
Click on it with your Magic Wand.
New Raster layer.
Flood fill with #504d2e
Apply the same Noise.
Deselect.
Delete the template layer.
Highlight Raster 8 layer.
Click on it with your Magic Wand.
New Raster layer.
Copy and paste PP1 Into Selection.
Deselect.
Delete the template layer.
Highlight Raster 6 layer.
Click on it with your Magic Wand.
New Raster layer.
Copy and paste PP 8 Into Selection.
Deselect for now.
Copy and paste your tube as a new layer at the top of your layer pallet.
Move it into exact position.
Duplicate.
Move the duplicate tube layer to sit just above the circle paper of Raster 6.
Move it slightly to the side.
Highlight Raster 6 layer.
Click anywhere outside of it with your Magic Wand.
Highlight the duplicated tube layer.
Tap the delete key.
Deselect.
Delete the template layer.
Change the Properties to Soft Light.
Add your embellishments. I used:
Moth 1 & 2: Resize 25%/Free rotate 15 degrees
Ray of Light: Resize 80%
Stars 2: Resize 90%
Bird 2: Resize 25%
Bow 1: Resize 25%
Flowers 1 & 2: Resize 50%
I duplicated one of the butterflies (refer to my tag, it’s the lower left one)
Duplicate/Resize 70%/Mirror/Duplicate
I then moved the butterfly off to the side just a bit and in my layers pallet moved it just above the small circle paper.
Change the Properties to Soft Light.
Highlight your white background.
Select All.
Copy and paste Paper 6 Into Selection.
Deselect.
Apply the mask.
Merge Group.
Add your credits.
Add your name.
Choose your foreground and background colors.
Stroke: 1
Type out your name.
Convert to Raster layer.
Selections/Modify/Contract by 1
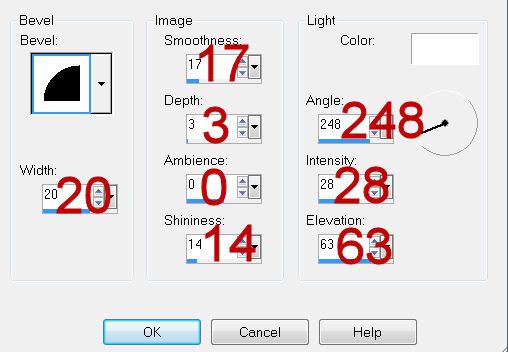
Give it an inner bevel:

Apply the inner bevel 2 more times.
Deselect.
Resize all layers 80%.
I hope you enjoyed this tutorial.
I’d love to see your results and show it off in my gallery.
Email me!
Hugs,
Bev

No comments:
Post a Comment