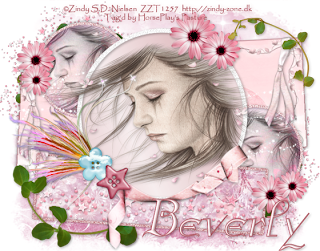
Clicking on the image will allow you to enlarge for bigger view.
Supplies
1 tube of your choice - I used the artwork of Zindy S.D. Neilsen and can be purchased from her site here.
Font of Choice - I used Anglican Italic here
Artmama’s Studio Template 21 here
Becky Mask 22 here
Eyecandy 4000 - Gradient Glow
“Dream Princess” is a PTU tagger size scrap kit created by Disyas Digitals Designs and can be purchased at Lollipops n Gumdrops. You can visit her blog here.
Thank you Dilcia for an enchanting kit!
This tutorial was written assuming you have a working knowledge of PSP.
~♥~ Let’s get started ~♥~
Open up a 700 x 700 blank canvas.
Flood fill white.
Open up the template.
Shift + D.
Close out the original.
Image/Canvas Size
700 x 550
OK
Delete the following layers:
Credit, Dots, Summer, Summer Glitter, Break, and Tiny Text
Highlight L. Lg. Rectangle layer
Copy and paste Paper 5 as a new layer.
Resize 50%/Free rotate Right 3 degrees.
Move into position so that the top left corner of the paper fits nicely into the top left corner of the template.
Highlight the template layer.
Click anywhere outside of it with your Magic Wand.
Highlight the paper layer.
Tap the delete key.
Deselect.
Delete the template layer.
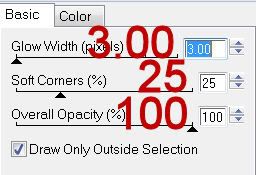
Apply Eyecandy 4000 - Gradient Glow:

On the color tab:
Choose #bf7e86.
Highlight R. lg. Rectangle layer.
Repeat the above 2 steps using the same paper accept free rotate it Left 3 degrees.
Highlight R. Sm. Circle layer.
Click on it with your Magic Wand.
New Raster layer.
Copy and paste Paper 1 Into Selection.
Copy and paste your tube as a new layer.
Resize as needed.
Selections/Invert
Tap the delete key.
Deselect.
Delete the template layer.
Change the Properties to Luminance Legacy.
Highlight L. Sm. Circle layer.
Repeat the above step.
Highlight R. Circle Frame layer.
Make your Target Tool active and change the color of the layer to a dark pink shade.
Highlight L. circle Frame layer.
Repeat the above step.
Highlight Bottom Rectangle layer.
Copy and paste Paper 1 as a new layer.
Resize 70%/Free rotate Right 4 degrees.
Highlight the Bottom Rectangle layer.
Click anywhere outside of it with your Magic Wand.
Highlight the paper layer.
Tap the delete key.
Deselect.
Delete the template layer.
Highlight Bot. Rec. Frame layer.
Colorize the same as you did the other frames.
Highlight Lg. Circle layer.
Click on it with your Magic Wand.
New Raster layer.
Flood fill with a gradient of your choice.
Deselect.
Delete the template layer.
Copy and paste your tube as a new layer.
Highlight Lg. Circle Frame.
Adjust/Add Remove Noise/Add Noise
Monochrome and Gaussian checked
Noise: 33%
OK
Add your embellishments. I used:
Fairy Wings 1
Foliage 4: Resize 85%
Foliage 2: Mirror
R 7: Resize 85% and 90%/Free rotate right 25 degrees
Buttons 2 and 4: Resize 70%
E 17: Free rotate L 3 degrees/Position at left of canvas/Duplicate/Mirror
Flower 7: Resize 50%/Duplciate/Resize 80%
Highlight your white background.
Select All.
Copy and paste a paper of choice Into Selection.
Deselect.
Apply the mask.
Resize 105%
Merge Group.
Duplicate
Add your credits.
Add your name.
Select your colors
Stroke: 1.5
Type your name.
Convert to Raster layer.
Select All/Float/Defloat
Selections/Modify/Contract by 1
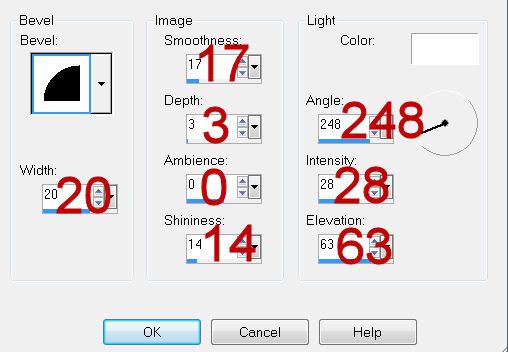
Give it an inner bevel:

Repeat the inner bevel once more.
Deselect.
Resize all layers 80%.
I hope you enjoyed this tutorial.
I’d love to see your results and show it off in my gallery.
Email me!
Hugs,
Bev

No comments:
Post a Comment