

Supplies
1 tube of your choice - I used the artwork of Keith Garvey and can be purchased at MPT
Font of Choice - I used Chocolate Box here
Gem’s Mask 161 here
“Water and Grass” is a PTU tagger size scrap kit created by ZaZa of Scrap and Tubes and can be purchased at Butterfly Blush Designs. You can visit her blog here.
Thank you ZaZa for a really beautiful kit!
This tutorial was written assuming you have a working knowledge of PSP.
~♥~ Let’s get started ~♥~
Open up a 700 x 700 blank canvas.
Flood fill white.
Copy and paste Frame as a new layer.
Resize 40%
Free rotate right 15 degrees
Duplicate/Mirror
Move both frames into position - see my tag for reference.
Highlight the top Frame.
Click inside of it with your Magic Wand.
Selections/Modify/Expand by 4.
New Raster layer below the frame.
Copy and paste Paper 2 Into Selection.
Deselect.
Highlight the bottom frame.
Repeat the above step.
Copy and paste your tube as a new layer below the top frame.
Duplicate/Mirror (close this tube layer out for now)
Move the tube that's under the frame into exact position.
Change the Properties to Luminance Legacy.
Duplciate/Move this tube just above the paper of the bottom frame in your layer’s pallet.
Highlight the tube that’s below the top frame.
Duplicate/Move to the right just slightly
Change the Properties to Soft Light
Duplicate this tube and move just above the paper of the bottom frame in your layers pallet.
Highlight the paper of the top frame.
Click anywhere outside of the paper with your Magic Wand.
Highlight each of the tube layers that are below the frame and tap the delete key.
Deselect.
The tube layers that you changed the Properties to Soft light….duplicate it.
Highlight the paper of the bottom frame.
Repeat the above step.
I truly hope I didn’t confuse you!!
Highlight the tube just below the top frame - (you changed the Properties of this tube to Luminance Legacy).
Use your Magic Wand and click ON it.
Make your Eraser Tool active.
Highlight each tube BELOW the Luminance Legacy one and erase the tube.
Deselect.
Now you shouldn’t see any other tubes showing through!
Repeat the above step with the tubes in the bottom frame.
You can now open up the tube layer I had you close out in the beginning.
Add your embellishments. I used:
Aqua Splatter
Glass Flower: Resize 50%/Duplicate/Resize 70%/Duplicate
To give these flowers a drop shadow - Put the drop shadow on a layer of its own. Click on the flower with your Magic Wand. Highlight the shadow layer and erase. Deselect.
White Bow: Resize 41% - Make your Pick Tool active. Hold down the Shift key and move the bottom left corner in until the edge of the ribbon aligns with the frame edge. Lower the opacity of the bow until you can see through it. Use your Freehand Selection Tool to section off what overhangs on the right side of the frame. Tap the delete key. Deselect. Put the Opacity back to 100%
Flower Beads Ribbon: Free rotate right 90 degrees
Star: Resize 60%
Highlight your white background.
Select All.
Copy and paste Paper 1 Into Selection.
Deselect.
Apply the mask.
Merge Group.
Add your credits.
Add your name.
Select your colors
Stroke: 1
Type your name.
Convert to Raster layer.
Select All/Float/Defloat
Selections/Modify/Contract by 1
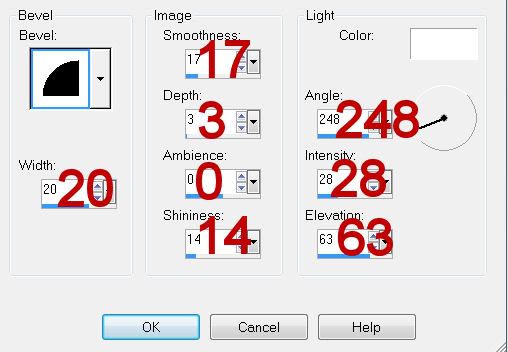
Give it an inner bevel:
Repeat the inner bevel 2 more times.
Deselect.
Resize all layers 80%.
I hope you enjoyed this tutorial.
I’d love to see your results and show it off in my gallery.
Email me!
Hugs,
Bev
No comments:
Post a Comment