Supplies
Font of Choice - I used Lavishly Yours which is a pay font.
Monti Circular Mask here
Blissfully Beth’s Template 81 here
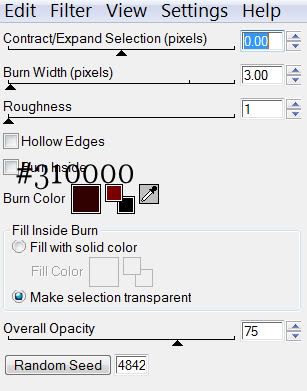
Xenofex 2: Burnt Edges
“Wild Horses” is a PTU tagger size scrap kit created by Dianna of Digicats (and dogs) and can be purchased at Aussie Scraps. You can visit her blog here.
Thank you Dianna for a such a beautiful kit. I love the way you captured the whole theme of Native and horses...both of which I have a passionate love for.
This tutorial was written assuming you have a working knowledge of PSP.
~♥~ Let’s get started ~♥~
Open up the template.
Resize all layers 120%.
Delete the credit and word art layer.
Highlight 3 layer.
Select All/Float/Defloat
New Raster layer.
Copy and paste a paper of choice Into Selection.
Deselect.
Delete the template layer.
Apply Xenofex 2: Burnt Edges:

Repeat the above steps with 2 and 1 layers.
Highlight Black Frame layer.
Select All/Float/Defloat
New Raster layer.
Copy and paste a paper of choice Into Selection.
Deselect.
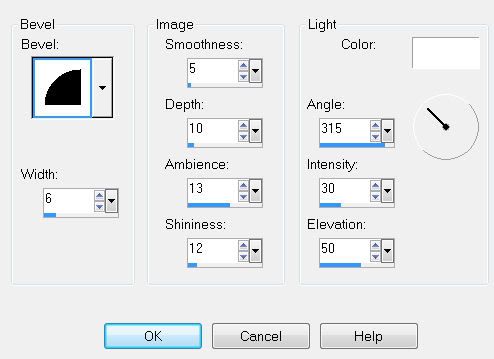
Give it a slight inner bevel:

Highlight Gray Rect Frame layer.
Select All/Float/Defloat
Copy and paste a paper of choice as a new layer - I used the top left corner of Paper 29.
Selections/Invert
Tap the delete key.
Deselect.
Copy and paste Tree 1 as a new layer.
Resize 70%
Move beneath the frame in your layers pallet.
Move into position at the left side of the rectangle.
Duplicate/Mirror
There’ll be a gap in the grass - that’s ok - you’ll duplicate one of the trees and move it so the grass of that tree covers the gap. Now use your Eraser Tool to erase all accept what you need to close that gap up.
I realize the trees are sticking out of the frame - we’ll take care of that in a bit.
Copy and paste Full Moon as a new layer.
Resize 35%
In your layers pallet, move it below the trees and move into position on your canvas.
Merge Visible all the tree layers including the grass layer that’s closing the gap and also your moon layer.
Highlight your rectangle layer.
Select All/Float/Defloat
Selections/Invert
Highlight the merged layer
Tap the delete key.
Deselect.
Copy and paste Eagle 2 as a new layer.
Resize 25% and 70%
Copy and paste Mustang 2 as a new layer.
Resize 25%
Copy and paste Mustang 1 as a new layer.
Resize 25%
Add your embellishments. I used:
Hanging Feather 4: Resize 70%
Fiber 6: Resize 40%
Butterfly 7: Resize 25% and 80% Free rotate 30 degrees left
Eagle 1
Highlight your white background.
Select All.
Copy and paste a paper of choice Into Selection.
Deselect.
Apply the mask.
Merge Group.
Copy and paste each of the horses you used in the rectangle as new layers above the mask and resize them each 120%.
Merge Visible both horses.
Apply the mask.
Merge Group.
Lower the Opacity to around 32.
If you used the poser mustangs you must credit Outlaw by Designs. The proper way to write the credit is in the TOU or you can see my tag for reference.
Write the words
“Give a horse what he needs -
He’ll give you his heart.”
Or whatever words you like and position them over the top of the rectangle.
Add your name.
Give it the same inner bevel.
Resize all layers 80%.
I hope you enjoyed this tutorial.
Highlight Black Frame layer.
Select All/Float/Defloat
New Raster layer.
Copy and paste a paper of choice Into Selection.
Deselect.
Give it a slight inner bevel:

Highlight Gray Rect Frame layer.
Select All/Float/Defloat
Copy and paste a paper of choice as a new layer - I used the top left corner of Paper 29.
Selections/Invert
Tap the delete key.
Deselect.
Copy and paste Tree 1 as a new layer.
Resize 70%
Move beneath the frame in your layers pallet.
Move into position at the left side of the rectangle.
Duplicate/Mirror
There’ll be a gap in the grass - that’s ok - you’ll duplicate one of the trees and move it so the grass of that tree covers the gap. Now use your Eraser Tool to erase all accept what you need to close that gap up.
I realize the trees are sticking out of the frame - we’ll take care of that in a bit.
Copy and paste Full Moon as a new layer.
Resize 35%
In your layers pallet, move it below the trees and move into position on your canvas.
Merge Visible all the tree layers including the grass layer that’s closing the gap and also your moon layer.
Highlight your rectangle layer.
Select All/Float/Defloat
Selections/Invert
Highlight the merged layer
Tap the delete key.
Deselect.
Copy and paste Eagle 2 as a new layer.
Resize 25% and 70%
Copy and paste Mustang 2 as a new layer.
Resize 25%
Copy and paste Mustang 1 as a new layer.
Resize 25%
Add your embellishments. I used:
Hanging Feather 4: Resize 70%
Fiber 6: Resize 40%
Butterfly 7: Resize 25% and 80% Free rotate 30 degrees left
Eagle 1
Highlight your white background.
Select All.
Copy and paste a paper of choice Into Selection.
Deselect.
Apply the mask.
Merge Group.
Copy and paste each of the horses you used in the rectangle as new layers above the mask and resize them each 120%.
Merge Visible both horses.
Apply the mask.
Merge Group.
Lower the Opacity to around 32.
If you used the poser mustangs you must credit Outlaw by Designs. The proper way to write the credit is in the TOU or you can see my tag for reference.
Write the words
“Give a horse what he needs -
He’ll give you his heart.”
Or whatever words you like and position them over the top of the rectangle.
Add your name.
Give it the same inner bevel.
Resize all layers 80%.
I hope you enjoyed this tutorial.


No comments:
Post a Comment