Supplies
1 tube of choice - I’m using the beautiful artwork of Zindy S.D. Nielsen which you can purchase here.
Font of Choice - I used Impact which came with my pc
Scraps of Enchantment Template 114 here
Artmama Mask 1 here
Xero: Porcelain
“On Cloud Nine” is a PTU tagger size scrap kit created by Vella of Wench Designs and can be purchased at TKO Scraps. You can visit her blog here.
Thank you Vella for a beautiful kit!
This tutorial was written assuming you have a working knowledge of PSP.
~♥~ Let’s get started ~♥~
Open up the template.
New Raster layer.
Send to bottom.
Flood fill white.
Delete TOU and Heart Strip layers.
Highlight Grey Rectangle layer.
Select All/Float/Defloat
New Raster layer.
Copy and paste a paper of choice Into Selection.
Deselect.
Delete the template layer.
Highlight Pink Rectangle layer.
Select All/Float/Defloat
Copy and paste a paper of choice as a new layer.
Resize 75%
Selections/Invert
Tap the delete key.
Deselect.
Delete the template layer.
Highlight White Strip layer.
Select All/Float/Defloat
New Raster layer.
Flood fill with a dark color of your choice.
Deselect.
Delete the template layer.
Give it a texture of your choice.
Highlight Black Rectangle layer.
Select All/Float/Defloat
New Raster layer.
Flood fill with a light color of your choice.
Deselect.
Delete the template layer.
Adjust/Add Remove Noise/Add Noise
Uniform Checked
Noise: 29%
OK
Highlight Brush 1 layer.
Merge down.
Brush 1 and Brush 2 should now be on one layer together.
Highlight Crazy For You layer.
Select All/Float/Defloat
New Raster layer.
Flood fill with the dark color you used before
Selections/Modify/Contract by 2
Flood fill with the light color you used before
DO NOT DESELECT
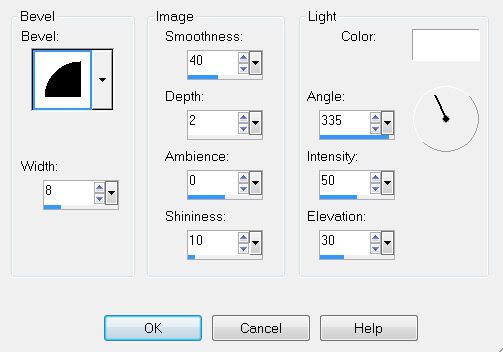
Give it a slight inner bevel:

Deselect
Delete the template layer.
Highlight Black Heart layer.
Repeat the above step.
Highlight Dotted Line layer.
Select All/Float/Defloat
New Raster layer.
Flood fill with your dark color.
Deselect.
Delete the template layer.
Now we’re going to add your tube and elements.
Using your Selection Tool -
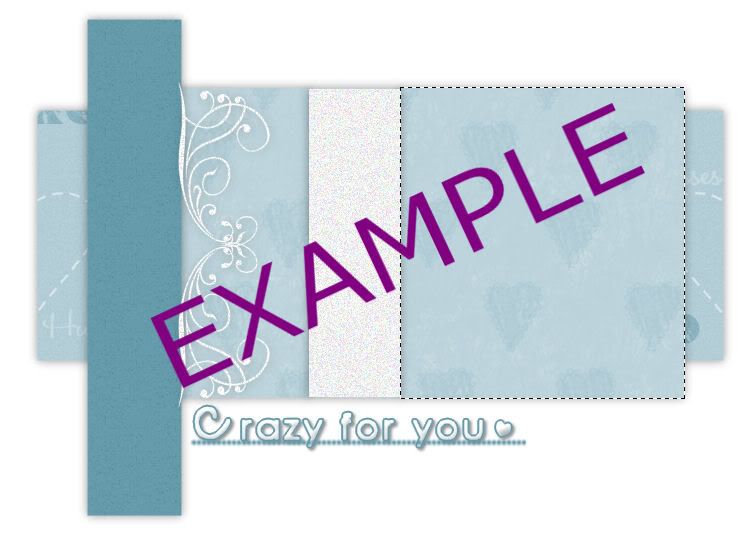
Outline the area to the right of your light colored strip.

Center your tube over the area.
Selections/Invert
Tap the delete key.
Selections/Modify/Feather
Number of Pixels:
42
OK
Tap the delete key until you have a nice feathered look.
Deselect.
Apply Xero: Porcelain
Default Settings
Using the Impact Font - or whichever you chose to write your name -
Type out your name with your light color.
Free rotate left 90 degrees and position over your dark colored strip.
If you haven’t made your name layer into a Raster layer yet then stretch your name out if it’s a short one. If your name is already a Raster layer then use your Pick Tool to stretch it out.
Give it the same inner bevel.
Apply the same Noise.
Add your embellishments. I used:
Bow 3: Resize 80%
Bleeding Hearts 1: Resize 60%
Feather 3: Resize 40%
Feather 6: Resize 35%/Mirror
Heart Trails 5: Resize 50% Free rotate left 40 degrees
Bird 1: Resize 40%
Butterfly 4: Resize 30% Duplicate/Mirror/Resize 80%
Rose 4: Resize 55% Free rotate left 25 degrees
Highlight your white background.
Select All.
Copy and paste a paper of choice Into Selection.
Deselect.
Apply the mask.
Merge Group.
Add your copyrights.
Resize all layers 80%.
I hope you enjoyed this tutorial.
I’d love to see your results and show it off in my gallery.
Email me!
Hugs,
Bev


No comments:
Post a Comment