Supplies
1 tube of choice - I’m using the wonderful artwork of Jennifer Janesko which you can purchase here.
Font of Choice - I used OhLara which is a pay font
Scraps of Enchantment Template 109 here
Monti Circular Mask here
“Angel‘s Song” is a PTU tagger size scrap kit created by Gina of Gina’s Gems Scraps and can be purchased at Butterfly Blush Designs. You can visit her blog here.
This tutorial was written assuming you have a working knowledge of PSP.
~♥~ Let’s get started ~♥~
Open up the template.
Image/Canvas size 700 X 650
New Raster layer.
Send to bottom.
Flood fill white.
Delete TOU layer and Stars layer.
Highlight Circle Background layer.
Select All/Float/Defloat
New Raster layer.
Copy and paste a paper of choice Into Selection.
Deselect.
Delete the template layer.
Highlight Circle Frame layer.
Select All/Float/Defloat
New Raster layer.
Flood fill with a dark matching color.
Deselect.
Delete the template layer.
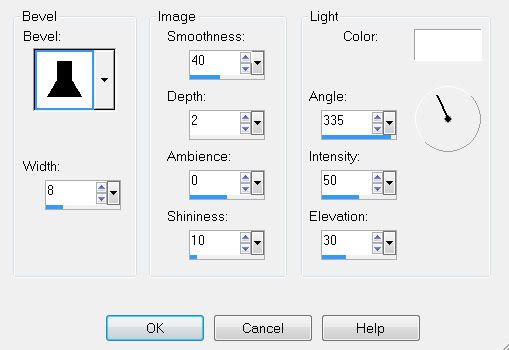
Give it a slight inner bevel:

Repeat the above step with Top and Bottom Frame layers.
Highlight Top Background layer.
Select All/Float/Defloat
Copy and paste a paper of choice as a new layer.
Resize 60%
Move into position.
Selections/Invert
Tap the delete key.
Deselect.
Delete the template layer.
Repeat the above step with Bottom Background layer.
Highlight Grey Strip layer.
Select All/Float/Defloat
New Raster layer.
Flood fill with a gradient of your choice.
Deselect.
Delete the template layer.
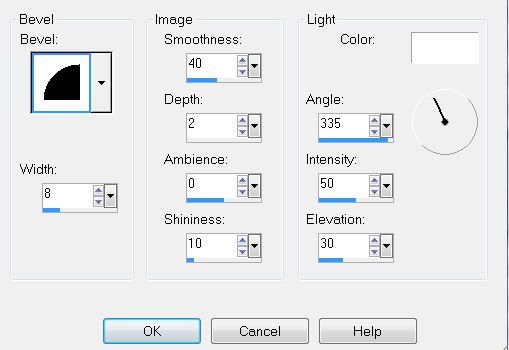
Give it a slight inner bevel:

Copy and paste your tube as a new layer.
Position it exactly where you’d like it on the right side of the squares.
Duplicate/Mirror
In your layers pallet move the tube below the top frame.
Duplicate the tube and move this one below the bottom frame.
Highlight the Top Background paper layer.
Select All/Float/Defloat
Selections/Invert
Highlight the tube that’s just above it.
Tap the delete key.
Deselect.
Change the Properties to Soft Light.
Highlight the Bottom Background paper layer.
Select All/Float/Defloat
Selections/Invert
Highlight the tube that’s just above it.
Tap the delete key.
Deselect.
Change the Properties to Soft Light.
Add your embellishments. I used:
Flower 2
Heart Pendant: Resize 30%
Wrap 2: Resize 30% Free rotate left 10 degrees
Blossom 1 & 2: Resize 25%
Stainless Glass Butterflies 2 & 4: Resize 25% and 70%
Music Doodle 2: Resize 50%
Highlight your white background.
Select All.
Copy and paste a paper of choice Into Selection.
Deselect.
Copy and paste the Gate as a new layer.
Resize 85%
Merge Visible the Gate and paper.
Apply the mask.
Merge Group.
Add your copyrights.
Add your name.
Give it the same inner bevel you used last.
Resize all layers 80%.
I hope you enjoyed this tutorial.
I’d love to see your results and show it off in my gallery.
Email me!
Hugs,
Bev


No comments:
Post a Comment