
 Clicking on the image will enlarge to full view.
Supplies
1 tube of choice - I’m using the beautiful artwork of Barbara Jensen which can purchase here
Font of Choice - I’m using Evanescence Series here
Weescotlass Mask 297 here
Scraps of Enchantment Template 112 here
“Irish Mist” is a PTU full size kit created by Cari of Kissed by Cari and can be purchased at TKO Scraps. You can visit Cari’s blog here.
Thank you so much for this softly created Irish kit, Cari. It is truly beautiful.
This tutorial was written assuming you have a working knowledge of PSP.
~♥~ Let’s get started ~♥~
Open up the template.
Delete TOU layer.
Image/Canvas Size
700 X 500
New Raster layer.
Send to bottom.
Flood Fill white.
Highlight BlkOval layer.
Select All/Float/Defloat
Copy and paste Paper 6 as a new layer.
Resize 25% and 65%
Selections/Invert
Tap the delete key.
DO NOT DESELECT.
Copy and paste Harp as a new layer above the paper.
Resize 35% and move into position.
See my tag for reference.
Tap the delete key.
Change the Properties to Soft Light.
Deselect.
Delete the template layer.
Highlight GreOvalFrame Layer.
Select All/Float/Defloat
New Raster layer.
Flood fill with a dark matching color.
Deselect.
Delete the template layer.
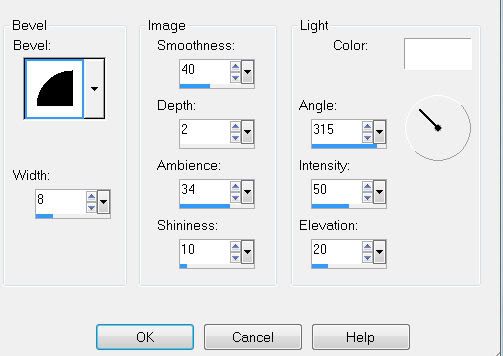
Give it a slight inner bevel:
Highlight WhiteOval layer.
Select All/Float/Defloat
Copy and paste Paper 7 as a new layer.
Resize 25% and 65%
Selections/Invert
Tap the delete key.
DO NOT DESELECT.
Copy and paste Celtic Cross 2 as a new layer above the paper.
Resize 25% and move into position.
See my tag for reference.
Tap the delete key.
Change the Properties to Soft Light.
Deselect.
Delete the template layer.
Highlight BlkOvalFrame layer.
Repeat the same steps as you did for the GreOvalFrame.
Highlight Black Square layer.
Select All/Float/Defloat
Copy and paste Paper 8 as a new layer.
Resize 25% and 30%
Selections/Invert
Tap the delete key.
DO NOT DESELECT.
Copy and paste your tube as a new layer below the frame.
Tap the delete key.
Deselect.
Delete the template layer.
Highlight SquareGreyFrame layer.
Select All/Float/Defloat
New Raster layer.
Flood fill with a gradient that will match your tag.
Deselect.
Delete the template layer.
Give it the same inner bevel.
Highlight Black Circle layer.
Select All/Float/Defloat
New Raster layer.
Flood fill with the same gradient you just used.
Give the same inner bevel.
Deselect.
Delete the template layer.
Highlight DarkGreyCircle layer.
Select All/Float/Defloat
New Raster layer.
Flood fill with the dark color you used for the oval frames.
Give the same inner bevel.
Deselect.
Delete the template layer.
Highlight LightGreyCircle layer.
Select All/Float/Defloat
Copy and paste Paper 8 again as a new layer.
Resize 25% and 25%
Selections/Invert
Tap the delete key.
DO NOT DESELECT.
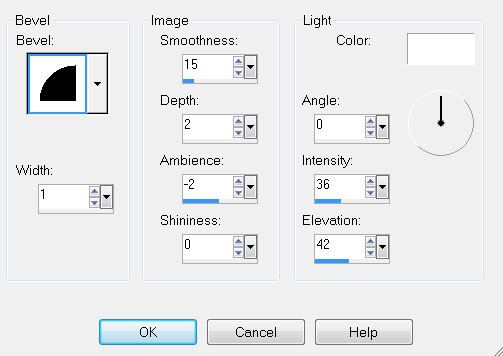
Apply the same inner bevel.
Copy and paste your tube again as a new layer over the paper.
Resize so that it’s slightly larger than your other one.
Position over the circle.
Selections/Invert
Selections/Modify/Feather
Number of Pixels:
35
OK
Selections/Invert
Tap the delete key until you have a nice feathered effect to your tube.
Deselect.
Delete the template layer.
Change the Properties to Luminance Legacy.
Highlight DarkGreyStrip layer.
Select All/Float/Defloat
Copy and paste Paper 2 as anew layer.
Resize 25% and 40%
Selections/Invert
Tap the delete key.
Deselect.
Give it a slight inner bevel:
Highlight LightGreyStrip layer.
Select All/Float/Defloat
Copy and paste Paper 3 as anew layer.
Resize 25% and 40%
Selections/Invert
Tap the delete key.
Deselect.
Give it the same slight inner bevel.
Add your embellishments. I used:
Shamrock: Resize 25%, 25%, and 25%
Flower: Resize 25% and 40% Mirror/Free rotate left 10 degrees
Cluster Frame: Resize 25% and 60%
Floral 1: Resize 25%
Copy and paste Floral 1 as a new layer again.
Resize 25%
Using your Freehand Selection Tool, zoom in on it and outline the shamrock.
Edit/Copy
Edit/Paste as new layer.
Delete the layer that you outlined the shamrock on.
Deselect.
Now that you have a cutout of the shamrock as a new layer, resize 50%
Give it a slight inner bevel:
Duplicate/Resize 80%
We’ll use the shamrocks in a bit….
Highlight your white background.
New Raster layer.
Select All.
Copy and paste a paper of choice Into Selection.
Deselect.
Apply the mask.
Merge Group.
Add your copyrights.
Add your name.
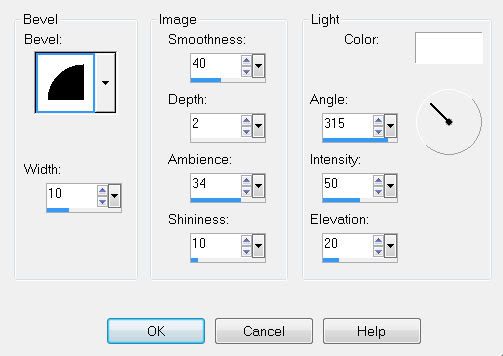
Give it the same inner bevel you used last.
Move the shamrocks into position to decorate your name.
Resize all layers 85%.
I hope you enjoyed this tutorial.
I’d love to see your results and show it off in my gallery.
Email me!
Hugs,
Bev
No comments:
Post a Comment