Supplies
1 tube of choice - I used the artwork of Anna Marine at CILM
Font of Choice - I used Rat Infested Mailbox here
MWY mask 010 and animated snowflake here- if you know who this mask belongs to please email me so I can give proper credit.
Eyecandy 5: Nature - Fire
Animation Shop
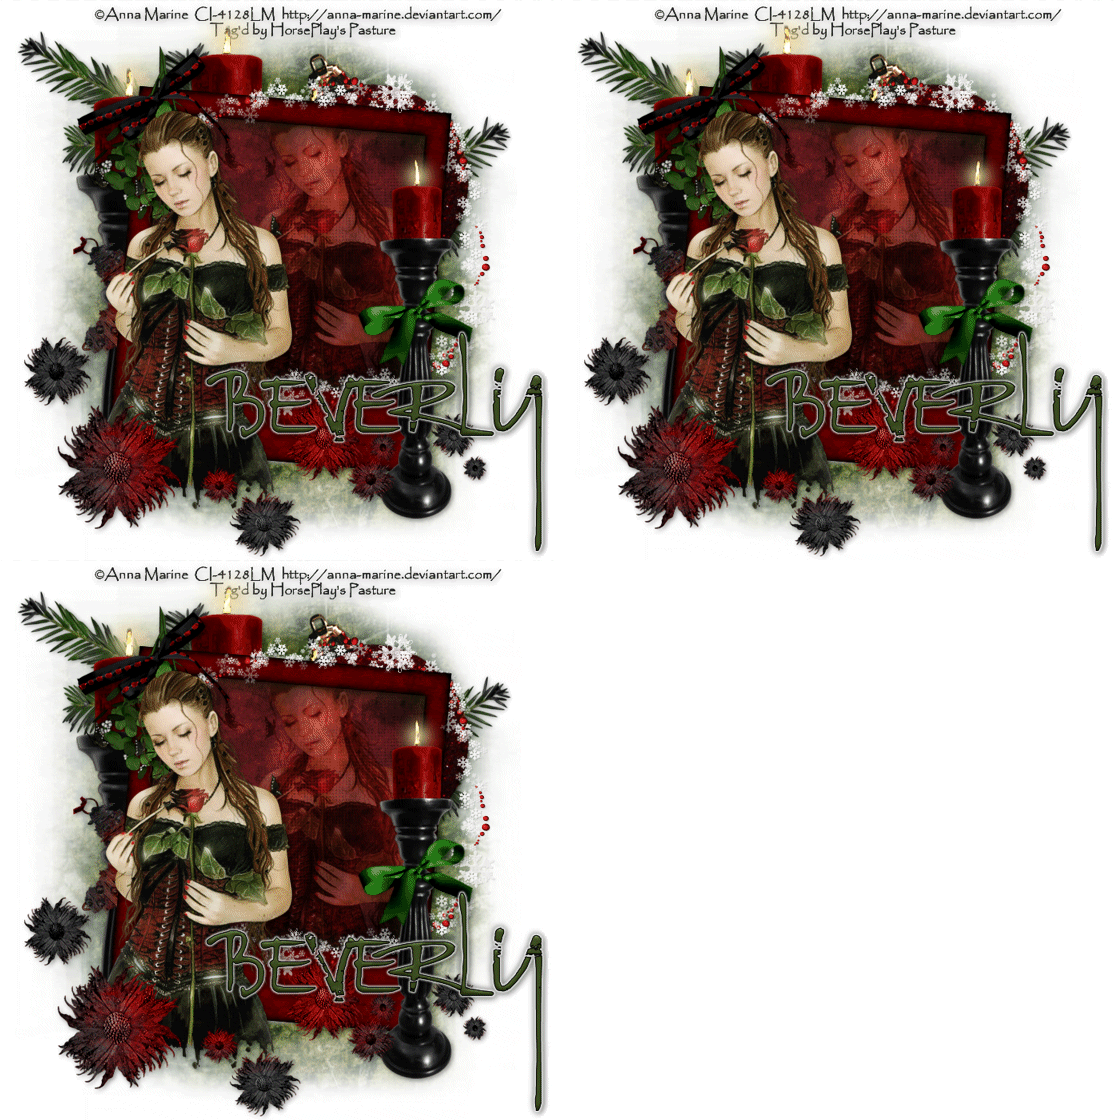
“Ho! Ho! Ho!” is a PTU tagger size scrap kit created by Jessica of Gothic Inspirations and can be purchased from her store Gothic Inspirations. You can visit her blog here.
Jessica, thank you for yet another brilliant kit!
This tutorial was written assuming you have a working knowledge of PSP.
~♥~ Let’s get started ~♥~
Open up a 700 x 700 blank canvas.
Flood fill white.
Copy and paste Frame 4 as a new layer.
Resize 60%
Free rotate left 5 degrees.
Click inside with your Magic Wand.
Selections/Modify/Expand by 6.
New Raster layer below the frame.
Copy and paste a paper of choice Into Selection.
Copy and paste your tube as a new layer in front of the frame.
Duplicate/Move to the right just a little/position below the frame.
Selections/Invert
Tap the delete key.
Change the Properties to Soft Light.
Deselect.
Add your embellishments. I used:
Frame 2: Resize 60%
Mistletoe: Resize 50%/Mirror
Flowers
Candle: Position behind the frame/Duplicate/See my tag for reference/Erase the base of both candles that you can see.
Candle again: Resize 70%/Position in front of the frame.
Bow 1: Resize 30%/Free rotate Right 15 degrees
Star: Resize 50%
Ornament 1: Resize 60%/Free rotate Left 20 degrees
Pine: Resize 60%/Free rotate Right 35 degrees/Duplicate/Mirror
Highlight your white background.
Select All.
Copy and paste a paper of choice Into Selection.
Deselect.
Apply the mask.
Merge Group.
We’re going to get the candles ready for animation.
Merge Visible the two candle behind the frame.
Duplicate twice for a total of 3 candle layers.
Rename them Merged Candle 1, 2, and 3.
Highlight the candle in front of the frame.
Duplicate two times for a total of 3 candle layers.
Rename them Candle 1, 2, and 3.
Using your Freehand Selection Tool outline the flame of each candle.
Zoom in very close to make it easier.
Highlight Merged Candle 1 layer.
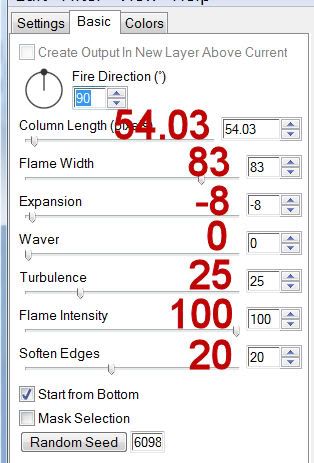
Apply Eyecandy Nature - Fire using these settings:
Settings Tab:
Small, Candle
Basic Tab:

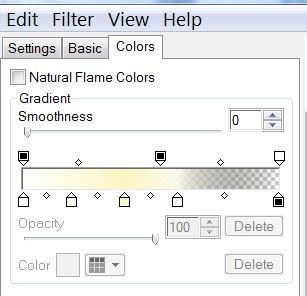
Colors Tab:
Move the tabs into about the same position as mine are. (You’re trying to keep the flame color the same as the element already is.)

Highlight Candle 1 layer.
Apply the same Fire setting….
ONLY CLICK “OK” - DO NOT HIT THE RANDOM SEED BUTTON!
Highlight Merged Candle 2 layer.
Apply the same fire effect but hit the Random Seed button once.
OK
Highlight Candle 2 layer.
Apply the same setting - DON’T HIT THE RANDOM SEED BUTTON!
Highlight Merged Candle 3 layer.
Apply the same fire effect but hit the Random Seed button once.
OK
Highlight Candle 3 layer.
Apply the same setting - DON’T HIT THE RANDOM SEED BUTTON!
Close out Merged Candle 2 & 3 layers.
Only keep Merged Candle 1 layer open.
Close out Candle 2 & 3 layers.
Only keep Candle 1 layer open.
Add your credits.
Add your name.
Resize all layers 80%
Copy Merge
~Time to Animate~
Open up Animation Shop.
Edit/Paste/As New Animation.
Back in PSP.
Close out Merged Candle 1 and Candle 1 layers.
Open up Merged Candle 2 and Candle 2 layers.
Merge Visible.
Carry Into AS.
Edit/Paste/After Current Frame.
Back in PSP.
Close out Merged Candle 2 and Candle 2 layers.
Open up Merged Candle 3 and Candle 3 layers.
Merge Visible.
Carry Into AS.
Edit/Paste/After Current Frame.
Ctrl + A to highlight all frames.
Animation/Frame Properties:
Change the display time to 25
Open up the animated Snowflake that I’ve provided.
I'm sorry it's not the same exact one that I used by very close - the one I used became distorted after it was up loaded into in a file to share.
Highlight Frame 1
Edit/Delete
Ctrl + A to highlight them all.
Animation/Resize Animation
Percentage of Original checked
Width x Height
15
OK
Edit/Copy
Highlight your tag frames.
Ctrl + A
Ctrl + E and place the snowflake over the largest flake at the top of the ring that hangs over the frame.
Highlight the Snowflake frames again.
Ctrl + A
Animation/Resize Animation
Percentage of Original checked.
Width x Height:
40
OK
Edit/Copy
Ctrl + E and place the snowflake where you like as many times as you like - I placed mine randomly around the ring.
View your animation.
If you’re happy then save.
I hope you enjoyed this tutorial.
I’d love to see your results and show it off in my gallery.
Email me!
Hugs,
Bev

No comments:
Post a Comment