Supplies
Font of Choice - I used St. Nicholas here
Vaybs Mask 111 here
Eyecandy 5: Nature - Snow Drift
VM Natural - Sparkle
Animation Shop
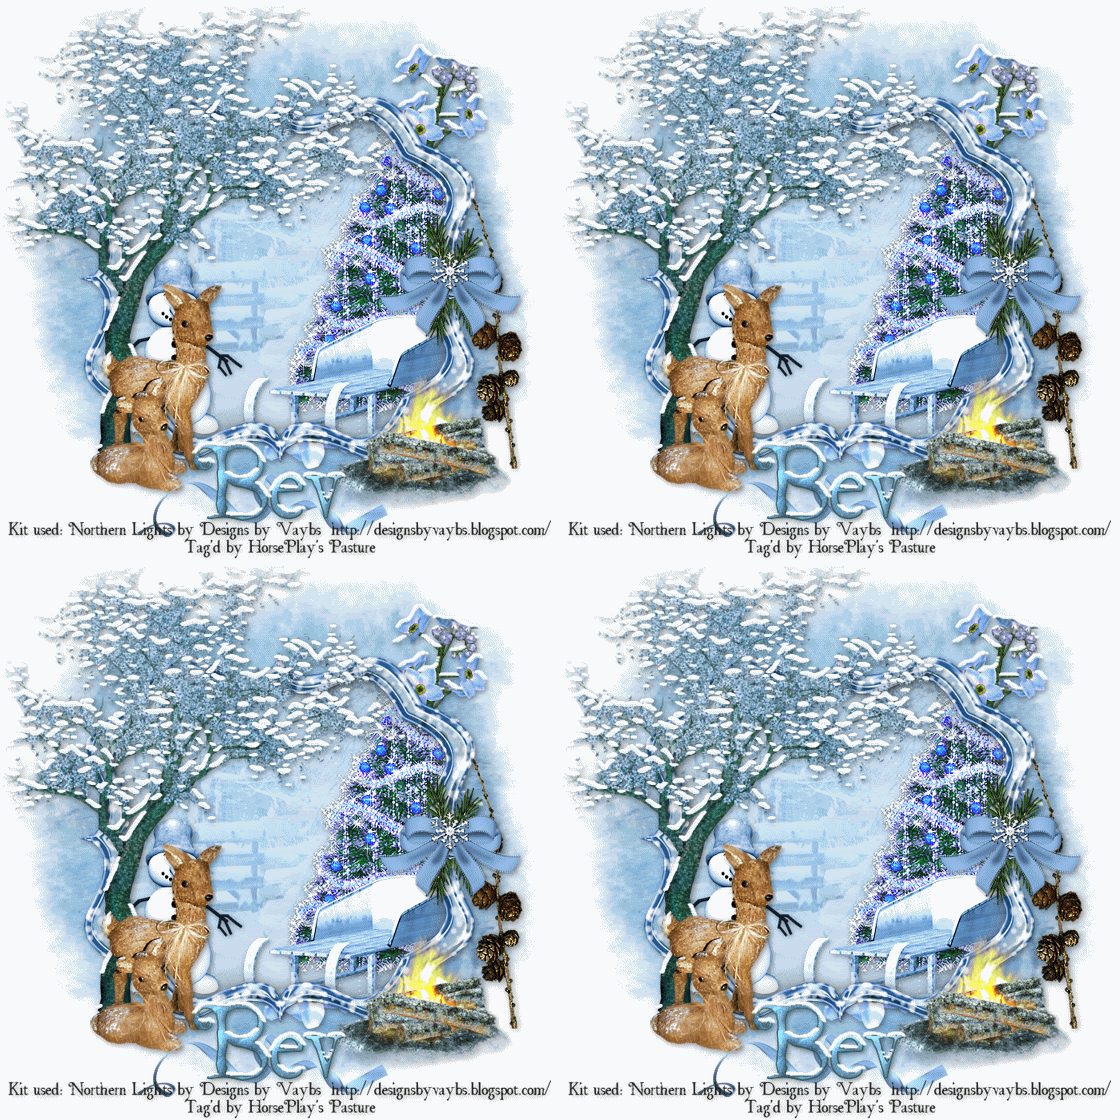
“Northern Lights” is a FTU tagger size scrap kit created by Designs by Vaybs and can be found on her blog here.
Please leave a thank you or send her a small note of appreciation when downloading any of her creations as it’s a very small gesture for her hard work given freely.
This tutorial was written assuming you have a working knowledge of PSP.
~♥~ Let’s get started ~♥~
Open up a 700 x 700 blank canvas.
Flood fill white.
Copy and paste Frame 12 as a new layer.
Click inside of it with your Magic Wand.
Selections/Modify/Expand by 6.
New Raster layer.
Copy and paste Paper 6 Into Selection.
Deselect.
Copy and paste Element 15 as a new layer below the frame.
Resize 50%
Mirror
Move into position
Erase any part of the sled that you can see poking out from behind the side of the frame.
Copy and paste Element 25 as a new layer below the frame.
Resize 50%
Move into position
Erase any part of it that’s sticking out from the side of the frame.
Copy and paste Element 52 as a new layer.
Move into position behind the sled.
Highlight the paper layer.
Click anywhere outside of it with your Magic Wand.
Highlight the tree layer.
Tap the delete key.
Deselect.
Duplicate the tree layer three times for a total of 4 tree layers.
Rename them Tree 1, 2, 3, and 4.
Highlight Tree 1 layer.
Use your Freehand Selection Tool and outline the tree - it doesn’t have to be perfect. We’re going to apply the sparkles to it and you don’t want the sparkles all over your entire image.
Apply VM Natural - Sparkle:
Use default settings accept move the Random Seed button to a number of your choice.
Once you’ve done that highlight Tree 2.
Apply the same effect but move the Random Seed button.
Repeat this step on Tree layers 3 and 4.
Deselect.
Close out Tree layers 2, 3, and 4.
Leave Tree layer 1 open.
Copy and paste Element 47 as a new layer.
Resize 50%
Move into position at the right side of the frame.
Copy and paste Element 13 as a new layer.
Free rotate left 90 degrees.
Move into position behind the other blow - concentrate on only the sprigs sticking up from the bow. See my tag for reference.
Duplicate/close this layer off for now.
Be sure you have the original highlighted and use your Eraser Tool to erase all of the bow accept the sprigs sticking out of the top of the ribbon.
Open up your Duplicate layer.
Move it into position so that the sprigs are sticking out of the bottom of the ribbon.
Use your Eraser Tool to erase all of the ribbon accept for the sprigs sticking out of the bottom of the ribbon.
Add your embellishments. I used:
NL Element
Element 10: Resize 60%
Element 57: Resize 50%
Element 32: Resize 60%/Free rotate right90 degrees/Mirror
Element 58: Mirror
Highlight your white background.
Select All.
New Raster layer.
Copy and paste Paper 7 Into Selection.
Deselect.
Apply the mask.
Merge Group.
Add your credits.
Add your name.
Convert it to a Raster layer.
Select All/Float/Defloat
Selections/Modify/Contract by 1
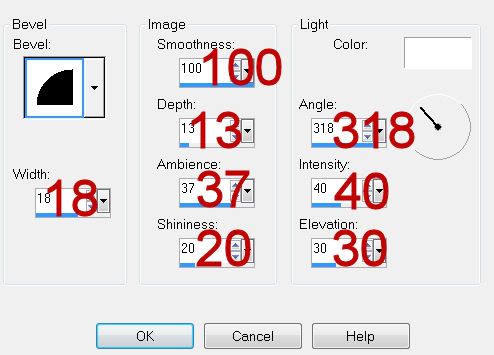
Give it a slight Inner Bevel:

Copy and paste Element 31 as a new layer.
Resize 50%
Position behind your name.
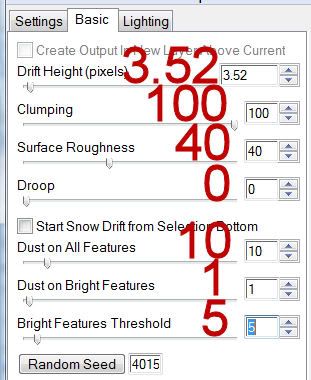
Apply Eyecandy 5: Nature - Snow Drift to the flowers behind the frame and your name using these settings:
Basic Tab:

Resize all layers 80%.
Copy Merge.
~Time to Animate~
Open up Animation Shop.
Edit/Paste/As New Animation
Back in PSP.
Close out Tree 1 layer.
Open up Tree 2 layer.
Copy Merge
Carry into AS.
Edit/Paste/After Current Frame.
Back in PSP.
Close out Tree 3 layer.
Open up Tree 4 layer.
Copy Merge.
Carry into AS.
Edit/Paste/After Current Frame.
Ctrl + A to highlight all frame.
Animation/Frame Properties
Change the Display time to 25
OK
View your animation.
If you’re happy then save.
I hope you enjoyed this tutorial.
I’d love to see your results and show it off in my gallery.
Email me!
Hugs,
Bev

Genial .lindo el diseño y gracias por compartirlo
ReplyDeletenice tutorial! thanks! I enjoyed a lot!
ReplyDeleteI love this tutorial. Thank you for sharing.
ReplyDelete