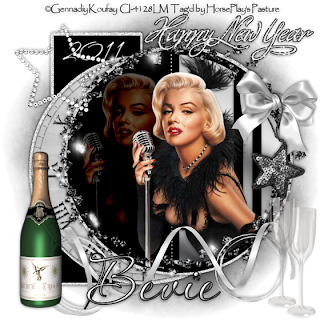
Clicking on the image will allow you to enlarge for bigger view.
Supplies
1 tube of choice - I used the artwork of Gennadiy Koufay at CILM
Font of Choice - I used Aquarelle here
Monti Circular Mask here
Tracy F Designz Template 69 at Freebie Friends Scraps here
“New Year‘s Glitter” is a FTU scrap kit created by Seven’s Scraps and can be from her blog here.
Please leave a thank you when downloading as it’s a small gesture for hard work given freely.
This tutorial was written assuming you have a working knowledge of PSP.
~♥~ Let’s get started ~♥~
Open up the template.
Shift + D.
Close out the original.
Delete the top 2 layers.
New Raster layer.
Send to bottom.
Image/Canvas Size
700 x 700
OK
Highlight the bottom layer and flood fill white.
In your color pallet:
Foreground set on Gradient: Metallic Silver
Angle: 32
Repeat: 0
Invert checked
Highlight Circle 1 layer.
Select All/Float/Defloat
New Raster layer.
Copy and paste Clock 01 Into Selection.
Deselect.
Delete the template layer.
Highlight Half Circle layer.
Select All/Float/Defloat
New Raster layer.
Flood fill with your gradient.
Duplicate
Adjust/Blur/Gaussian blur:
Radius: 20
OK
Deselect.
Delete the template layer.
Make a new 700 x 700 blank canvas.
Flood fill with your gradient.
Copy
Close the canvas out. You won’t be needing it any more.
Highlight Dotted Line layer.
Select All/Float/Defloat
New Raster layer.
Paste Into Selection.
Deselect.
Delete the template layer.
Copy and paste your tube as a new layer.
Position it mostly over the gradient - see my tag for reference.
Duplicate/Move to the left/In your layers pallet move just above Circle 2 layer.
Change the Properties to Hard Light and lower the Opacity to about 36.
To get rid of the bit of tube that overhangs the circles:
Highlight the half circle gradient layer and click anywhere outside of it with your Magic Wand.
Selections/Invert
Highlight the tube and erase the bottom area that overhangs the circle.
Deselect.
Highlight Circle 2 layer and click anywhere outside of it with your Magic Wand.
Selections/Invert
Highlight each of the tubes and erase what overhangs the bottom of the circle.
Deselect.
Add your embellishments. I used:
Star 02: Resize 70%
Frame 16: Resize 115%
Bow 02: Resize 70%
Star 02: Resize 70%
Ribbon 5
Word Art 02: Resize 55%
Bottle 02: Resize 90%
Glass 04: Resize 70%
Type out the year 2011
Highlight your white background.
Select All.
New Raster layer.
Copy and paste a paper of choice Into Selection.
Deselect.
Apply the mask.
Merge Group.
Add your credits.
Add your name.
Foreground: #000000
Background: #efefef
Stroke set at 2
Type out your name.
Convert to Raster layer.
Select All/Float/Defloat
Selections/Modify/Contract by 2
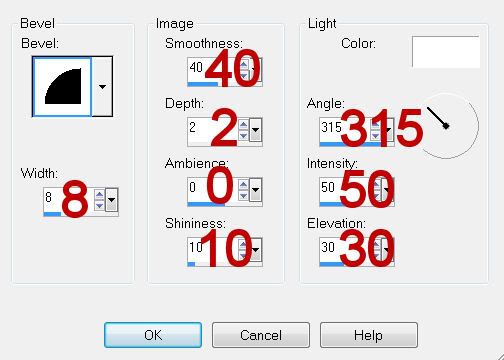
Give it an inner bevel 3x’s:

Deselect.
Resize all layers 80%.
I hope you enjoyed this tutorial.
I’d love to see your results and show it off in my gallery.
Email me!
Hugs,
Bev
Supplies
1 tube of choice - I used the artwork of Gennadiy Koufay at CILM
Font of Choice - I used Aquarelle here
Monti Circular Mask here
Tracy F Designz Template 69 at Freebie Friends Scraps here
“New Year‘s Glitter” is a FTU scrap kit created by Seven’s Scraps and can be from her blog here.
Please leave a thank you when downloading as it’s a small gesture for hard work given freely.
This tutorial was written assuming you have a working knowledge of PSP.
~♥~ Let’s get started ~♥~
Open up the template.
Shift + D.
Close out the original.
Delete the top 2 layers.
New Raster layer.
Send to bottom.
Image/Canvas Size
700 x 700
OK
Highlight the bottom layer and flood fill white.
In your color pallet:
Foreground set on Gradient: Metallic Silver
Angle: 32
Repeat: 0
Invert checked
Highlight Circle 1 layer.
Select All/Float/Defloat
New Raster layer.
Copy and paste Clock 01 Into Selection.
Deselect.
Delete the template layer.
Highlight Half Circle layer.
Select All/Float/Defloat
New Raster layer.
Flood fill with your gradient.
Duplicate
Adjust/Blur/Gaussian blur:
Radius: 20
OK
Deselect.
Delete the template layer.
Make a new 700 x 700 blank canvas.
Flood fill with your gradient.
Copy
Close the canvas out. You won’t be needing it any more.
Highlight Dotted Line layer.
Select All/Float/Defloat
New Raster layer.
Paste Into Selection.
Deselect.
Delete the template layer.
Copy and paste your tube as a new layer.
Position it mostly over the gradient - see my tag for reference.
Duplicate/Move to the left/In your layers pallet move just above Circle 2 layer.
Change the Properties to Hard Light and lower the Opacity to about 36.
To get rid of the bit of tube that overhangs the circles:
Highlight the half circle gradient layer and click anywhere outside of it with your Magic Wand.
Selections/Invert
Highlight the tube and erase the bottom area that overhangs the circle.
Deselect.
Highlight Circle 2 layer and click anywhere outside of it with your Magic Wand.
Selections/Invert
Highlight each of the tubes and erase what overhangs the bottom of the circle.
Deselect.
Add your embellishments. I used:
Star 02: Resize 70%
Frame 16: Resize 115%
Bow 02: Resize 70%
Star 02: Resize 70%
Ribbon 5
Word Art 02: Resize 55%
Bottle 02: Resize 90%
Glass 04: Resize 70%
Type out the year 2011
Highlight your white background.
Select All.
New Raster layer.
Copy and paste a paper of choice Into Selection.
Deselect.
Apply the mask.
Merge Group.
Add your credits.
Add your name.
Foreground: #000000
Background: #efefef
Stroke set at 2
Type out your name.
Convert to Raster layer.
Select All/Float/Defloat
Selections/Modify/Contract by 2
Give it an inner bevel 3x’s:

Deselect.
Resize all layers 80%.
I hope you enjoyed this tutorial.
I’d love to see your results and show it off in my gallery.
Email me!
Hugs,
Bev

No comments:
Post a Comment