Supplies
Font of Choice - I used St. Nicholas here
Vix Mask 451 here
Divine Intentionz Template 355 here
DSB Flux - Bright Noise
Brush Strokes - Sprayed Strokes
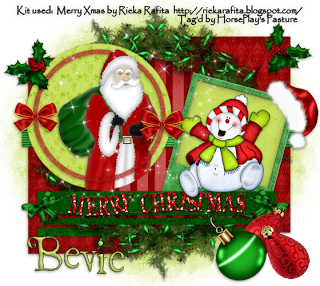
“Merry Xmas” is a PTU scrap kit created Rieka_Rafita and can be purchased from Heartbeatz Creationz. You can visit her blog here.
Thank you Rieka for a really cute Christmas kit!
This tutorial was written assuming you have a working knowledge of PSP.
~♥~ Let’s get started ~♥~
Open up the template.
Shift + D.
Close out the original.
Delete the top 2 layers.
Image/Canvas Size
700 x 625
OK
Highlight the background layer and flood fill white.
Highlight Shape 1 layer.
Click on it with your Magic Wand.
New Raster layer
Copy and paste Paper 7 Into Selection.
Deselect.
Delete the template layer.
Highlight Shape 2 layer.
Repeat the above step.
Highlight Circle Background layer.
Copy and paste Wreath as a new layer and position it above the template layer.
Delete the Circle Background template layer and Circle template layer.
Highlight the wreath.
Click inside of it with your Magic Wand.
New Raster layer below the wreath.
Copy and paste Paper 4 Into Selection.
Deselect.
Highlight Thin Rectangle 2 layer.
Click on it with your Magic Wand.
New Raster layer.
Open up Paper 5.
Free rotate Left 90 degrees.
Copy
Make your template active.
Paste Into Selection.
Deselect.
Delete the template layer.
Highlight Polaroid layer.
Click on the white area of it with your Magic Wand.
New Raster layer.
Copy and paste Paper 11 Into Selection.
Deselect.
Highlight the Polaroid layer again.
Click on the black area with your Magic Wand.
New Raster layer below the Polaroid paper layer.
Make Paper 9 active and use your Selection Tool set on Rectangle to section out a plain green area of the paper.
Set your foreground to Pattern and find the green area.
Make your working canvas active.
Flood fill with the pattern.
Deselect.
Delete the template layer.
Highlight Small Circle layer.
Click on it with your Magic Wand.
New Raster layer.
Make Paper 9 active. Deselect if you haven’t already.
Copy
Make your working canvas active.
Paste Into Selection.
Copy and paste Santa as a new layer.
Resize 70%
Position over the circle - see my tag for reference.
Selection/Invert
Tap the delete key.
Deselect.
Delete the template layer.
Highlight Transparent Circle Edge layer.
Click on it with your Magic Wand.
New Raster layer.
Copy and paste Paper 10 Into Selection.
Deselect.
Delete the template layer.
Lower the Opacity about 69.
Apply DSB Flux - Bright Noise:
Intensity: 30
Mix checked
OK
Open up Paper 8.
Use your Selection Tool set on Rectangle and section out a plain green area.
Set your foreground to Pattern and look for the green area.
Highlight Thin Rectangle 4 layer.
Click on it with your Magic Wand.
New Raster layer.
Flood fill with your Pattern.
Deselect.
Delete the template layer.
Make Paper 8 active.
Deselect.
Apply Brush Strokes - Sprayed Strokes:
Stroke Length: 1
Spray Radius: 21
OK
Copy
Make your working canvas active.
Highlight Thin Rectangle.
Merge Down.
Both thin rectangles should be on one layer.
Us your Magic Wand and click on both rectangles.
New Raster layer.
Paste Into Selection.
Deselect.
Delete the template layer.
Add your embellishments. I used:
Holly: Resize 30%
Bow 1: Resize 35%
Snowman: Resize 405/Free rotate Left 10 degrees
Snow Cap: Resize 40%
Banner: Resize 90%
Sparkle 2
Christmas 4: Resize 405
Christmas Ball 3: Resize 70%/Free rotate Left 40 degrees
Highlight your white background.
Select All.
New Raster layer.
Copy and paste a paper of choice Into Selection.
Deselect.
Apply the mask.
Resize 120%
Merge Group.
Add your credits.
Add your name.
Resize all layers 80%.
I hope you enjoyed this tutorial.
I’d love to see your results and show it off in my gallery.
Email me!
Hugs,
Bev

No comments:
Post a Comment