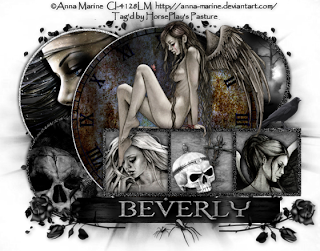
Clicking on the image will allow you to enlarge to bigger view.
Supplies
4 tubes of your choice - I used the artwork of Anna Marine and can be purchased from CILM.
Font of Choice - I used Fire of Ysgard Wide here
Divine Intentionz Template 346 here
Gem Mask 71 here
Greg’s Factory Output Vol. II - Pool Shadow
“Underworld” is a PTU tagger size scrap kit created by Heart of Essence and can be purchased from Lollipops n Gumdrops. You can visit her blog here.
Thank you HE for a stunning kit!
This tutorial was written assuming you have a working knowledge of PSP.
~♥~ Let’s get started ~♥~
Open up the template.
Shift + D.
Close out the original.
Delete the top 2 layers.
Resize all layers 90%
Image/Canvas Size
700 x 550
OK
Open up the background layer.
Flood fill white.
Highlight Circle Left layer.
Use your Magic Wand and click on it.
New Raster layer.
Copy and paste Paper 1 Into Selection.
Apply Greg’s Factory Output Vol. II - Pool Shadow:
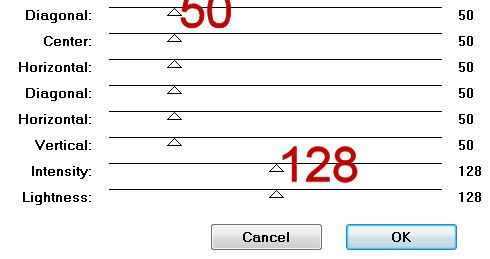
Copy and paste one of your tubes as a new layer.
Move into position over the circle.
Selections/Invert
Tap the delete key.
Deselect.
Delete the template layer.
Change the Properties to Soft Light.
Duplicate
Change the Properties to Overlay
Highlight Small Circle Left layer.
Click on it with your Magic Wand.
New Raster layer.
Copy and paste Paper 5 Into Selection.
Adjust/Add Remove Noise/Add Noise:
Monochrome and Gaussian checked.
Noise: 88%
OK
Deselect.
Delete the template layer.
Highlight Small Circle 2 Left layer.
Click on it with your Magic Wand.
New Raster layer.
Copy and paste Paper 12 Into Selection.
Apply the Pool Shadow effect (same settings as before) 3 times
Copy and paste Element 14 as a new layer.
Resize 60%
Selections/Invert
Tap the delete key.
Deselect.
Change the Properties to Hard Light.
Delete the template layer.
Highlight Small Circle 1 Right layer.
Click on it with your Magic Wand.
New Raster layer.
Copy and paste Paper 5 Into Selection.
Apply the same Noise effect.
Deselect.
Delete the template layer.
Highlight Small Circle 2 Right layer.
Click on it with your Magic Wand.
New Raster layer.
Copy and paste Paper 15 Into Selection.
Apply the Pool Shadow Effect (same settings as before) 2 times.
Deselect.
Delete the template layer.
Highlight Glittered Circle Large layer.
Apply the Noise effect.
Higlight Glittered Circle left layer.
Apply the same Noise effect.
Highlight Circle Large layer.
Click on it with your Magic Wand.
New Raster layer.
Copy and paste Paper 13 Into Selection.
Apply the Pool Shadow Effect - same settings.
New Raster layer.
Copy and paste Element 19 Into Selection.
Apply Pool Shadow Effect:
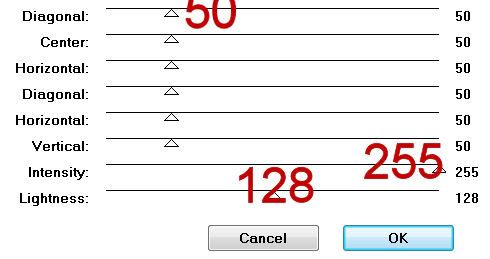
Deselect.
Delete the template layer.
Highlight Frame Background layer.
Click on each of the squares.
New Raster layer.
Copy and paste Paper 11 Into Selection.
Deselect.
Delete the template layer.
Highlight Frame layer.
Click on it with your Magic Wand.
New Raster layer.
Copy and paste Paper 5 Into Selection.
Apply the same Noise effect.
Deselect.
Delete the template layer.
Copy and paste one of your tubes as a new layer.
Move into position beneath the left square of the frame.
Highlight the frame layer.
Click inside that square with your Magic Wand.
Selections/Modify/Expand by 2.
Selections/Invert
Highlight the tube layer.
Tap the delete key.
Deselect.
Change the Properties to Hard Light.
Duplicate
Change the Properties to Multiply.
Repeat the above step with the far right square.
Highlight Rectangle layer.
Click on it with your Magic Wand.
New Raster layer.
Copy and paste Paper 2 Into Selection.
Apply the Pool Shadow effect - same settings as before.
Deselect.
Delete the template layer.
Copy and paste your main tube as a new layer.
Add your embellishments. I used:
33: Resize 25% and 80%/Free rotate right 15 degrees
12: Resize 50%/Mirror/Free rotate left 15 degrees
40: Resize 40%/Free rotate left 85 degrees
9: Resize 25% and 60%
49: Resize 80%/Duplciate/Mirror
11: Resize 25% and 25%/Duplicate/Resize 50%
Highlight the white background.
New Raster layer.
Select All
Copy and paste a paper of choice Into Selection.
Deselect.
Apply the mask.
Merge Group.
Add your credits.
Add your name.
I used Paper 11 for both foreground and background.
Give it a slight inner bevel:
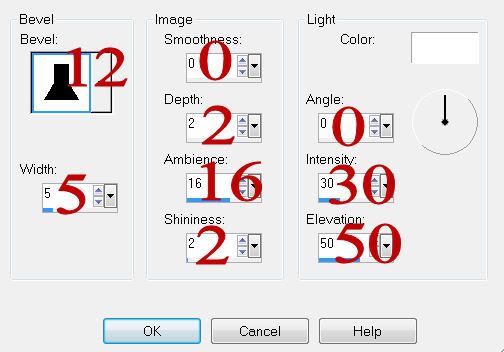
Resize all layers 80%.
I hope you enjoyed this tutorial.
I’d love to see your results and show it off in my gallery.
Email me!
Hugs,
Bev
Supplies
4 tubes of your choice - I used the artwork of Anna Marine and can be purchased from CILM.
Font of Choice - I used Fire of Ysgard Wide here
Divine Intentionz Template 346 here
Gem Mask 71 here
Greg’s Factory Output Vol. II - Pool Shadow
“Underworld” is a PTU tagger size scrap kit created by Heart of Essence and can be purchased from Lollipops n Gumdrops. You can visit her blog here.
Thank you HE for a stunning kit!
This tutorial was written assuming you have a working knowledge of PSP.
~♥~ Let’s get started ~♥~
Open up the template.
Shift + D.
Close out the original.
Delete the top 2 layers.
Resize all layers 90%
Image/Canvas Size
700 x 550
OK
Open up the background layer.
Flood fill white.
Highlight Circle Left layer.
Use your Magic Wand and click on it.
New Raster layer.
Copy and paste Paper 1 Into Selection.
Apply Greg’s Factory Output Vol. II - Pool Shadow:

Copy and paste one of your tubes as a new layer.
Move into position over the circle.
Selections/Invert
Tap the delete key.
Deselect.
Delete the template layer.
Change the Properties to Soft Light.
Duplicate
Change the Properties to Overlay
Highlight Small Circle Left layer.
Click on it with your Magic Wand.
New Raster layer.
Copy and paste Paper 5 Into Selection.
Adjust/Add Remove Noise/Add Noise:
Monochrome and Gaussian checked.
Noise: 88%
OK
Deselect.
Delete the template layer.
Highlight Small Circle 2 Left layer.
Click on it with your Magic Wand.
New Raster layer.
Copy and paste Paper 12 Into Selection.
Apply the Pool Shadow effect (same settings as before) 3 times
Copy and paste Element 14 as a new layer.
Resize 60%
Selections/Invert
Tap the delete key.
Deselect.
Change the Properties to Hard Light.
Delete the template layer.
Highlight Small Circle 1 Right layer.
Click on it with your Magic Wand.
New Raster layer.
Copy and paste Paper 5 Into Selection.
Apply the same Noise effect.
Deselect.
Delete the template layer.
Highlight Small Circle 2 Right layer.
Click on it with your Magic Wand.
New Raster layer.
Copy and paste Paper 15 Into Selection.
Apply the Pool Shadow Effect (same settings as before) 2 times.
Deselect.
Delete the template layer.
Highlight Glittered Circle Large layer.
Apply the Noise effect.
Higlight Glittered Circle left layer.
Apply the same Noise effect.
Highlight Circle Large layer.
Click on it with your Magic Wand.
New Raster layer.
Copy and paste Paper 13 Into Selection.
Apply the Pool Shadow Effect - same settings.
New Raster layer.
Copy and paste Element 19 Into Selection.
Apply Pool Shadow Effect:

Deselect.
Delete the template layer.
Highlight Frame Background layer.
Click on each of the squares.
New Raster layer.
Copy and paste Paper 11 Into Selection.
Deselect.
Delete the template layer.
Highlight Frame layer.
Click on it with your Magic Wand.
New Raster layer.
Copy and paste Paper 5 Into Selection.
Apply the same Noise effect.
Deselect.
Delete the template layer.
Copy and paste one of your tubes as a new layer.
Move into position beneath the left square of the frame.
Highlight the frame layer.
Click inside that square with your Magic Wand.
Selections/Modify/Expand by 2.
Selections/Invert
Highlight the tube layer.
Tap the delete key.
Deselect.
Change the Properties to Hard Light.
Duplicate
Change the Properties to Multiply.
Repeat the above step with the far right square.
Highlight Rectangle layer.
Click on it with your Magic Wand.
New Raster layer.
Copy and paste Paper 2 Into Selection.
Apply the Pool Shadow effect - same settings as before.
Deselect.
Delete the template layer.
Copy and paste your main tube as a new layer.
Add your embellishments. I used:
33: Resize 25% and 80%/Free rotate right 15 degrees
12: Resize 50%/Mirror/Free rotate left 15 degrees
40: Resize 40%/Free rotate left 85 degrees
9: Resize 25% and 60%
49: Resize 80%/Duplciate/Mirror
11: Resize 25% and 25%/Duplicate/Resize 50%
Highlight the white background.
New Raster layer.
Select All
Copy and paste a paper of choice Into Selection.
Deselect.
Apply the mask.
Merge Group.
Add your credits.
Add your name.
I used Paper 11 for both foreground and background.
Give it a slight inner bevel:

Resize all layers 80%.
I hope you enjoyed this tutorial.
I’d love to see your results and show it off in my gallery.
Email me!
Hugs,
Bev

Could you supply the links to the supplies?
ReplyDeleteThanks
HUGE apologies for that! Was late last night when I posted it:S Links are all working now♥
ReplyDelete