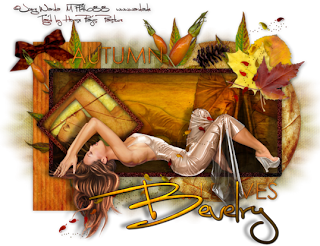
Clicking on the image will allow you to enlarge for bigger view.
Supplies
1 tube of your choice (laying down one will work best) - I used the artwork of Joerg Warda and can be purchased from MPT.
Font of Choice - I used Luna Bar here
Mythical’s Template which can be found on Creative Misfits blog here - it’s on Sept. 26th
Weescotlass Mask 138 here
Greg’s Factory Output Vol. II - Pool Shadow
“Welcome Autumn” is a PTU tagger size scrap kit created by Kesha of KnC Scraps and can be purchased from her store Lollipops n Gumdrops. You can visit her blog here.
Kesha, this kit captures autumn for sure! Thank you!
This tutorial was written assuming you have a working knowledge of PSP.
~♥~ Let’s get started ~♥~
Open up the template.
Shift + D.
Close out the original.
Delete the top 2 layers.
Image/Canvas Size
700 x 600
OK
Flood fill the background layer white.
Highlight Raster 1 layer.
Use your Magic Wand and click on it.
New Raster layer.
Copy and paste PP 10 Into Selection.
Deselect.
Delete the template layer.
Highlight Raster 2 layer.
Click on it with your Magic Wand.
New Raster layer.
Copy and paste PP5 Into Selection.
Deselect.
Delete the template layer.
Highlight Raster 3 layer.
Click on it with your Magic Wand.
New Raster layer.
Copy and paste PP 7 Into Selection.
Deselect.
Delete the template layer.
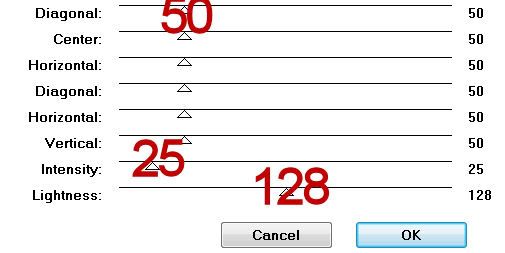
We’ll come back to apply the tube a bit later. For now apply Greg’s Factory Output Vol. II - Pool Shadow:

Highlight Raster 4 layer.
Click on it with your Magic Wand.
New Raster layer.
Copy and paste PP 1 Into Selection.
Adjust/Add Remove Noise/Add Noise:
Monochrome and Gaussian checked
Noise: 50%
OK
Deselect.
Delete the template layer.
Repeat the above step with Raster 7.
Highlight Raster 5 layer.
Select All/Float/Defloat
Copy and paste Paper 7 Into Selection.
Apply Greg’s Factory Output Vol. II - Pool Shadow:

Deselect.
Delete the template layer.
Highlight Raster 6 layer.
Click on it with your Magic Wand.
New Raster layer.
Copy and paste PP 8 Into Selection.
Deselect.
Delete the template layer.
Copy and paste your tube as a new layer.
Move it into the exact position where you want it.
Duplicate/Resize a bit larger.
Move the duplicate layer just above the diamond paper in your layers pallet.
Duplicate
Move this tube just above the rectangle paper in your layers pallet.
Highlight the rectangle paper.
Click anywhere outside of it with your Magic Wand.
Highlight the tube layer just above the rectangle paper.
Tap the delete key.
Deselect.
Highlight the diamond paper.
Click anywhere outside of it with your Magic Wand.
Highlight the tube layer just above the paper.
Tap the delete key.
Deselect.
Change the Properties of both tube layers to Multiply.
Add your embellishments. I used:
Bow 1: Resize 25% and 80%/Free rotate left 10 degrees
Leaf 3: Resize 30%
Leaf 2: Resize 30%
Leaf 1: Resize 30%
Branch 2: Resize 30%
Element 4: Resize 40%
Element 4 again: Resize 25%/Flip/Mirror
Pinecone: 25% and 70%
Leaves 1: Resize 40%
Highlight the white background.
New Raster layer.
Select All
Copy and paste a paper of choice Into Selection.
Deselect.
Apply the mask.
Merge Group.
Move to the left of your canvas.
Duplicate/Mirror
If the middle is too dark then use your Eraser Tool and erase the overlap.
Add your credits.
Add your name.
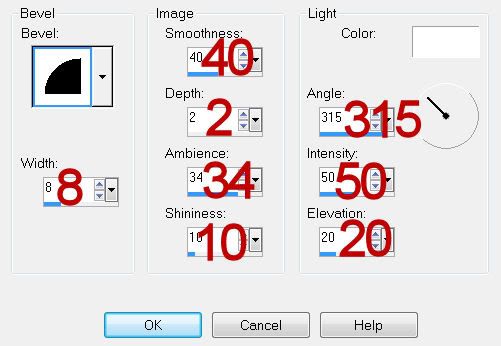
Give it a slight inner bevel.

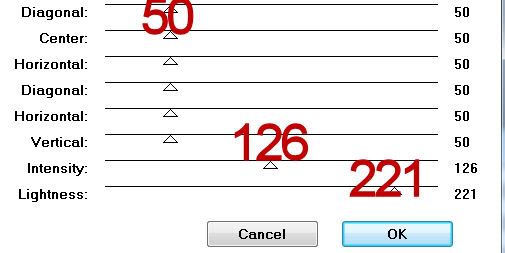
Apply the Pool Shadow effect and toy with the Lightness bar to get the affect you like.
Resize all layers 80%.
I hope you enjoyed this tutorial.
I’d love to see your results and show it off in my gallery.
Email me!
Hugs,
Bev

No comments:
Post a Comment