
Supplies
1 tube of your choice - I used the beautiful artwork of Anna Marine at CILM
Font of Choice - I used Bibliotheque here
Weescotlass Mask 286 here
Eyecandy 5: Nature - Fire
Animation Shop
“Vindictive Pleasures” is a PTU scrap kit created by
Jessica of Gothic Inspirations and can be purchased at Scraps with Attitude. You can visit her blog here.
Thank you Jessica for another stunning Goth kit!
~♥~ Let’s get started ~♥~
Open up a 700 X 700 blank canvas.
Flood fill white.
In your color pallet:
Foreground - Null
Background: 9f6d8f (or whatever color you prefer)
Make your Ellipse Tool active, set on Circle
Create a Circle 525 X 525
Convert to Raster Layer.
Click on it with you Magic Wand.
New Raster layer.
Flood fill black
Deselect
Resize 95%
Highlight the lavendar circle layer.
Adjust/Add Remove Noise/Add Noise
Uniform and Monochrome checked
25%
OK
Highlight the Black Circle layer.
Click on it with your magic Wand.
Selections/Modify/Contract by 10
New Raster layer.
Copy and paste Paper 17 Into Selection
Deselect.
Copy and paste Parchment Tab as a new layer.
Use your Target Tool and change it to the lavender color - or whatever color you prefer.
Center it over the paper circle layer.
Copy and Paste Frame 1 as a new layer.
Resize 50%
Move into position at the left side of your canvas.
Duplicate/Mirror
Highlight the left frame.
Click inside with your Magic Wand.
Selections/Modify/Expand by 3
New Raster layer below the frame.
Copy and paste Paper 17 Into Selection.
Copy and paste your tube as a new layer below the frame.
Selections/Invert
Tap the delete key.
Change the Properties to Luminance Legacy.
Lower the Opacity to about 51 or so.
Repeat the above step with the frame on the right.
Copy and paste your tube as a new layer.
Give your tube an exaggerated drop shadow.
Copy and paste Candle as a new layer
Resize 25% and 70%
Duplicate/Mirror
Duplicate/Resize 80%
Duplicate/Mirror
Move the candles into exact position.
Merge Visible all candle layers.
Give the merged candle layer a drop shadow (NOT EXAGGERATED - WE’LL DO THAT LATER) and be sure “Shadow on new layer” is checked.
Use your Freehand Selection Tool - zoom in - and section out the drop shadow from the tops of the candles and up. (You don’t want any darkness or shadows higher than the candle tops)
Be sure the shadow layer is highlighted and tap the delete key.
Deselect.
Merge Visible the candle layer and its drop shadow.
Now you can go ahead and give it the same exaggerated drop shadow you did with your tube.
Create 3 new layers above the candle layer.
Rename them Flame 1, 2, and 3.
Highlight the candle layer.
Using your Freehand Selection Tool - zoom in - carefully trace around the flame of each candle.
Highlight Flame 1 layer and apply Eyecandy 5: Nature - Fire
On the Settings Tab:
Small, Candle
Basic Tab:
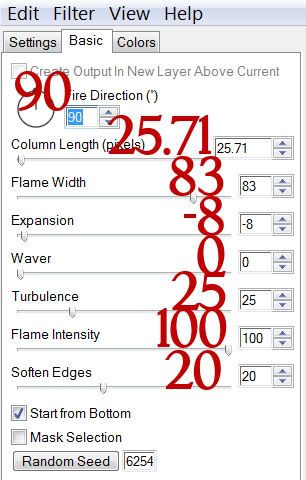
OK.
Highlight Flame 2 layer.
Apply the same fire effect accept hit the Random Seed button once.
OK
Highlight Flame 3 layer.
Repeat the above step.
Be sure Flame 2 and 3 layers are closed out.
Add your embellishments. I used:
Shelf: Resize 50%
Chess Piece: Resize 25% and 25%/Duplicate/Mirror. Duplicate/Free rotate left 90 degrees
Twig: Resize 80%/Free rotate left 10 degrees
Ribbon 2: Resize 30%
Flower 2: Resize 25%/Duplicate/Mirror
Flower 2 again: Resize 25% and 80%/Flip/Mirror/Duplicate
Highlight your white background.
Select All
New Raster layer.
Copy and paste a of choice Into Selection.
Deselect.
Apply the mask.
Merge Group.
Resize 96%
Add your credits.
Add your name.
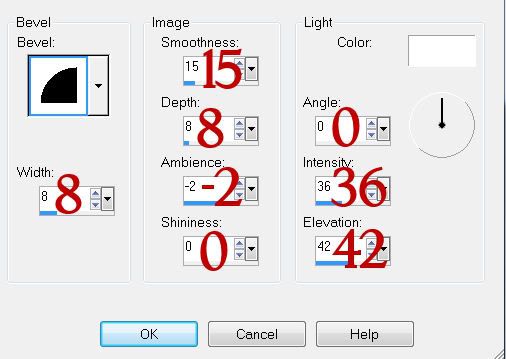
Give it a slight inner bevel:
Copy Merge
~Time to Animate~
Open up Animation Shop.
Edit/Paste/As New Animation.
Back in PSP.
Close out Flame 1.
Open up Flame 2.
Copy Merge
Carry into AS.
Edit/Paste/After Current Frame.
Back in PSP.
Close out Flame 2.
Open up Flame 3.
Copy Merge.
Carry into AS.
Edit/Paste/After Current Frame.
Ctrl + A to highlight all frames.
Animation/Frame Properties
Display Time: 23
OK
Animation/Resize Animation
Percentage of Original checked
Width x Height: 80
OK
View your Animation.
If you’re happy then save.
I hope you enjoyed this tutorial.
I’d love to see your results and show it off in my gallery.
Email me!
Hugs,
Bev
No comments:
Post a Comment