Supplies
2 tubes of your choice - I used the awesome artwork of Ismael Rac at his site here
Font of Choice - I used Arctic 2 here
Gem Mask 22 here
Divine Intentionz Template 352 here
Mura Meister - Copies
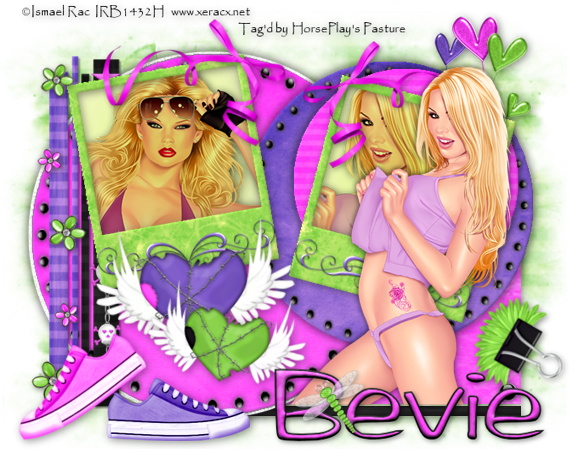
“Emolicious” is a PTU tagger size scrap kit created by Nikki of Creative Intensionz and can be purchased from her store Twilight Scraps. You can visit her blog here.
Thank you Nikki for such a fun kit! I really had a lot of fun with this one!!
This tutorial was written assuming you have a working knowledge of PSP.
~♥~ Let’s get started ~♥~
Open up the template.
Shift +D.
Close out the Original.
Resize all layers 90%
Image/Canvas Size
700 X 600
OK
Open up the white background layer and flood fill white.
Delete the credit layer and word art layer.
Highlight Square Shape layer.
Click on it with your Magic Wand.
New Raster layer.
Copy and paste a paper of choice Into Selection.
Deselect.
Delete the template layer.
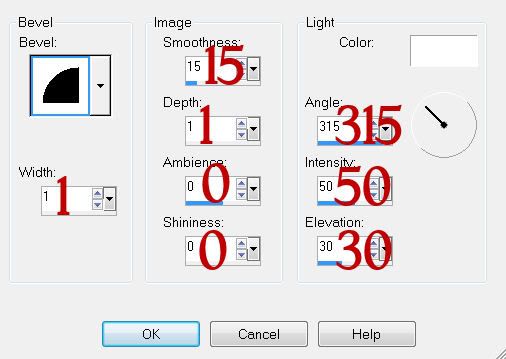
Give it a slight inner bevel:

Highlight Raster 1 layer.
Repeat the above step.
Highlight Large Circle layer.
Repeat the above step accept DO NOT DELETE THE TEMPLATE LAYER. Just close it out for now.
Highlight Thin Rectangle 2 layer.
Merge Down.
Both pink rectangle layers should be on the same layer.
Click on both with your Magic Wand.
New Raster layer.
Copy and paste a paper of choice Into Selection.
Deselect.
Delete the template layer.
Give it the same slight inner bevel.
Highlight Thin Rectangle 4 layer.
Merge down.
Both black rectangle layers should be on the same layer.
Repeat the above step.
Highlight Med Circle layer.
Click on it with your Magic Wand.
New Raster layer.
Copy and paste a paper of choice Into Selection.
Deselect.
Give it the same slight inner bevel.
DO NOT DELETE THE TEMPLATE LAYER. Instead just close it out.
Highlight Small Circle layer.
Click on it with your Magic Wand.
New Raster layer.
Copy and paste a paper of choice Into Selection.
Deselect.
Delete the template layer.
Give it the same slight inner bevel.
Highlight Polaroid 1 by Missy layer.
Click on the white area with your Magic Wand.
New Raster layer.
Copy and paste a paper of choice Into Selection.
Deselect.
Give it the same slight inner bevel.
Delete the template layer.
Click inside frame with your Magic Wand.
Selections/Modify/Expand by 3
New Raster layer below the frame.
Flood fill with a gradient of choice.
Copy and paste your tube as a new layer below the frame.
Selections/Invert
Tap the delete key.
Change the Properties to Multiply.
Deselect.
Highlight Polaroid 2 by Missy layer.
Repeat the above 2 steps using a different tube.
Copy and paste the same tube you used in Polaroid 1 as a new layer.
Copy and paste Glass Brad 1 as a new layer.
Resize 25% and 30%
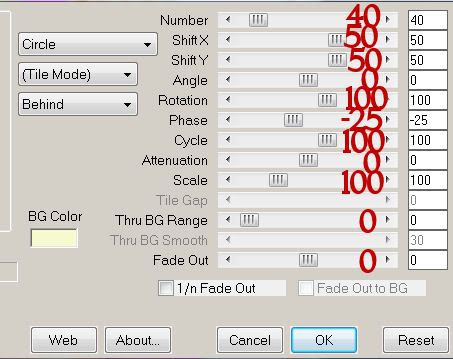
Apply Mura Meister Copies:

Edit/Copy
Highlight the Large Circle template layer.
Click on it with your Magic Wand.
Highlight the paper of the template layer.
New Raster layer.
Selections/Modify/Contract by 5
Edit/Paste Into Selection
Deselect.
Delete the Original Glass Brad 1 ring layer and the template layer.
Copy and paste Glass Brad 1 again.
Resize 25% and 30%
Apply Mura Meister Copies: same settings
Edit/Copy
Highlight the Med Circle template layer.
Click on it with your magic wand.
Highlight the paper of the template layer.
New Raster layer.
Selections/Modify/Contract by 5
Edit/Paste Into Selection
Deselect.
Delete the Original Glass Brad 1 ring layer and the template layer.
Copy and paste Doodle 2 as a new layer.
Resize 25% & 60%
Duplicate/Mirror
Bring both of them together
Merge Down
Free rotate left 10 degrees - move it into position at the bottom of the left Polaroid frame.
Duplicate/Mirror/Free rotate right 5 degrees - move into position at he bottom of the right Polaroid frame.
Add your embellishments. I used:
Wired Hearts 3: Resize 35%/Free rotate right 10 degrees
Wired Hearts 1: Resize 40%/Mirror
Wired Hearts 2: Resize 30%
Mini Flower 2: Resize 30%
Mini Flower 4: Resize 50%/Duplciate/Resize 90%/Duplicate/Resize 90%
Barbed Wire Heart 1: Resize 50%/Free rotate left 5 degrees
Barbed Wire Heart 2: Resize 40%/Free rotate right 10 degrees
Skull Chain 1: Resize 80%
Bow Ribbon 1: Resize 40%/Duplicate/Mirror
Binder Clip 3: Resize 50%/Free rotate right 120 degrees
Shoe 1: Resize 50%/Mirror/Free rotate left 35 degrees
Shoe 2: Resize 50%
Dragonfly 3: Resize 30%
Crop you image slightly.
Highlight your white canvas.
New Raster layer.
Select All
Copy and paste a paper of choice Into Selection.
Deselect.
Apply the mask.
Merge Group.
Use your Pick Tool to pull it out just a tad.
Add your credits.
Add your name.
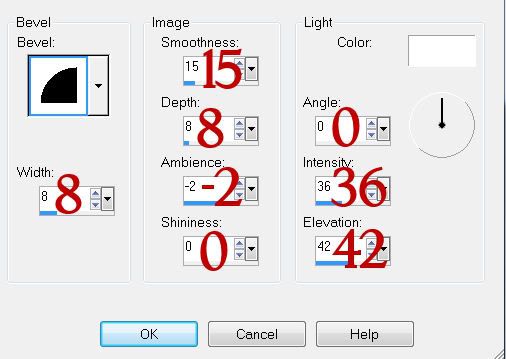
Give it a slight Inner Bevel:

Resize all layers 85%.
I hope you enjoyed this tutorial.
I’d love to see your results and show it off in my gallery.
Email me!
Hugs,
Bev

No comments:
Post a Comment