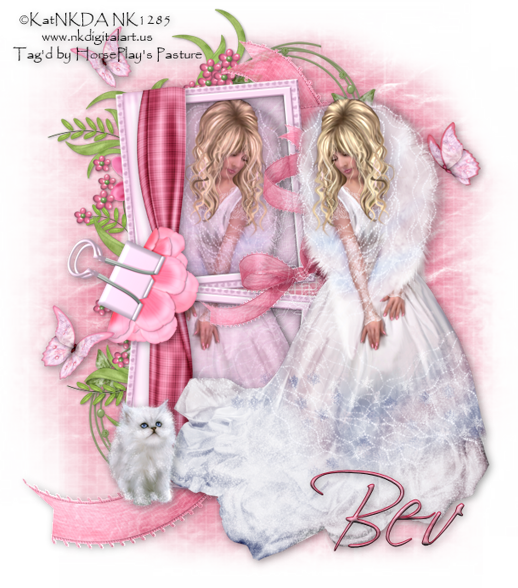
Supplies
1 tube of your choice - I used the beautiful artwork of KatNKDA at NK Art Shop
Font of Choice - I used Scriptina
JWY mask 10 here - If you know how this mask belongs to please email me so that I can give proper credit and link to their site for download.
“Tinker Bell” is a PTU tagger size scrap kit created by Heike of Fantasy Dreams Designz and can be purchased at Heartbeatz Creationz. You can visit her blog here.
Thank you Heike for such a dreamy kit!
This tutorial was written assuming you have a working knowledge of PSP.
~♥~ Let’s get started ~♥~
Open up a 700 X 700 blank canvas.
Flood fill white.
Copy and paste FR1 as a new layer.
Resize 35%
Duplicate
Move the frames into position - see my tag for reference.
Free rotate the top frame left 5 degrees
Free rotate the bottom frame right 5 degrees.
Copy and paste your tube as a new layer.
Move all 3 elements into the exact position.
Highlight the top frame.
Click inside of it with your Magic Wand.
New Raster layer below the frame.
Copy and paste a paper of choice Into Selection.
Deselect for now.
Highlight the bottom frame.
Repeat the above step.
Highlight your tube layer.
Duplicate/Mirror/Move into position behind the top frame.
Duplicate/Move into position behind the bottom frame.
Highlight the paper layer of the bottom frame.
Click anywhere outside of it with your Magic Wand.
Highlight the tube below the bottom frame.
Tap the delete key.
Deselect.
Highlight the paper of the top frame.
Click anywhere outside of the paper with your Magic Wand.
Highlight the tube below the top frame.
Tap the delete key.
Deselect.
Copy and paste Element 32 as a new layer.
Resize 50%
Free rotate left 65 degrees
Move into position - see my tag for reference.
Copy and paste El 55 as a new layer.
Free rotate right 90 degrees
Resize 63%
Move into position below the clip and be sure the end of the ribbon is aligned with the top of the top frame.
Use your Eraser Tool and erase the part of the ribbon that’s sticking out from the side of the clip.
Add your embellishments. I used:
El 21: Duplicate/Flip
FR 12: Resize 35%/Duplciate
El 13 - Move behind both frames.
El 13 again: Resize 40%
El 91: Resize 30%
El 92; Resize 25% and 80%
Highlight your white canvas.
New Raster layer.
Select All
Copy and paste a paper of choice Into Selection.
Deselect.
Apply the mask.
Merge Group.
Add your credits.
Add your name.
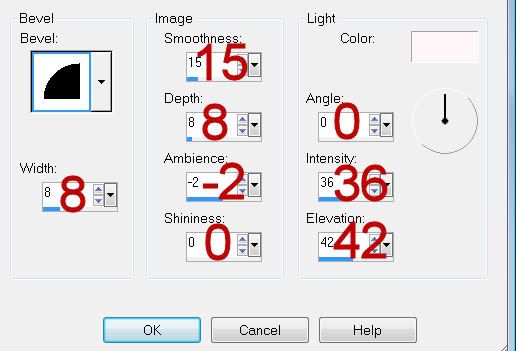
Give it a slight Inner Bevel:

Resize all layers 85%
I hope you enjoyed this tutorial.
I’d love to see your results and show it off in my gallery.
Email me!
Hugs,
Bev

No comments:
Post a Comment