Supplies
Font of Choice - I used SC Tina’s Baby Shower here
Weescotlass Mask 161 here
Greg’s Factory Output Vol. II - Pool Shadow
“Tinker‘s Dragon” is a PTU full size size scrap kit created by Pixie of Kissed by Pix Design and is free with any purchase of $6 or more at her store TKO Scraps. You can visit her blog here.
Thank you Pixie - this kit is an amazing free deal! No disapointments with this!!!
This tutorial was written assuming you have a working knowledge of PSP.
~♥~ Let’s get started ~♥~
Open up a 700 X 700 blank canvas.
Flood fill white.
Copy and paste Paper 1 as a new layer.
Resize 25% and 45%
Use your Magic Wand and click anywhere on your white canvas.
Selections/Invert
Selections/Modify/Contract by 10
OK
Tap the delete key.
Selections/Modify/Expand by 6.
New Raster layer below the new frame you just created.
Flood fill with a gradient of choice.
Deselect.
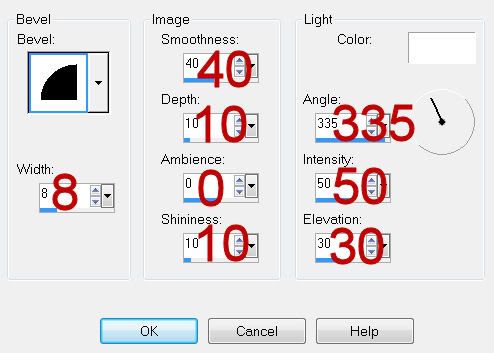
Give the frame an Inner Bevel:

Copy and paste Fairy House 1 as a new layer below the frame.
Mirror/Resize 50%
Move into position - see my tag for reference.
Copy and paste Magic Lights 6 as a new layer.
Resize 25%
Move into position.
Highlight the gradient layer.
Use your Magic Wand and click outside of it.
Highlight each of the elements above the gradient layer and tap the delete key.
Deselect.
Highlight the gradient layer again.
Apply Greg’s Factory Output Vol. II - Pool Shadow

Copy and paste Lady Bug Frame as a new layer.
Resize 25% and 50%
Duplicate
Move each frame into position - see my tag for reference.
Highlight the top Frame.
Click inside with your Magic Wand.
Selections/Modify/Expand by 2.
New Raster layer below the frame.
Flood fill with a gradient of choice.
Make Dragon 3 active.
Mirror/Copy
Highlight your canvas.
Edit/paste as a new layer below the frame.
Resize 25% and 40%
Change the Properties to Soft Light.
Move into position - see my tag for reference.
Selections/Invert
Tap the delete key.
Deselect.
Paste the dragon again above the frame.
Resize 25% and 40%
Move into position - see my tag for reference.
Highlight the bottom frame.
Repeat the above steps used for the top frame accept use Tinker 4.
Tinker 4 - Inside the frame: Resize 40%
Tinker 4 - Outside the frame: Resize 35%
Add your embellishments. I used:
Spiral 1: Resize 25% and 50% Free rotate right 20 degrees
Daisy: Resize 25% and 60%
String 1: Resize 25% and 50%
Ladder 1: Resize 25% and 40%
Vine 1: Resize 25% and 25%
Glitter Trail: Resize 25% and 70%
Dragonfly: Resize 25% and 50% Free rotate right 30 degrees
Flutterby: Resize 25% and 40% Free rotate left 30 degrees
Highlight your white background.
Select All
New Raster layer.
Copy and paste a paper of choice Into Selection.
Deselect.
Apply the mask.
Resize 110%
Merge Group.
Add your credits.
If you used the poser be sure to give Medi the credit.
Add your name.
Give it the same inner bevel.
Resize all layers 80%.
I hope you enjoyed this tutorial.
I’d love to see your results and show it off in my gallery.
Email me!
Hugs,
Bev


No comments:
Post a Comment