Supplies
1 tube of your choice - I used the beautiful artwork of Jennifer Janesko at CILM
Font of Choice - I used Black Heart Inertia
Gem Mask 21 here
Eyecandy 5: Nature - Fire
Animation Shop - Optional
“Dragon‘s Breath” is a PTU tagger size scrap kit created by Dee of Scraps by Dmg and can be purchased at The North Wing. You can visit her blog here.
Thank you Dee - this kit is more than awesome!!
This tutorial was written assuming you have a working knowledge of PSP.
~♥~ Let’s get started ~♥~
Quick Note:
First we’re going to assemble the entire tag and then go back and add the extra layers for the animation. It seems the easiest way without losing anyone.
Open up a 700 X 700 blank canvas.
Flood fill white.
Copy and paste Frame 8 as a new layer.
Resize 85%
Click inside of it with your Magic Wand.
Selections/Modify/Expand by 3.
New Raster layer below the frame.
Copy and paste Paper 14 Into Selection.
Copy and paste Dragon 1 as a new layer.
Move into position - see my tag for reference.
Selections/Invert
Tap the delete key.
Deselect.
Lower the Opacity to about 48 or so.
DO NOT give the frame a drop shadow yet if you intend to animate the tag.
Copy and paste Frame 5 as a new layer.
Resize 85%
Move to the left just a bit.
Click inside of all the openings with your Magic Wand.
Selections/Modify/Expand by 6.
New Raster layer below the frame.
Copy and paste Paper 24 Into Selection.
Deselect for now.
Copy and paste Fire Tower as a new layer.
Resize 40%
Move into position below the frame - see my tag for reference.
Copy and paste Glass Bobble Hanger as a new layer.
Resize 40%
Copy and paste Dragon 1 as a new layer.
Free rotate right 25 degrees.
Move into position - see my tag for reference.
Change the Properties to Luminance Legacy.
Highlight the frame layer again.
Click inside of all the openings with your Magic Wand.
Selections/Modify/Expand by 6
Selections/Invert
Highlight each of the elements below the frame and tap the delete key.
Deselect.
(I erased the part of the dragon that you could see in the left frame)
Copy and paste your tube as a new layer.
Add your embellishments. I used:
Brad 2: Resize 25% and 30%/Duplicate to decorate the corners of the frames
Candle: Resize
Frame 11: Resize 50%
Dragon 2
Gem 12 through 16: Choose which stars you want/Resize 60%
Highlight your white background.
Select All
New Raster layer.
Copy and paste a paper of choice Into Selection.
Deselect.
Apply the mask.
Merge Group.
Add your credits.
Add your name.
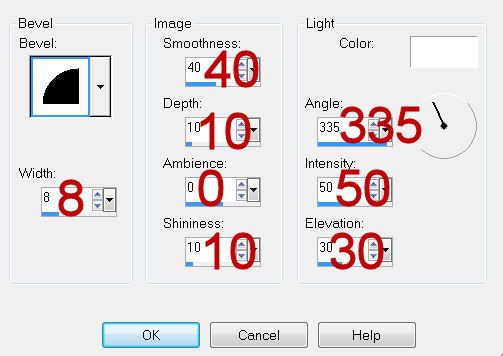
Give it a slight inner bevel:
Resize all layers 80%.
If you’re not going to animate then save.
If you are then lets continue…
Highlight the Candle layer.
Create 4 layers above it.
Name them C1, C2, C3, and C4
Highlight the Candle layer again.
Using your Freehand Selection tool outline the flame.
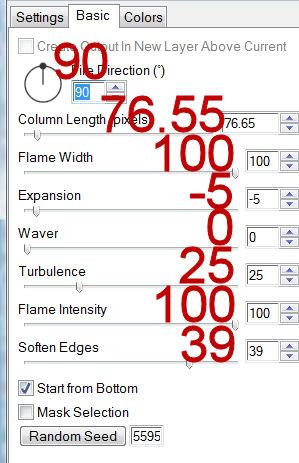
Highlight C1 and apply Eyecandy 5: Nature - Fire
In the Settings Tab:
Small Candle
In the Basic Tab:
OK
Highlight C2 layer.
Apply the Fire effect accept hit the random seed button once.
Repeat the above Step with C3 and C4.
Deselect.
Close out C2, C3, and C4 layers.
Highlight the paper of the round chain frame (Frame 8) layer.
Create 4 layers above it.
Rename them F1, F2, F3, and F4.
Highlight the chain frame.
Click inside of it with your Magic Wand.
Selections/Modify/Expand by 6.
Highlight F1 layer.
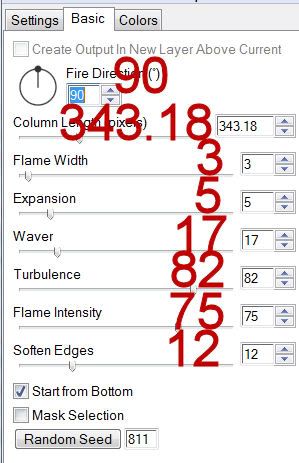
Apply Eyecandy 5: Nature - Fire
Settings Tab:
Medium, Campfire
Basic Tab:
OK
Highlight F2 layer.
Apply the fire effect accept hit the random seed button once.
Repeat the above step with layers F3 and F4.
DO NOT DESELECT YET!
Selections/Invert
Highlight each of the flame layers and tap the delete key.
Deselect.
Be sure to close out F2, F3, and F4 layers.
Give the chain frame a drop shadow now.
~ Onto the Animation ~
Copy Merge
Carry into Animation Shop.
Edit/Paste/As new Animation
Back in PSP.
Close out C1 and F1.
Open up C2 and F2.
Edit/Copy Merge
Carry into AS.
Edit/Paste/After Current Frame.
Back in PSP.
Close out C2 and F2.
Open up C3 and F3.
Edit/Copy Merge
Carry into AS.
Edit/Paste/After Current Frame
Back in PSP.
Close out C3 and F3.
Open up C4 and F4.
Edit/Copy Merge
Carry into AS.
Edit/Paste/After Current Frame.
Ctrl + A (to highlight all the frames)
Animation/Frame Properties
Change the number to 19.
View your animation.
If you’re happy then save.
I hope you enjoyed this tutorial.
I’d love to see your results and show it off in my gallery.
Email me!
Hugs,
Bev

No comments:
Post a Comment