

Clicking on the image will enlarge to full view.
Supplies
1 tube of your choice - I used the beautiful artwork of Ida Larsen at MPT
Font of Choice - I used Annabelle here
Weescotlass Mask 138 here
“Endless Love” is a PTU scrap kit created by Kara of Sweet Cravings Scraps and can be purchased at TKO Scraps. You can visit her blog here.
Thank you Kara for a truly amazing kit! The possibilities are endless for the imagination.
This tutorial was written assuming you have a working knowledge of PSP.
~♥~ Let’s get started ~♥~
Open up a 700 X 700 blank canvas.
Flood fill white.
Copy and paste Balcony as a new layer.
Resize 65%
Use your Freehand Selection Tool and outline the opening of the balcony. Be sure to go all the way to the “floor” when outlining.

New Raster layer below the balcony.
Copy and paste Paper 15 Into Selection.
Deselect.
Copy and paste your tube as a new layer.
Give your tube an exaggerated drop shadow to throw on the wall.
Copy and paste Trillis Vine as a new layer.
Position to the left of the balcony - behind the door.
See my tag for reference.
Copy and paste Flowers 4 as a new layer.
Move into position - see my tag for reference.
Highlight your white background.
Select All
Selection/Modify/Feather
Number of Pixels:
43
OK
Selections/Invert
Highlight the Flowers layer and tap the delete key until you have a nice feathered look.
Highlight your trellis layer and erase any that is sticking out above the flowers.
Add your embellishments. I used:
Catty Nine Tails: Resize 40%
Grass: Resize 80%
Bow 4: Resize 25%
Flowers 3: Resize 25% and 25%
Highlight your white background.
Select All
New Raster layer.
Copy and paste a Paper 17 Into Selection.
Deselect.
Copy and paste Castle Mountain as a new layer above the paper.
Move it into position - see my tag for reference.
Merge Down.
Apply the mask.
Resize 120%
Merge Group.
Add your credits.
Add your name.
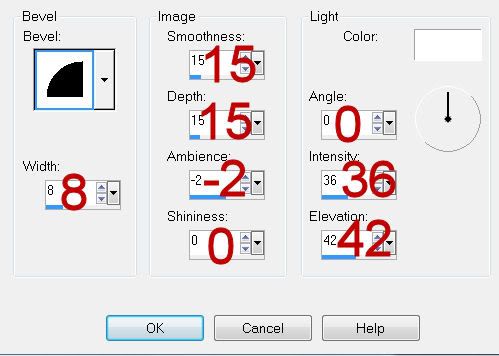
Give it a slight inner bevel:
Resize all layers 80%.
I hope you enjoyed this tutorial.
I’d love to see your results and show it off in my gallery.
Email me!
Hugs,
Bev
Supplies
1 tube of your choice - I used the beautiful artwork of Ida Larsen at MPT
Font of Choice - I used Annabelle here
Weescotlass Mask 138 here
“Endless Love” is a PTU scrap kit created by Kara of Sweet Cravings Scraps and can be purchased at TKO Scraps. You can visit her blog here.
Thank you Kara for a truly amazing kit! The possibilities are endless for the imagination.
This tutorial was written assuming you have a working knowledge of PSP.
~♥~ Let’s get started ~♥~
Open up a 700 X 700 blank canvas.
Flood fill white.
Copy and paste Balcony as a new layer.
Resize 65%
Use your Freehand Selection Tool and outline the opening of the balcony. Be sure to go all the way to the “floor” when outlining.
New Raster layer below the balcony.
Copy and paste Paper 15 Into Selection.
Deselect.
Copy and paste your tube as a new layer.
Give your tube an exaggerated drop shadow to throw on the wall.
Copy and paste Trillis Vine as a new layer.
Position to the left of the balcony - behind the door.
See my tag for reference.
Copy and paste Flowers 4 as a new layer.
Move into position - see my tag for reference.
Highlight your white background.
Select All
Selection/Modify/Feather
Number of Pixels:
43
OK
Selections/Invert
Highlight the Flowers layer and tap the delete key until you have a nice feathered look.
Highlight your trellis layer and erase any that is sticking out above the flowers.
Add your embellishments. I used:
Catty Nine Tails: Resize 40%
Grass: Resize 80%
Bow 4: Resize 25%
Flowers 3: Resize 25% and 25%
Highlight your white background.
Select All
New Raster layer.
Copy and paste a Paper 17 Into Selection.
Deselect.
Copy and paste Castle Mountain as a new layer above the paper.
Move it into position - see my tag for reference.
Merge Down.
Apply the mask.
Resize 120%
Merge Group.
Add your credits.
Add your name.
Give it a slight inner bevel:
Resize all layers 80%.
I hope you enjoyed this tutorial.
I’d love to see your results and show it off in my gallery.
Email me!
Hugs,
Bev
No comments:
Post a Comment