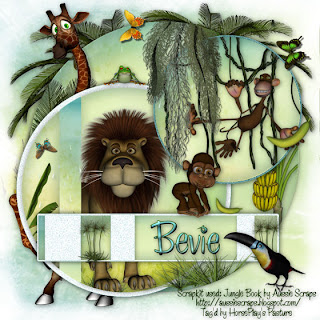
Clicking on the image will enlarge to full view.
Supplies
Font of Choice - I used Chicken Basket - a pay font
Gem’s Mask 166 here
Divine Intentionz Template 298 here.
“Jungle Book” is a PTU fullsize size scrap kit created by Gail of Aussie Scraps and can be purchased at her store Aussie Scrap Designs. You can visit her blog here.
Thank you Gail for such a fun kit! Loved it!!
This tutorial was written assuming you have a working knowledge of PSP.
~♥~ Let’s get started ~♥~
Open up the template.
Image/Canvas Size
700 X 700
Open up the background layer and flood fill white.
Delete the following template layers:
By Missy, Diamonds, Hearts, Maintenance, So High, Pixel Words, and Stars
In this tutorial we won’t be deleting any template layers but rather closing them out.
Highlight Circle layer (the black one just above the white background layer)
Click on it with your Magic Wand.
Copy and paste BG2 as a new layer.
Resize 25% and 60%
Selections/Invert
Tap the delete key.
Deselect.
Paste the paper again.
Flip
Resize 25% and 60%
Highlight the template layer and click on it with your Magic Wand.
Selections/Invert
Highlight the paper and tap the delete key.
Deselect.
Use your Eraser tool and erase the top half of the paper - this is just to have a uniform color to the circle and no pictures from the paper showing.
Merge Down.
Close out the template layer.
Highlight (the pink) Circle layer.
Use your Magic Wand and click on both portions of it.
Copy and paste BG1 as a new layer.
Resize 25% and 60%
Selections/Invert
Tap the delete key.
Deselect.
Close out the template layer.
Make your Target Tool active.
Change the foreground in your Color Pallet to a color of your choosing -
I used a blue shade from the paper.
Highlight Glittered Circle 1 layer.
Use your Target Tool to change the color.
Highlight Thin Rectangle layer.
Use your Magic Wand and click on it.
Copy and paste BG6 as a new layer.
Resize 25% and 60%
Move it into position.
Selections/Invert
Tap the delete key.
Deselect.
Close out the template layer.
Highlight Glittered Rectangle layer.
Use your Target Tool on this layer to change the color the same as the other.
Highlight Rectangle layer.
Copy and paste BG6 as a new layer.
Resize 25% and 60%
Move it into position.
Selections/Invert
Tap the delete key.
Deselect.
Close out the template layer.
Highlight Small Rectangle Shapes layer.
Use your Target Tool on this layer.
Highlight Glittered Circle 2 layer.
Repeat the above step.
Highlight Small Circle layer.
Use your Magic Wand and click on it.
Copy and pate BG6 as a new layer.
Resize 25% and 60%
Move into position.
Selections/Invert
Tap the delete key.
Deselect.
Close out the template layer.
Now we’re going to add the embellishments. See my Tag for reference on any that you need to.
Copy and paste TG2 as a new layer.
Resize 35%
Move into position.
Adjust/Brightness and Contrast
Brightness/Contrast
Brightness: 35
Contrast: 35
OK
Copy and paste Banana Tree as a new layer.
Resize 35%
Move into position over the paper of the largest circle.
Highlight the black template layer (you don’t have to open the layer up) and click on it with your Magic Wand.
Selections/Invert
Highlight the banana tree.
Use your Eraser Tool and erase all of the tree that overhangs the circle.
Deselect.
Copy and paste Vines 2 as a new layer.
Resize 25% and 85%
Highlight the template layer (You don’t have to open it up) and click on it with your Magic Wand.
Move the vine into exact position
Selections/Invert
Highlight the vine layer.
Use your Eraser Tool and erase all that is outside of the circle.
Deselect.
Copy and pate MB1 as a new layer.
Resize 25% and 85%
Free rotate right 20 degrees
Move into position.
Copy and paste Banana as a new layer.
Resize 25% and 25%
Place it in the Monkey’s hand.
Copy and paste Moss 1 as a new layer.
Resize 25% and 85%
Highlight the large black circle template layer and click on it with your Magic Wand.
Selections/Invert
Tap the delete key.
Deselect.
Copy and paste the Lion as a new layer.
Resize 25%
Move into position
Highlight the pink circle template layer and click on it with your Magic Wand.
Selections/Invert
Highlight the lion and tap the delete key.
Deselect.
Copy and paste Grasses 1 as a new layer.
Resize 25% and 45%
Highlight the black circle template layer and click on it with your Magic Wand.
Selections/Invert
Highlight the grass layer.
Tap the delete key.
Deselect.
Copy and paste BM5 as a new layer.
Resize 25% and 60%
Copy and paste the banana as a new layer.
Resize 25%, 25%, and 60%
Free rotate right 65 degrees.
Copy and paste Papyrus 1 as a new layer.
Resize 25%, 25%, and 60%
Duplicate
Copy and pate Toucan 1 as a new layer.
Resize 25%nad 35%
Copy and paste Palm Tree 2 as a new layer.
Resize 40%
Duplicate/Mirror
Copy and paste the Frog as a new layer.
Resize 25% and 25%
Copy and paste Butterflies 1, 2, and 4:
Resize all 25% and 40%
Highlight your white background.
New Raster layer.
Select All.
Copy and paste a paper of choice Into Selection.
Deselect.
Duplicate/Flip
Use your Eraser Tool and erase the top half of the paper so that you don’t see any of the picture on the paper and it appears as if the entire canvas is the yellow/blue color only.
Merge Down.
Apply the mask.
Merge Group.
Duplicate/Merge Down
Duplicate/Merge Down
Add your copyrights.
Add your name.
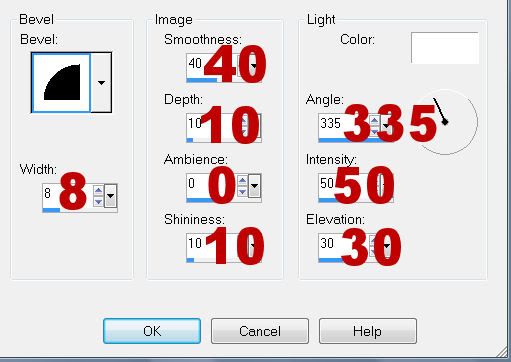
Give it a slight inner bevel:

Resize all layers 80%.
I hope you enjoyed this tutorial.
I’d love to see your results and show it off in my gallery.
Email me!
Hugs,
Bev

No comments:
Post a Comment