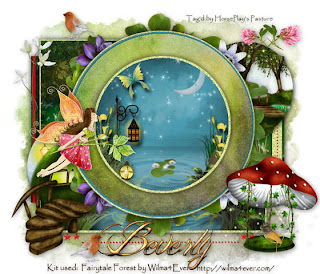
 Clicking on the image will enlarge to full view.
Supplies
Font of Choice - I used Billy Argel here
Becky Mask 22 here
Divine Intentionz Template 329 here.
“Fairytale Forest” is a PTU tagger size size scrap kit created by Wilma of Wilma4Ever and can be purchased at her store here. You can visit her blog here.
Thank you Wilma for such a beautiful kit! Just gorgeous!
This tutorial was written assuming you have a working knowledge of PSP.
~♥~ Let’s get started ~♥~
Open up the template.
Resize all layers 85%
Image/Canvas Size
700 X 600
Open up the background layer and flood fill white.
Delete the top 3 layers.
Highlight Shape 1 layer.
Click on it with your Magic Wand.
New Raster layer.
Copy and paste Paper 5 Into Selection.
Deselect.
Delete the template layer.
Highlight Thin Rectangle 1 layer.
Select All/Float/Defloat
New Raster layer.
Flood fill with a color of choice.
Deselect.
Delete the template layer.
Highlight Dotted Line 1 layer.
Repeat the above step using the same color.
Highlight Stars layer.
Repeat the above step using the same color.
Highlight Shape 2 layer.
Use your Magic Wand and click on it.
Copy and paste Paper 5 as a new layer.
Resize 60%
Move it into position.
Selections/Invert
Tap the delete key.
Deselect.
Delete the template layer.
Highlight Thin Rectangle 2 layer.
Select All/Float/Defloat
New Raster layer.
Flood fill with a light color of choice.
Adjust/Add Remove Noise/Add Noise
Uniform and Monochrome checked
Noise: 45%
OK
Deselect.
Delete the template layer.
Highlight Dotted Line 2 layer.
Select All/Float/Defloat
New Raster layer.
Flood fill with the same color you used on the Thin Rectangle layer.
Deselect.
Delete the template layer.
Highlight Glittered Rectangle layer.
Select All/Float/Defloat
New Raster layer.
Flood fill with the same color you used for Thin Rectangle 2 layer.
Apply the same Noise
Deselect.
Delete the template layer.
Highlight Rectangle layer.
Click on it with your Magic Wand.
Copy and paste Paper 5 as a new layer.
Resize 60%
Move into position.
Selections/Invert
Tap the delete key.
Deselect.
Delete the template layer.
Highlight Glittered Thin Rectangle layer.
Repeat the same step you used on Glittered Rectangle layer.
Highlight Thin Rectangle layer.
Click on it with your Magic Wand.
New Raster layer.
Copy and paste Paper 1 as a new layer.
Resize 60%
Move into Position.
Selections/Invert
Tap the delete key.
Deselect.
Delete the template layer.
Highlight Small Circle layer.
Select All/Float/Defloat
Copy and paste Paper 14 as a new layer.
Resize 40%
Move into position.
Selections/Invert
Tap the delete key.
Duplicate
Change Properties to Multiply.
Make the element “House” active.
Mirror
Copy and paste it as a new layer.
Resize 50%
Move into position.
Tap the delete key.
Deselect.
Delete the template layer.
Highlight Small Circle 2 layer.
Select All/Float/Defloat
Copy and paste Paper 14 as a new layer.
Resize 40%
Move into position.
Selections/Invert
Tap the delete key.
Duplicate
Change Properties to Multiply.
Copy and patse Bridge Scene as a new layer.
Resize 25%
Move into position.
Tap the delete key.
Copy and paste Tree as a new layer.
Resize 50%
Move into position.
Tap the delete key.
Make the element from the kit active again.
Mirror
Copy and paste as a new layer.
Resize 50% and 50%
Move into position.
Tap the delete key.
Deselect.
Delete the template layer.
Highlight Glittered Circle 1 layer.
Select All/Float/Defloat
New Raster layer.
Flood fill with the same color you used on the other glittered layers.
Apply the same Noise.
Deselect.
Delete the template layer.
Highlight Circle 1 layer.
Click on it with your Magic Wand.
New Raster layer.
Flood will with another color of your choice.
Deselect.
Delete the template layer.
Highlight Circle 2 layer.
Click on it with your Magic Wand.
New Raster layer.
Copy and paste Paper 15 Into Selection.
Duplicate
Change the Properties to Multiply.
Deselect.
Delete the template layer.
Highlight Glittered Circle 2 layer.
Repeat the same step you used for the other glittered circle.
Highlight Circle 3 layer.
Click on it with your Magic Wand.
New Raster layer.
Copy and paste Paper 1 Into Selection.
Deselect.
Delete the template layer.
Copy and paste Frame 2 as a new layer.
Move into position behind the largest circle - see my tag for reference.
Move the frame so that the leaves and flowers are peeking around the top half of the circle.
Duplciate/Flip/Mirror
Move that frame so that the leaves and flowers are peeking out from the lower half of the circle. Use your Eraser Tool to delete any that you see peeking around the top edges of the circle.
Merge Down.
Add your embellishments. I used:
Stairs: Resize 35%
Mushroom Arbor: Resize 35%
Bug: Resize 40% Mirror
Fairy 2: Resize 50%
Bird: Resize 30%
Flower: Duplicate/Resize 80%
Flower 2: Resize 50%
Highlight your white background.
New Raster layer.
Select All.
Copy and paste a paper of choice Into Selection.
Deselect.
Apply the mask.
Merge Group.
Duplicate
Change the Properties to Mulitply.
Add your copyrights.
Add your name.
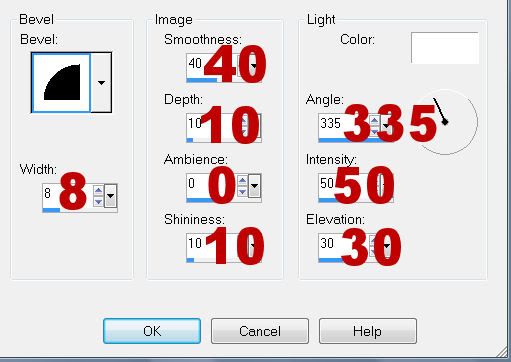
Give it a slight inner bevel:

Resize all layers 80%.
I hope you enjoyed this tutorial.
I’d love to see your results and show it off in my gallery.
Email me!
Hugs,
Bev

No comments:
Post a Comment