
 Clicking on the image will enlarge to full view.
Supplies
1 tube of choice - I used the wonderful artwork of Dean Yeagle here
Font of choice - I used Bonheur Royale and is a pay font
Weescotlass mask 138 here
Designs by Ali Template 181 here
“Spring is Here” is a PTU scrap kit created by Manda of Manda’z Dazzling Dzignz and can be purchased Heartbeatz Creationz. You can visit her blog here.
Thank you Manda for such a beautiful spring kit!
This tutorial was written assuming you have a working knowledge of PSP.
~♥~ Let’s get started ~♥~
Open up the template.
Shift + D.
Close out the original.
Resize all layers 85%
Image/Canvas Size
700 X 700
OK
New Raster layer.
Send to bottom.
Flood fill white.
Highlight Raster 2 layer.
Use your Magic Wand and click on it.
New Raster layer.
Copy and paste a paper of choice Into Selection.
Deselect.
Delete the template layer.
Highlight Raster 8 layer.
Select All/Float/Defloat
New Raster layer
Copy and paste a paper of choice Into Selection.
Deselect.
Delete the template layer.
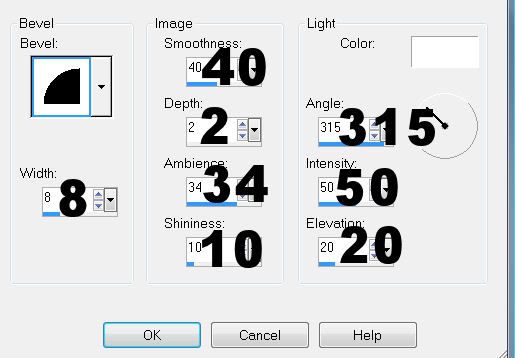
Give it a slight inner bevel:
Highlight Raster 6 layer.
Use your Magic Wand and click on it.
New Raster layer.
Copy and paste a paper of choice Into Selection.
Copy and paste your tube as a new layer.
Move into position over the paper.
Selections/Invert
Tap the delete key.
Deselect.
Change the Properties to Multiply.
Lower the Opacity to about 24
Delete the template layer.
Highlight Raster 7 layer.
Use your Magic Wand and click on it.
New Raster layer.
Copy and paste a paper of choice Into Selection.
Deselect.
Delete the template layer.
Highlight Raster 5 layer.
Repeat the above step.
Highlight Raster 3 layer.
Use your Magic Wand and click on it.
New Raster layer.
Copy and paste a paper of choice Into Selection.
Deselect.
Delete the template layer.
Highlight Raster 4 layer.
Repeat the above step.
Give it the same inner bevel as you used before.
Copy and paste your tube as a new layer.
Add your embellishments. I used:
Flower Frame 1: Resize 25% and 80%
Butterfly & Butterfly 1: Resize 25% and 40%
Cli Flower: Resize 25% and 50% Free rotate left 40 degrees
Flower 1: Resize 25% and 50% Duplicate/Resize 80%
Flower 2: Resize 25% and 40% Mirror
Heart Button & Heart Button 1: Resize 25% and 70% Free rotate 10 degrees
Chickie 1: Resize 25% and 50%
Highlight your white background.
New Raster layer.
Select All.
Copy and paste a paper of choice Into Selection.
Deselect.
Apply the Mask.
Resize 130%
Merge Group.
Add your copyrights.
Add your name.
Give it the same slight inner bevel.
Resize all layers 80%.
I hope you enjoyed this tutorial.
I’d love to see your results and show it off in my gallery.
Email me!
Hugs,
Bev
No comments:
Post a Comment