
 Clicking on the image will enlarge to full view.
Supplies
4 tubes of choice - I used the beautiful artwork of Jennifer Janesko here
Font of choice - I used Aquarelle here
Weescotlass Mask 236 here
Divine Intentions Template 311 here
“Spring Fling” is a PTU tagger size scrap kit created by Jane of JT’s Designs and can be purchased at Butterfly Blush Designs. You can visit her blog here.
Thank you Jane for yet another kit that really shows off your brilliant talent! This kit truly is beautiful.
This tutorial was written assuming you have a working knowledge of PSP.
~♥~ Let’s get started ~♥~
Open up the template.
Shift + D.
Close out the original.
Image/Canvas Size
700 X 700
Flood fill Bakcground layer white.
Delete By Missy, Word Art by Missy, and Pink Punk layer.
Highlight Circle layer.
Use your Magic Wand and click on it.
New Raster layer.
Copy and paste a Glitter Sheet of your choice Into Selection.
Deselect.
Delete the template layer.
Highlight Glittered Circle layer.
Select All/Float/Defloat
New Raster layer.
Copy and paste a different Glitter Sheet of choice Into Selection.
Deselect.
Delete the template layer.
Highlight Circle 2 layer.
Use your Magic Wand and click on it.
New Raster layer.
Copy and paste a paper of choice Into Selection.
Deselect.
Delete the template layer.
Highlight Circle Half layer.
Repeat the above step.
Highlight 3 Frame Background layer.
Select All/Float/Defloat
New Raster layer.
Copy and paste a paper of choice Into Selection.
Deselect.
Delete the template layer.
Highlight Stars layer.
Select All/Float/Defloat
New Raster layer.
Flood fill with plain color that will match your tag.
Deselect.
Delete the template layer.
Move this layer above the 3 frame layer in your layers pallet.
Highlight 3 Frame layer.
Select All/Float/Defloat.
New Raster layer.
Copy and paste a Glitter Paper of your choice Into Selection.
Deselect.
Delete the template layer.
Highlight the Glittered Frame layer.
Click inside one of the squares with your Magic Wand.
Selections/Modify/Expand by 4.
Copy and paste a tube below the frame.
Selections/Invert
Tap the delete key.
Deselect.
Repeat the above step with the remaining 2 frames.
Highlight Frame Background Layer.
Select All/Float/Defloat
New Raster layer.
Copy and paste a paper of choice Into Selection.
Deselect.
Delete the template layer.
Highlight Frame layer.
Select All/Float/Defloat
New Raster layer.
Flood fill with the same Glitter paper you used for the 3 frame layer.
Deselect.
Delete the template layer.
Click inside the frame with your Magic Wand.
Selections/Modify/Expand by 4.
Copy and paste your tube below the frame.
Selections/Invert
Tap the delete key.
Deselect.
Copy and paste Bunny 3 above the circle layer.
Move it into position - see my tag for reference.
Highlight the paper circle layer.
Select All/Float/Defloat
Highlight the bunny layer and tap the delete key.
Deselect.
Change the Properties to Multiply.
Add your embellishments. I used:
RoseVine 1: Resize 35% Free rotate left 90 degrees
Bow 9: Resize 25%
Heart String 3: Resize 35%
Butterfly 7: Resize 30%
Daisy 1: Resize 40% Duplicate/Resize 80%
Daisy 2: Resize 40%
Highlight your white background.
New Raster layer.
Select All.
Copy and paste a paper of choice Into Selection.
Deselect.
Apply the Mask.
Merge Group.
Duplicate
Add your copyrights.
Add your name.
Select All/Float/Defloat
Selections/Modify/Contract by 1
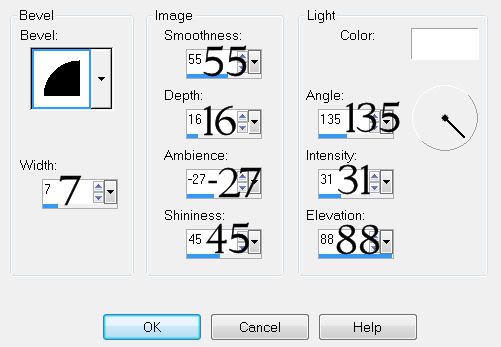
Give it an inner bevel:
I also added that cute little turtle for decoration - lol!
Resize 25%
Resize all layers 80%.
I hope you enjoyed this tutorial.
I’d love to see your results and show it off in my gallery.
Email me!
Hugs,
Bev
No comments:
Post a Comment