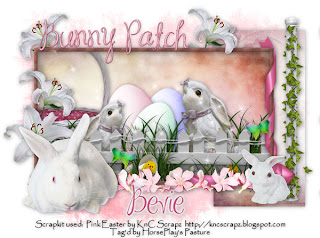
 Clicking on the image will enlarge to full view.
 Supplies
Font of choice - I used MaSexy here
Weescotlass Mask 297 here
Scraps of Enchantment Template 106 here
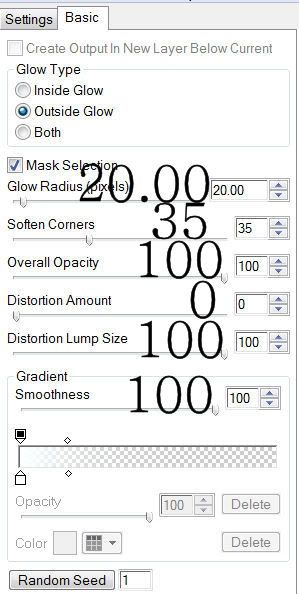
Eyecandy 5 - Impact: Gradient Glow
“Pink Easter” is a PTU tagger size scrap kit created by Kesha of KnC Scrapz and can be purchased at Lollipops n Gumdrops. You can visit her blog here.
Thank you Kesha for such a sweet kit!
This tutorial was written assuming you have a working knowledge of PSP.
~♥~ Let’s get started ~♥~
Open up the template.
Shift + D.
Close out the original.
Delete Info, Glitter Dots, Teasing, Enticing, SSF Text, and the Brush layer.
Highlight Black Rectangle layer.
Select All/Fl9oat/Defloat.
Copy and paste a paper of choice as a new layer.
Resize 65%
Selections/Invert
Tap the delete key.
Deselect.
Highlight Gradient Background layer.
Select All/Float/Defloat
Copy and paste a different paper of choice as a new layer.
Resize 70%
Selections/Invert
Tap the delete key.
Deselect.
Delete the template layer.
Highlight White Frame layer.
Use your Magic Wand and click on it.
New Raster layer.
Flood fill with a plain color.
Deselect.
Delete the template layer.
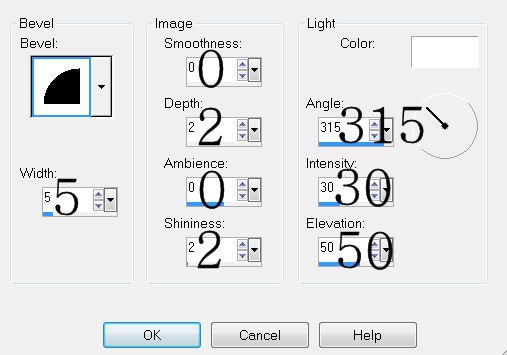
Give it a slight inner bevel:

Copy and paste the Archway as a new layer.
Resize 40%
Use your Freehand Selection Tool and section off the top and right pole of the Archway.
Tap the delete key.
You should now only have the left pole of the archway.
Position it over the Pink Strip template layer.
Delete the template layer.
Copy and paste the fence as a new layer at the top of your layers pallet.
Resize 30%
Duplicate 3 times and move the layers into position to create a fence line across your pallet.
Merge Visible all fence layers.
Move beneath the frame in your layers pallet.
Highlight your frame layer.
Click inside with your Magic Wand.
Selections/Modify//Expand by 4.
Selections/Invert
Highlight the merged fence layer.
Tap the delete key.
Copy and paste Chick in Egg.
Resize 25%
Move it below the frame in your layers pallet.
Position it so that only the tip of the grass are poking up from the frame.
Duplicate as many times as you like to create grass along the bottom of your frame.
Merge Visible all the grass layers.
Highlight your frame layer.
Click inside with your Magic Wand.
Selections/Modify//Expand by 4.
Selections/Invert
Highlight the merged grass layer.
Tap the delete key.
Add your embellishments. I used:
Ribbon 1: Resize 40%
White Lily: Resize 25%
Flower Strand: Resize 25%
Chick in Egg: Resize 25% and 50%
Basket: Resize 50%
Bunny: Resize 30%
Lil Bunny: Resize 40%
Bunny String: Resize 60% Erase the string
Egg: Use your Target Tool to color different colors. Put as many eggs as you like in your tag…resizing them 70% or smaller and rotating them as you like.
Highlight your white background.
New Raster layer.
Select All.
Copy and paste a paper of choice Into Selection.
Deselect.
Apply the Mask.
Merge Group.
Duplicate
Type out the words “Bunny Patch” and position at the top left corner of your frame.
Add your copyrights.
Add your name.
Apply Eyecandy 5: Impact - Gradient Glow

Resize all layers 80%.
I hope you enjoyed this tutorial.
I’d love to see your results and show it off in my gallery.
Email me!
Hugs,
Bev

No comments:
Post a Comment