

Supplies
1 tube of choice - I used the wonderful artwork of Elias Chatzoudis which you can purchase here.
Font of choice - I used NewYorkDeco here and Al Sandra here
Mask 71 by Kreations here - if you know who this mask belongs to can your please email me so that I can give proper credit. Thank you.
DSB Flux - Bright Noise
Animation Shop
“Glitz and Glamour” is a PTU tagger size scrap kit created by Julie of Bits n Bobs and can be purchased at Exquisite Scraps.
Thank you Julie for another amazing kit!
This tutorial was written assuming you have a working knowledge of PSP.
~♥~ Let’s get started ~♥~
Open up a 700 X 700 blank canvas.
Flood fill white.
Copy and Paste Element 7 as a new layer.
Use your Magic Wand and click inside of the frame - even beneath the ribbon.
New Raster layer below the frame.
Flood fill with a gradient of your choice.
DO NOT DESELECT
Copy and paste your tube as a new layer.
Selections/Invert
Tap the delete key.
Deselect.
In your color pallet:
Foreground: Black
Background: null
Width: 4
Using your Ellipse Tool set on circle, draw out a circle that goes just slightly beyond the outside edge of the frame.
Objects/Align/Center in Canvas
Change the colors in your pallet to match your tube. Have your stroke set at 2.
Move your cursor along the circle until you see a Rocking A appear.
Click your mouse and a text box will appear.
Using the NewYorkDeco font, type “Glitz & Glamour”
Apply
In your layers pallet, click on the plus box
Click on the eye of the New Ellipse layer.
Highlight the Vector one layer.
Right Click/Convert to Raster layer.
Select All/Float/Defloat
Selections/Modify/Contract by 2.
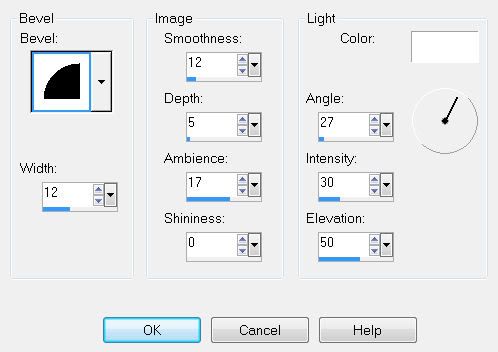
Effects/3D Effects/Inner Bevel:
Duplicate it two times for a total of 3 word layers.
Rename G&G 1, 2, and 3.
Highlight G&G 1 layer.
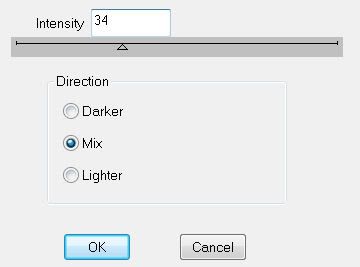
Apply DSB Flux - Bright Noise:
Highlight GG2 layer.
Apply Bright Noise again accept hit the mix button twice.
Highlight GG3 layer.
Apply Bright Noise again accept hit the mix button three times.
Close out GG2 & GG3 layers.
Add your embellishments. I used:
Element 32: Placed behind the frame.
Element 31 & 32: Resize 50. Duplicate both/resize both 80%
Element 58: Resize 50%
Element 5: Resize 70%
Element 40
Highlight your white canvas.
New Rater Layer.
Copy and paste a paper of choice as a new layer.
New Rater layer again.
Copy and paste a paper of choice as a new layer.
Deselect.
To each paper layer apply the mask.
Merge Group on each layer.
Move one of the layers slightly to the right and down.
Add your copyrights.
Add your name.
Give it the same inner bevel
Duplicate 2 times for a total of 3 name layers.
Rename Name 1, 2, and 3.
Repeat the steps you used before in applying the DSB Flux Bright Noise.
Close out Name 2 & 3 layers.
Copy Merge.
~Now it’s time to Animate~
Open up Animation Shop.
Edit/Paste as New Animation.
Back into PSP.
Close out GG 1 and Name 1 layers.
Open up GG2 and Name 2 layers.
Copy Merge.
Carry into AS.
Edit/Paste/After Current Frame.
Back into PSP.
Close out GG2 and Name 2 layers.
Open up GG3 and Name 3 layers.
Copy Merge.
Carry Into AS.
Edit/Paste After Current Frame.
View your animation.
If you’re happy then resize your frames.
Animation/Resize Animation.
Percentage of Original checked.
Change numbers to 85
OK
Now you can save your animation.
I hope you enjoyed this tutorial.
I’d love to see your results.
Email me!
Hugs,
Bev
No comments:
Post a Comment