

Clicking on the image will enlarge to full view.
Supplies
1 tube of choice - I used the fabulous artwork of Elias Chatzoudis here
Font of choice - I used Dragonfly here.
Weescotlass Mask 241 here
“Singing in the Rain” is a tagger size scrap kit created by Lynne of BabyCakes Scraps and can be purchased at her store Creative Scraps. You can visit her site here.
Thank you Lynne for such a fun kit!
This tutorial was written assuming you have a working knowledge of PSP.
~♥~ Let’s get started ~♥~
Open up a 700 X 700 blank canvas.
Flood fill white.
Copy and Paste Frame 2 as a new layer.
Resize 30%
Use your Magic Wand and click inside of it.
Selections/Modify/Expand by 6.
New Rater layer below the frame.
Copy and paste a paper of choice Into Selection.
DO NOT DESELECT.
Resize 30%
Use your Magic Wand and click inside of it.
Selections/Modify/Expand by 6.
New Rater layer below the frame.
Copy and paste a paper of choice Into Selection.
DO NOT DESELECT.
Copy and paste your tube as a new layer below the frame.
Selections/Invert
Tap the delete key.
Deselect.
Copy and paste Grass 2 as a new layer.
Resize 25%
Duplicate/Mirror.
Move both grass layers into position below the frame.
Erase any that overhangs the frame.
Close out your white canvas.
Merge Visible.
Reopen your white canvas.
Merge Visible.
Reopen your white canvas.
Copy and paste Frame as a new layer.
Resize 40%
Use your Magic Wand and click inside of it.
Selections/Modify/Expand by 6.
New Rater layer below the frame.
Copy and paste a paper of choice Into Selection.
Deselect.
Resize 40%
Use your Magic Wand and click inside of it.
Selections/Modify/Expand by 6.
New Rater layer below the frame.
Copy and paste a paper of choice Into Selection.
Deselect.
Copy and paste Grass 2 as a new layer.
Resize 40%
Duplicate/Mirror.
Move both grass layers into position below the frame.
Erase any that overhangs the frame.
Resize 40%
Duplicate/Mirror.
Move both grass layers into position below the frame.
Erase any that overhangs the frame.
Copy and paste Cat Tail as a new layer.
Resize 30%
Duplicate/Mirror
Move the cat tail layers into position below the frame.
Erase any that overhangs.
Resize 30%
Duplicate/Mirror
Move the cat tail layers into position below the frame.
Erase any that overhangs.
Close out your white canvas and your merged frame layer.
Merge Visible.
Reopen all layers.
Merge Visible.
Reopen all layers.
Move both merged frame layers into position.
See my tag for reference.
Copy and paste Leaf Boat as a new layer.
Mirror
Resize 50%
Mirror
Resize 50%
Now we’re going to make the frog look as if they’re sitting in the boat.
Copy and paste Frog 4 as a new layer.
Resize 30%
Copy and paste Frog 3 as a new layer.
Resize 30%
In your layers pallet move the frogs above the boat and position them so they’re beside each other.
Merge visible both frogs.
Lower the opacity on them until you can see the boat through them.
Using your Freehand Selection Tool, zoom in and outline the edge of the boat and then around the bottom part of the frogs.
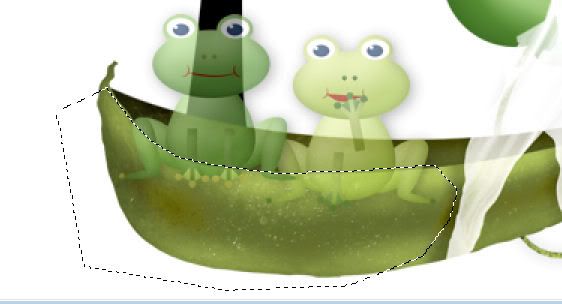
Be sure your frog layer is highlighted and tap the delete key.
Deselect.
If you happen to notice just the slightest gap in between the frogs and the edge of the boat then tap on the down arrow on your keyboard.
Turn the opacity of the frog layer back to 100.
Merge visible the frogs and boat.
Add your embellishments. I used:
Tree: Resize 60%
Lantern: Resize 80%
Dragonfly 2 & 3: Resize both 25%
Grass 2: Resize 25%
Cat Tail: Resize 25%
Highlight your white background.
New Raster layer.
Seletct All.
Copy and paste a paper of your choice.
Deselect.
Apply the mask.
Merge Group.
New Raster layer.
Seletct All.
Copy and paste a paper of your choice.
Deselect.
Apply the mask.
Merge Group.
Add your copyrights.
Add your name.
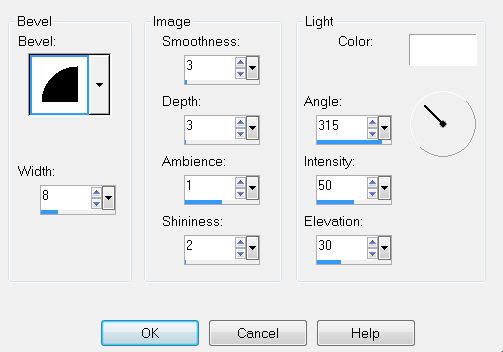
Give it a slight inner bevel:
Resize all layers 80%.
I hope you enjoyed this tutorial.
I’d love to see your results.
Email me!
Hugs,
Bev
Bev
No comments:
Post a Comment