Supplies
2 tubes of choice - I used the beautiful artwork of Zindy S.D. Nielsen here
Font of choice - I used Hand Script LCase here
Blissfully Beth’s Template 90 here
Becky Mask 22 here
“Pastel Grunge” is a FTU tagger size scrap kit created by Pink Poet Scraps and can be found here.
Please leave a simple thank you when downloading. It’s a small gesture for hard work given freely.
This tutorial was written assuming you have a working knowledge of PSP.
~♥~ Let’s get started ~♥~
Open up the template.
Shift + D.
Close out the original.
Delete the credit layer words layer.
Resize all layers 110%
Image/Canvas Size
700 x 600
Flood fill Raster 1 layer white.
Open up the template.
Shift + D.
Close out the original.
Delete the credit layer words layer.
Resize all layers 110%
Image/Canvas Size
700 x 600
Flood fill Raster 1 layer white.
Highlight Line 1 layer.
Select All/Float/Defloat
New Raster layer.
Copy and paste a paper of choice Into Selection.
Deselect.
Delete the template layer.
Repeat the above step with Line 2 layer.
Highlight 1 layer.
Select All/Float/Defloat
New Raster layer.
Copy and paste a paper of choice Into Selection.
Copy and paste your tube as a new layer.
Resize as needed.
Selections/Invert
Tap the delete key.
Deselect.
Delete the template layer.
Merge visible the tube and paper.
Highlight 4 layer.
Select All/Float/Defloat
New Raster layer.
Copy and paste the same paper as you used before Into Selection.
Deselect.
Highlight your tube layer.
Duplicate/Mirror
Free rotate left 2 degrees.
Copy
Now delete that layer.
(I know! It sounds nuts, but trust me. Just delete the layer…lol)
Highlight 4 layer.
Select All/Float/Defloat
New Raster layer.
Paste Into Selection.
Deselect.
Delete the template layer.
Change the Properties to Multiply.
Merge Visible the tube and paper.
Select All/Float/Defloat
New Raster layer.
Copy and paste the same paper as you used before Into Selection.
Deselect.
Highlight your tube layer.
Duplicate/Mirror
Free rotate left 2 degrees.
Copy
Now delete that layer.
(I know! It sounds nuts, but trust me. Just delete the layer…lol)
Highlight 4 layer.
Select All/Float/Defloat
New Raster layer.
Paste Into Selection.
Deselect.
Delete the template layer.
Change the Properties to Multiply.
Merge Visible the tube and paper.
Highlight 3 layer.
Select All/Float/Defloat
New Raster layer.
Copy and paste a paper of choice Into Selection.
Copy and paste your tube as a new layer.
Resize as needed.
Selections/Invert
Tap the delete key.
Deselect.
Delete the template layer.
Merge Visible the tube and paper.
Select All/Float/Defloat
New Raster layer.
Copy and paste a paper of choice Into Selection.
Copy and paste your tube as a new layer.
Resize as needed.
Selections/Invert
Tap the delete key.
Deselect.
Delete the template layer.
Merge Visible the tube and paper.
Highlight 2 layer.
Select All/Float/Defloat
New Raster layer.
Copy and paste the same paper as you used before Into Selection.
Deselect.
Highlight your tube layer from 3 layer.
Duplicate/Mirror
Free rotate right 5 degrees.
Copy
Now delete that layer.
(Yup, we‘re about to do this step again…lol)
Highlight 2 layer.
Select All/Float/Defloat
New Raster layer.
Paste Into Selection.
Deselect.
Delete the template layer.
Change the Properties to Multiply.
Merge Visible the tube and paper.
To each Merged Visible layer:
Highlight the layer
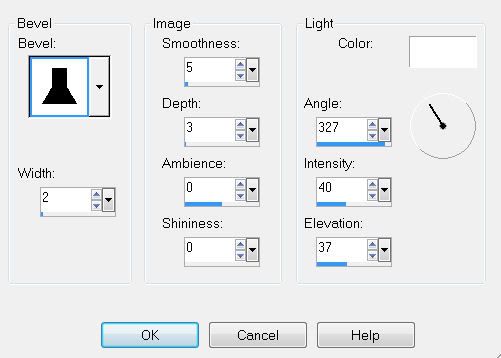
Give it an inner bevel:

Select All/Float/Defloat
New Raster layer.
Copy and paste the same paper as you used before Into Selection.
Deselect.
Highlight your tube layer from 3 layer.
Duplicate/Mirror
Free rotate right 5 degrees.
Copy
Now delete that layer.
(Yup, we‘re about to do this step again…lol)
Highlight 2 layer.
Select All/Float/Defloat
New Raster layer.
Paste Into Selection.
Deselect.
Delete the template layer.
Change the Properties to Multiply.
Merge Visible the tube and paper.
To each Merged Visible layer:
Highlight the layer
Give it an inner bevel:

Add your embellishments. I used:
Flower: Resize 40%
Flowers 1: Resize 40%
Flower 3: Resize 40%
Butterfly: Resize 30%
Bird: Resize 50%
Star Bling: Resize 35%
Crop your image -
Leaving some room at the top and bottom.
Highlight your white background.
New Raster layer.
Select All.
Copy and paste a paper of choice Into Selection.
Deselect.
Copy and paste Mesh as a new layer above the paper.
Merge Down.
Apply the mask.
Merge Group.
Merge Down.
Apply the mask.
Merge Group.
Add your copyrights.
Add your name.
Give it the same inner bevel.
I hope you enjoyed this tutorial.
I’d love to see your results.
Email me!
Give it the same inner bevel.
I hope you enjoyed this tutorial.
I’d love to see your results.
Email me!
Hugs,
Bev
Bev


No comments:
Post a Comment