
 Clicking on the image will enlarge to full view.
Supplies
3 tubes of choice - I used the beautiful artwork of Zindy S.D. Nielsen which can be purchased here.
Font of Choice - I used Al Sandra here
Scrap Dimensions Mask 6 here
My Template 61 here
Xero - Porcelain
Mura Meister - Copies
This tutorial was written assuming you have a working knowledge of PSP.
~♥~ Let’s get started ~♥~.
Open up the template.
Shift + D
Close out the original.
Delete the credit layer.
Highlight the Background layer.
Image/Canvas Size
700 X 700
Flood fill white.
Create a new 600 X 600 transparent image.
Flood Fill white.
You’ll use this image to feather your tubes:
Copy and paste your tube onto the new image.
Give it the drop shadow you want.
Using your Freehand Selection Tool, outline the image.
Selections/Modify/Feather
Number of Pixels: 53
Selections/Invert
Tap the delete key until you have a nice feathery look.
Repeat the above step with each of your tubes.
Make your template active.
Highlight Top Rectangle layer.
Select All/Float/Defloat
Copy and paste each of your tubes as a new layer.
Resizing each to your liking.
Arrange them exactly where you’d like them.
Selections/Invert
Highlight each tube layer and tap the delete key.
Merge Visible your tube layers.
Apply Xero-Porcelain:

Duplicate/Mirror
Move it into position over the Bottom Rectangle layer.
Edit/Copy
Highlight the word Shameless.
Select All/Float/Defloat
Selections/Modify/Contract by 2
Edit/Paste Into Selection.
Deselect.
Highlight Top Stripes layer.
Select All/Float/Defloat
New Raster layer.
Flood fill with a gradient of your choice.
Deselect.
Delete the template layer.
Repeat the above step with Bottom Stripe layer.
Close out your white background and merge visible.
Reopen your white background.
Duplicate your merged layer.
Highlight the Original.
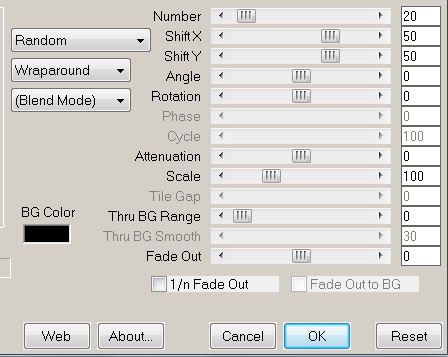
Apply Mura Meister - copies: Wallpaper
Apply the mask.
Merge Group.
Duplicate/Merge down.
Add your copyrights.
Add your name using the same Gradient you used for the stripes.
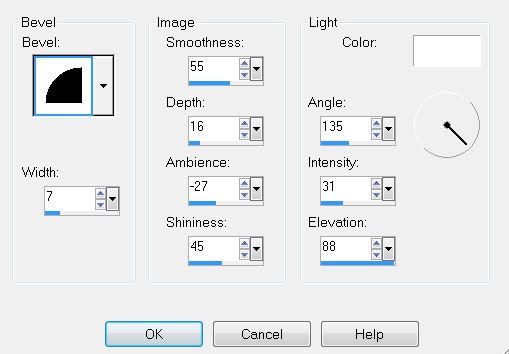
Give it an inner bevel:
Crop your image.
Resize all layers 80%.
I hope you enjoyed this tutorial.
I’d love to see your results and show it off in my Show Arena.
Email me!
Hugs,
Bev
No comments:
Post a Comment