Supplies
1 tube and 1 image of choice - I used the beautiful artwork of Ida Larsen which can be purchased here.
Font of Choice - I used Angelo DB here
My Template 32 here
Filters Unlimited
Toadies - Ommadawn
Alien Skin Xenofex 2: Burnt Edges
This tutorial was written assuming you have a working knowledge of PSP..
~♥~ Let’s get started ~♥~
Open up the template.
Shift + D
Close out the original.
Delete the credit layer and Raster 3.
Highlight the Background layer.
Image/Canvas Size
700 X 700
Flood fill white.
Color Pallet:
Foreground: #849e9f
Background: #e9e0a2
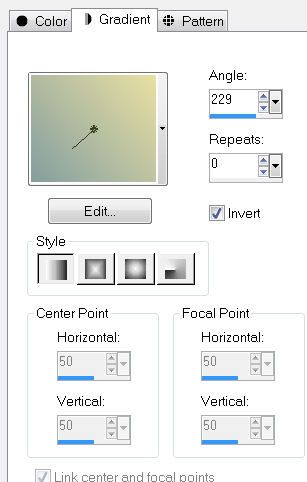
Set to Gradient:
Foreground: #849e9f
Background: #e9e0a2
Set to Gradient:

Highlight Diamond 1.
Select All/Float/Defloat
New Raster Layer.
Flood fill with the gradient.
Change the Properties to Overlay.
Merge down.
Apply Filters Unlimited - Japanese Paper
Default settings.
Select All/Float/Defloat
New Raster Layer.
Flood fill with the gradient.
Change the Properties to Overlay.
Merge down.
Apply Filters Unlimited - Japanese Paper
Default settings.
Highlight Diamond 2.
Select All/Float/Defloat
New Raster Layer.
Flood fill with the same gradient accept uncheck Invert.
Change the Properties to Overlay.
Merge down.
Apply Filters Unlimited - Japanese Paper - same as before.
Merge Down.
Both Diamonds should be on one layer now.
Highlight the Frame layer.
Use your Freehand Selection Tool to outline the frame.
Copy and paste your image as a new layer below the frame.
Selections/Invert
Tap the delete key.
Deselect.
Copy and paste your tube as a new layer.
Highlight the merged diamonds layer.
Duplicate.
Highlight the original.
Apply Toadies - Ommadawn:

Image Resize 105%
New Raster layer above your white background.
Set your color pallet:
Foreground: #785a33
Background: #e9e0a2
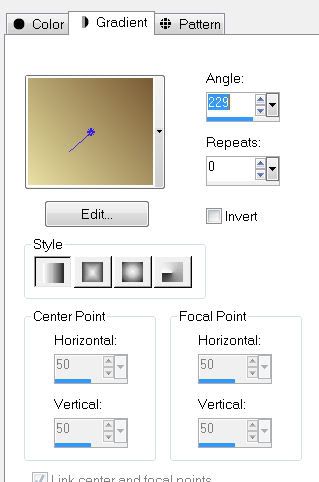
Gradient set like this:

Flood fill with the gradient.
Crop your image.
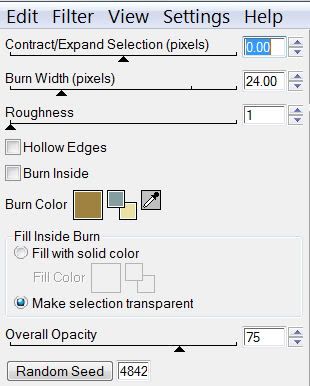
Apply Xenofex 2 - Burnt Edges

Add your copyrights.
Add your name using the same Gradient you used for paper.
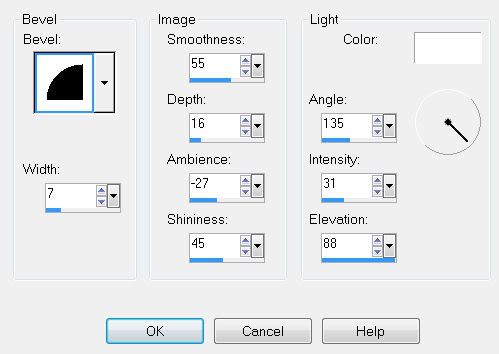
Give it an inner bevel:

Crop your image.
Resize all layers 80%.
I hope you enjoyed this tutorial.
I’d love to see your results and show it off in my Show Arena.
Email me!
Hugs,
Bev


No comments:
Post a Comment