
 Clicking on the tag will enlarge to full view.
Supplies
1 tube of choice - I used to beautiful artwork of Jennifer Janesko here
Font of choice - I used Big Daddy Condensed here
Weescotlass Mask 297 here
jbs2Designs Template 45 here
Alien Skin Xenofex 2 - Burnt Edges
“The Great Outdoors” is a PTU tagger size scrap kit created by Stitchy Angel Creationz and can be purchased at Twilight Scraps. You can visit her blog here.
Stitchy, I soooo loved this kit!
Thank you so very much!
This tutorial was written assuming you have a working knowledge of PSP.
~♥~ Let’s get started ~♥~
Open up the template.
Shift + D.
Close out the original.
Delete the credit and brush layer.
Resize all layers 120%
New Rater layer.
Send to bottom.
Image/Canvas Size
600 x 600
Flood fill white.
Highlight Rectangle layer..
Select All/Float/Defloat
New Raster layer.
Copy and paste a paper of choice Into Selection.
Deselect.
Delete the template layer.
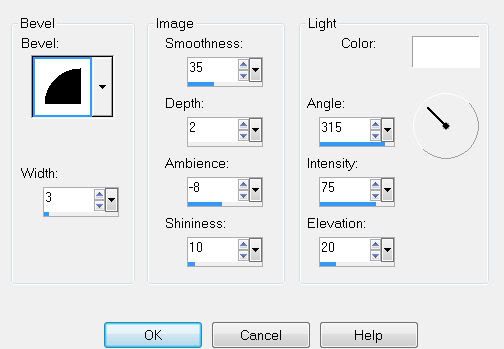
Give it an inner bevel:
Select All/Float/Defloat
New Raster layer.
Copy and paste a paper of choice Into Selection.
Deselect.
Delete the template layer.
Give it an inner bevel:
Highlight Ribbon 1 layer.
Select All/Float/Defloat
Copy and paste a paper of choice as a new layer.
Resize 70%
Selections/Invert
Tap the delete key.
Deselect.
Delete the template layer.
Apply Xenofex 2 - Burnt Edges
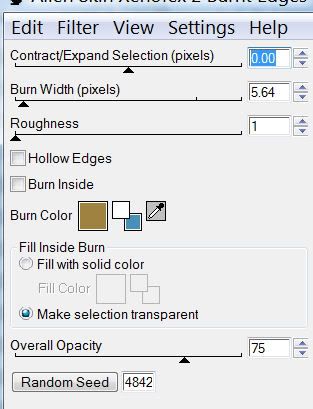
Repeat the above step with Ribbon 2 layer accept use a different paper.
Highlight Circle layer.
Select All/Float/Defloat
Copy and paste a paper of choice.
Selections/Invert
Tap the delete key.
Deselect.
Delete the template layer.
Give it an inner bevel:
Highlight the Diamond layer.
Select All/Float/Defloat
New Raster layer.
Copy and paste a paper of choice Into Selection.
Copy and paste your tube as a new layer.
(If your tube overhangs the diamond simply Invert and tap the delete key)
Deselect.
Delete the template layer.
Merge Visible the tube and diamond layer.
Give it the same inner bevel you just used.
Add your embellishments. I used:
Orange Clip: Resize 25% and 80%. Flip/Free rotate left 45 degrees
Butterfly: Resize 25%
Doodle 1: Resize 70%
Doodle 2: Resize 50%. Duplicate. Resize 80%/Mirror
Jar Bugs: Resize 25%
Crop your image but leave ample room around your tag.
Highlight your white canvas.
New Raster Layer.
Select All.
Copy and paste a paper of choice Into Selection.
Deselect.
Apply the mask.
Merge Group.
Add your copyrights.
Add your name.
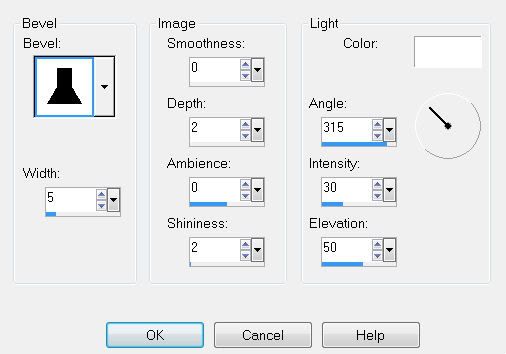
Give it the very first bevel you used in this tutorial.
I hope you enjoyed this tutorial.
I’d love to see your results.
Email me!
Hugs,
Bev
Thank you so much for using my kit Bev, you did a wonderful job...I love my new tag...
ReplyDeletehugz
stitchy