Supplies
2 tubes of choice - I used to wonderful artwork of PinUpToons here
Font of choice - I used Santa’s Sleigh here
Weescotlass Mask 209 here
Blissfully Beth Template 71 here
“Spilled Glitter” is a PTU tagger size scrap kit created by Brooke of Butterfly Blush Designs can be purchased at her store Butterfly Blush Designs. You can visit her blog here.
Such an amazing kit, Brooke!!
I fell in love with it!!
This tutorial was written assuming you have a working knowledge of PSP.
~♥~ Let’s get started ~♥~
Open up the template.
Shift + D.
Close out the original.
Delete the credit layer.
Shift + D.
Close out the original.
Delete the credit layer.
Highlight Ruffle 1 layer..
Select All/Float/Defloat
Copy and paste a paper of choice as a new layer.
Selections/Invert
Tap the delete key.
Deselect.
Delete the template layer.
Select All/Float/Defloat
Copy and paste a paper of choice as a new layer.
Selections/Invert
Tap the delete key.
Deselect.
Delete the template layer.
Repeat the above step with Copy of Ruffle 1 layer.
Highlight Vert Strip layer.
Select All/Float/Defloat
Copy and paste a paper of choice as a new layer.
(I selected a small portion of a paper, set my foreground to pattern. Made a new raster layer and flood filled it with the pattern).
Selections/Invert
Tap the delete key.
Deselect.
Delete the template layer.
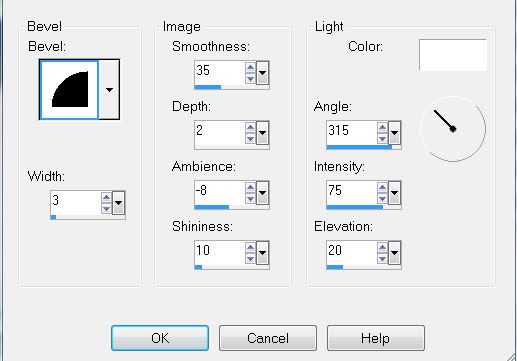
Give it a slight inner bevel:

Repeat the above step with the other Vert Strip layer.
Highlight Large Circle bg layer.
Select All/Float/Defloat
New Raster layer.
Flood fill with a gradient of choice.
Copy and paste your tube as a new layer.
Selections/Invert
Tap the delete key.
Deselect.
Delete the template layer.
Repeat the above step with White Circle layer.
Highlight Lg Gray Frame Circle layer.
Select All/Float/Defloat
New Raster layer.
Copy and paste a paper of choice Into Selection.
(I made a new raster layer and flood filled with the same pattern I used before)
Tap the delete key.
Deselect.
Delete the template layer.
Give it the same slight inner bevel.
Repeat the above step with Dk Gray Circle layer.
Highlight Word Art layer.
Select All/Float/Defloat
New Raster layer.
Flood fill with color #4790ba
Deselect.
Delete the template layer.
Give it the same inner bevel.
Add your embellishments. I used:
Ribbon Eyelet 4: Resize 35% Free rotate right 40 degrees
Double Bow 4: Resize 50% Free rotate left 20 degrees
Flower String 2: Resize 20%. Duplicate. Zoom in for better view and erase the very tip of the string (staple and teeny tiny flower). Move it down and match it up with the other flower string to create just one string. Merge Down.
Folded Ribbon 2: Resize 30%. Flip.
Dragonfly 1: Resize 50%
Dragonfly 2: Resize 40%
Highlight your white canvas.
New Raster Layer.
Select All.
Copy and paste a paper of choice Into Selection.
Deselect.
Apply the mask.
Merge Group.
Adjust/Add Remove Noise/Add Noise
Uniform and Monochrome checked
Noise: 39%
Add your copyrights.
Add your name.
Give it the same inner bevel.
Apply the same Noise.
Crop your image.
I hope you enjoyed this tutorial.
I’d love to see your results.
Email me!
Hugs,
Bev


No comments:
Post a Comment