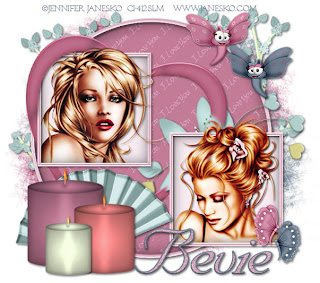
Clicking on the image will enlarge to full view.
Supplies
2 tubes of choice - I’m using the artwork of Jennifer Janesko which you can purchase here
Font of Choice - I’m using SNC Script here
Weescotlass Mask 167 here
Designs by Ali Template 121 here
(It’s a X-mas template lol!)
“#1 Mom” is a taggers size scrap kit created by Danielle of Dazzling Scraps and can be purchased here. You can visit her blog here.
Thank you Danielle for this gorgeous kit!!
This tutorial was written assuming you have working knowledge of PSP.
~♥~ Let’s get started ~♥~
Open up the template. Shift + D. Close out the original.
Delete the following layers - it’s a lot…hehehe
Rasters 11, 9, 6, 5, Copy of Raster 4, 4, 10, and 7
It doesn’t leave much left to the template, but wow, I just loved the frames in this template.
New Raster layer. Flood Fill white and send to bottom.
Highlight Raster 1.
Select All/Float/Defloat
Seletions/Invert
Copy and paste a paper of choice.
Hit the delete key.
Delete the template layer.
Using your Target Tool, colorize Raster 8 (the frame to the circle) a color that will look nice with the paper.
Use your Magic Wand and click inside the circle frame.
Selections/Modify/Expand by 2
New Layer beneath Raster 8
Effects/3D Effects/Cutout
Vertical and Horizontal: 5
Opacity and Blur: 35
Color: Black
OK
New Raster Layer.
Repeat the cutout accept change the horizontal and vertical numbers to -5.
Highlight Raster 2.
Select All/Float/Defloat
Seletions/Invert
Copy and paste a paper of choice.
Hit the delete key.
Delete the template layer.
Highlight Raster 3. Using your Target Tool again, colorize the frame the same as you did the other.
Use your Magic Wand and click inside the frame.
Selections/Modify/Expand by 2
Selections/Invert
Repeat the steps to create the cutout.
Copy and paste your tube as a new layer beneath the cutout layer.
Selections/Invert
Hit the delete key.
.
Lookin’ good?
Good. Now repeat all the above steps with the other square :O)
Add your embellishments. I used:
Candle 2: Resize 50%
Candle 3: Resize 40%
Candle 4: Resize 30%
Heart Frame 1: Free rotate right 40 degrees
Dragonflies 1 & 2: Resize 35%
Fan3: Resize 70%. Free rotate right 40 degrees
Branch 1
Butterflies 1 & 2: Resize 25%
Flower Decoration 2
Highlight your white canvas. New Raster layer. Select All.
Copy and paste a paper of choice Into Selection.
Apply the mask.
Merge Group.
Resize 110%
Repeat the above step accept use a different color paper and move this mask down slightly.
Add your copyrights.
Add your name. Stroke set to 2.
I gave mine an inner bevel:
Bevel: 2
Width: 1
Smoothness: 15
Depth: 2
Ambience: -2
Shininess: 0
Color: white
Angle: 0
Intensity: 36
Elevation: 42
OK
Select All/Float Defloat
Selections/Modify/Contract by 2
Adjust/Add Remove Noise/Add Noise
Gaussian checked
Monochrome checked
Noise: 30%
OK
Deselect.
Add a drop shadow to your name.
Resize all layers 95%
I hope you enjoyed this tutorial.
I’d love to see your results.
Email me!
Hugs,
Bev

No comments:
Post a Comment