

Clicking on the image will let you see it full size.
Supplies Needed
1 Tube of choice - I'm using the artwork of Elias Chatzoudis
which you can purchase here at Aussie Scraps Designs.
1 Tube of choice - I'm using the artwork of Elias Chatzoudis
which you can purchase here at Aussie Scraps Designs.
Toadies – Ommadawn
"Summertime" PTU taggers kit by Scrap Designs by Donna which can be found here.
"Summertime" PTU taggers kit by Scrap Designs by Donna which can be found here.
Please visit her blog here.
This kit definately screams "Summertime"!
This tutorial was written assuming you have knowledge of PSP.
~♥~ Let’s get started ~♥~
This tutorial was written assuming you have knowledge of PSP.
~♥~ Let’s get started ~♥~
Open a 700 X 700 transparent canvas. Flood fill white.
Copy and paste Frame 4 as a new layer. Use your Freehand Selection tool and draw around the rope handle. Hit the delete button.
Use your magic wand and click inside the frame. Selections/Modify by 6. Copy and paste a paper of choice as a new layer. Resize 60%. Hit the delete button.
Copy and paste your tube as a new layer just below the frame. Hit the delete button. Deselect. Close out your white background and merge visible. Open your background back up.
Copy and paste Bikini Top of your choice as a new layer. Resize 30%. Move into position so that it looks as if it’s hanging on the corner of the frame. Use your Selection Tool to remove part of the bikini string.
Copy and paste elements of your choice. I used:
Starfish: Resize 20%.
Crab: Resize 25%.
Different Flowers: Resize anywhere from 20% to 15%.
Frangipani (use selection tool to outline the cluster of flowers):
Resize 70%
Seashells: Resize anywhere from 15% to 10%.
Sand: Resize 70%. Duplicate/Mirror/Flip.
Close out your white canvas and merge visible. Duplicate. Adjust/Blur/Gaussian Blur with Radius: 10. Apply Toadies/Ommadawn with default settings. Use your Eraser Tool and erase the part of the Ommadawn layer that is overlapping the sand.
Open up your white canvas and highlight it. New Raster layer. Select All. Copy and paste a paper of choice Into Selection. Deselect. Apply your mask. Merge Visible. Resize 110%.
Add your copyrights.
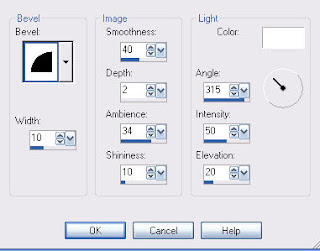
Add your name. I gave mine an innerbevel:
Use your magic wand and click inside the frame. Selections/Modify by 6. Copy and paste a paper of choice as a new layer. Resize 60%. Hit the delete button.
Copy and paste your tube as a new layer just below the frame. Hit the delete button. Deselect. Close out your white background and merge visible. Open your background back up.
Copy and paste Bikini Top of your choice as a new layer. Resize 30%. Move into position so that it looks as if it’s hanging on the corner of the frame. Use your Selection Tool to remove part of the bikini string.
Copy and paste elements of your choice. I used:
Starfish: Resize 20%.
Crab: Resize 25%.
Different Flowers: Resize anywhere from 20% to 15%.
Frangipani (use selection tool to outline the cluster of flowers):
Resize 70%
Seashells: Resize anywhere from 15% to 10%.
Sand: Resize 70%. Duplicate/Mirror/Flip.
Close out your white canvas and merge visible. Duplicate. Adjust/Blur/Gaussian Blur with Radius: 10. Apply Toadies/Ommadawn with default settings. Use your Eraser Tool and erase the part of the Ommadawn layer that is overlapping the sand.
Open up your white canvas and highlight it. New Raster layer. Select All. Copy and paste a paper of choice Into Selection. Deselect. Apply your mask. Merge Visible. Resize 110%.
Add your copyrights.
Add your name. I gave mine an innerbevel:
I hope you enjoyed this tutorial.
I would love to see your results and put them into my gallery!
Email me!
Hugs,
Bev
Bev your tut is awesome, I love what you have done with my kit, do you mind if I link to you from my blog?
ReplyDelete