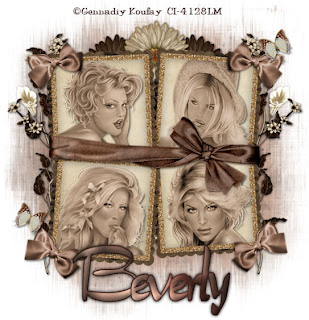
Clicking on the image will show it in full view.
Supplies Needed
4 tubes of choice – I'm using the artwork of Gennadiy Koufay
which you can purchase here
4 tubes of choice – I'm using the artwork of Gennadiy Koufay
which you can purchase here
Font of choice - I'm using Tabitha Regular
Weescotlast Mask 39 here
Greg’s Factory Output Vol. II – Pool Shadow
"Beautiful" FTU scrap kit by Bel Vidotti Scraps which can be found at here.
Please leave a thank you when downloading.
It’s a small gesture in return for hard work given freely.
This tutorial was written assuming you have working knowledge of PSP.
~♥~ Let’s get started ~♥~
Open a 700 X 700 canvas. Flood fill white.
Copy and paste Frame 4 as a new layer. Use your magic wand and click inside of each square. Selections/Modify/Expand by 4.
Copy and paste a paper of choice as a new layer beneath the frame. Selections/Invert. Hit the delete key.
Copy and paste a tube as a new layer beneath the frame layer. Position inside one of the frame squares. Hit the delete key.
Effects/Photo Effects/Sepia Toning
Amoun to age:
64
Ok
Repeat the above step for each square. Once that is done, deselect. Close out your white background and Merge Visible.
Copy and paste Flower 6 as a new layer. Resize 80%. Position behind the frame, but allowing some of the leaves to peek out. Duplicate/Mirror.
Copy and paste Flower 4 as a new layer. Free rotate left 25 degrees. Duplicate/Mirror. Merge down. Duplicate and move that layer lower. Merge down. Move this behind your merged frame layer. Use your eraser tool to erase anything that is sticking from behind the frame.
Copy and paste Wrap 5 as a new layer. Resize 62%. Image/Mirror. Image/Flip.
Copy and paste Bow 2 as a new layer. Resize 40%. Free rotate left 25 degrees. Move it to the top left corner. Duplicate/Mirror. Paste the bow as a new layer once again. Resize again. Free rotate right 25 degrees. Duplicate/Mirror.
Copy and paste Flower 2 as a new layer. Resize 40%. Move into position. See my tag for reference.
Copy and paste Flower 1 as a new layer. Move it slightly to the left of the other flower. Move it behind the flower. Duplicate/Mirror.
Copy and paste a butterfly as a new layer. Resize 20%. Free rotate 25 degrees in the direction of your choice.
Highlight your white canvas. Select All. Copy and paste a paper of choice Into Selection. Deselect. Apply your mask. Merge Group.
Add your copyrights.
Add your name. For mine I used:
Stroke set at 1
Foreground: #311b17
Background: #311b17
Click the Gradient tab on the background:
Style: Linear
Angle: 45
Repeats: 2
Once you’ve added your name be sure it’s now a Raster layer and not Vector. Select All/Float/Defloat/Modify/Contract by 1.
Effects/Plugs-Ins/Greg’s Factory Output Vol II/Pool Shadow
Use default settings.
Ok
Deselect.
Add a slight inner bevel and heavy drop shadow.
Crop your image.
I hope you enjoyed this tutorial.
I’d love to see your results.
Email me!
Hugs,
Bev

No comments:
Post a Comment