
Supplies Needed
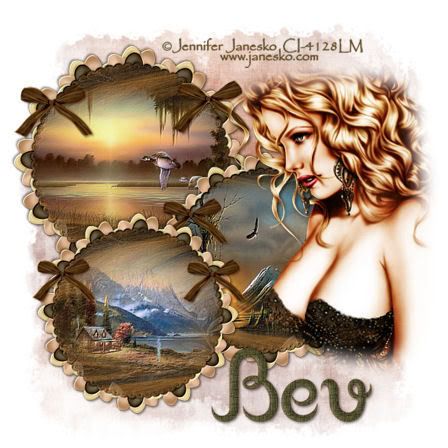
1 tube of choice – I'm using the artwork of Jennifer Janesko
which you can purchase here
3 Images of Choice
Mask of Choice – I used Becky Mask 22.
Mura’s Meister – Copies
Filter’s Unlimited 2.0 (optional)
FM Tiles Tools – blend Emboss (optional)
1 tube of choice – I'm using the artwork of Jennifer Janesko
which you can purchase here
3 Images of Choice
Mask of Choice – I used Becky Mask 22.
Mura’s Meister – Copies
Filter’s Unlimited 2.0 (optional)
FM Tiles Tools – blend Emboss (optional)
Font of choice - I'm using Franklin Cascaes here
"Old and New" PTU scrap kit by Designs by Ali which can be found at Paradise 4 Scrappers. Please visit Ali’s blog here.
This tutorial was written assuming you have working knowledge of PSP.
~♥~ Let’s get started ~♥~
Open a 700 X 700 transparent canvas. Flood fill white.
Copy and paste Template of choice. Give it an inner bevel:
Bevel: 2
Width: 20
Smoothness: 17
Depth: 3
Ambience: 0
Shininess: 14
Color: white
Angle: 248
Intensity: 28
Elevation: 63
Give it a drop shadow. Duplicate 2 times to have a total of 3 beveled templates. Rename Template 1, 2, and 3. Close out 2 and 3.
Copy and paste a Flower of choice. Resize 40%. Drop Shadow.
Effects/Plugs-Ins/Mura’s Meister/Copies
Choose Encircle. Default settings. Ok. Drop Shadow.
Duplicate 2 times. Rename all flower layers as Flower 1, 2, and 3.
Close out Flower 2 and 3. Move Flower 1 beneath Template 1. Resize Template 90%. Again 95%.
Select All/Float/Defloat. Selections/Modify/Contract by 6. Invert.
Copy and paste your first image as a new layer. Hit the delete key. Deselect.
Copy and paste a bow of choice as a new layer. Move into place. Duplicate/Mirror. Merge visible Template 1, Flower 1, the image, and bows. Close out that layer.
Repeat all of the above for the other 2 templates.
Resize the 1st merged template 70%.
Resize the 2nd merged template 65%.
Resize the 3rd merged template 60%.
Move into position.
To each template apply the FM Tile Tool plug-in
Blend Emboss with default settings.
Copy and paste your tube as a new layer.
Highlight white canvas. New Raster Layer.
Choose 2 colors from your images and make a gradient of your choice. Flood fill the new layer. Apply your mask. Merge Group.
Effect/Plug-Ins/Filters Unlimited 2.
Choose a Paper Texture of your choice.
I used Papyrus – default settings.
Add all Copyrights.
Add your name. Give it the same Inner Bevel you used on the templates. Use the same paper texture you used on the mask.
I hope you enjoyed this tutorial.
I’d love to see your results.
Email me!
Hugs,
Bev
No comments:
Post a Comment