Font of choice - I'm using Kinkee here
Mask of Choice - I used Becky Mask 23
DSB Flux - Bright Noise (optional)
"A Choca Love" PTU taggers kit by Southern Scrapz which can be found here.
Thank you Cindy for such a “Sweet” kit! Love it!!
This tutorial was written assuming you have working knowledge of PSP.
~♥~ Let’s get started ~♥~
Open a 600 X 600 transparent canvas. Flood fill white.
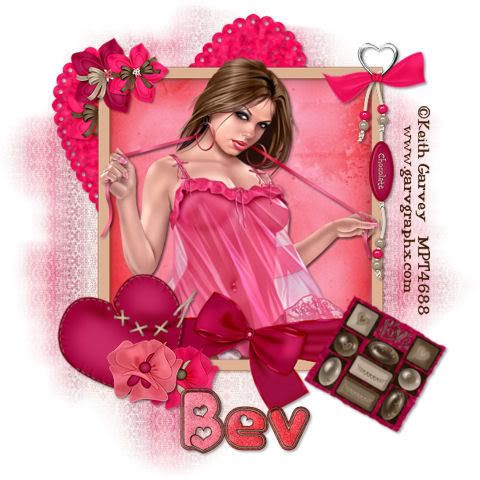
Copy and paste Frame 2 as a new layer. Use your Selection Tool set to rectangle and outline the frame.
Copy and paste a paper of choice below the frame. Selections/Invert. Hit the delete key.
Copy and paste your tube as a new layer. Deselect.
Copy and paste Heart 4 as a new layer. Resize 50%. Free rotate 25 degrees left. Move into position near the bottom left corner of the frame.
Copy and paste Flower 5 as a new layer. Resize 30%. Move into position near bottom left corner of the frame.
Copy and paste Flower 4 as a new layer. Resize 30% and again 90%. Move into position near the other flower.
Copy paste Box Candy as a new layer. Resize 40%. Free Rotate 30 degrees right. Move into position near the bottom right corner of the frame.
Copy and paste Flower 3 as a new layer. Resize 30% and again 90%. Move into position near the top left corner of the frame.
Copy and paste Flower 2 as a new layer. Resize 25%. Position behind the top left corner of the frame. See my tag for reference. Duplicate. In your layers pallet, move the duplicated flower in front of the frame. Resize 90% and move into position near Flower 3. See my tag for reference.
Copy and paste Beads 2 as a new layer. Resize 40% and move to the top right corner of the frame.
Copy and paste Heart Bow 2 as a new layer. Resize 40% and move to the top right corner of the frame.
Copy and paste Hearts 1 as a new layer and position behind the frame. See my tag as reference.
Highlight your white canvas. New Raster Layer. Select All. Copy and paste a paper of choice Into Selection. Deselect. Apply your mask. Merge Group. If you’re using Becky Mask 23 then duplicate 3 times. Merge visible mask layers only.
Add your copy rights.
Add your name.
I used
Foreground: 401e06
Background: Set to pattern - Paper 9
I added a slight bevel and DSB Flux Bright Noise to my name set at 20/Mix.
I hope you enjoyed this tutorial.
I would love to see your results.
Email me!
Hugs,
Bev


No comments:
Post a Comment