

Clicking on the image will allow you to enlarge for bigger view.
Supplies
1 tube of choice - I used the artwork of Barbara Jensen here
Font of Choice - I used Oh Lara a pay font
Weescotlass Mask 236 here
My Template 123 here
This tutorial was created with Puddicat Creations Scraps portion of the New Beginnings store collaboration kit. This kit is available for FREE with an $8 purchase at the store.
It is available EXCLUSIVELY at Heartbeatz Creationz. You can visit Cindy’s blog here.
This tutorial was written assuming you have a working knowledge of PSP.
~♥~ Let’s get started ~♥~
Open up the template.
Shift + D.
Close out the original.
Delete Credit and Hearts layers.
Image/Canvas size
700 x 700
OK
Highlight the background layer and flood fill white.
Highlight Back Rectangle 1 layer.
Click on it with your Magic Wand.
Copy and paste Paper 13 Into Selection.
Deselect.
Delete the template layer.
Highlight Back Rectangle 2 layer.
Click on it with your Magic Wand.
Copy and paste Paper 9 as a new layer.
Resize 70%
Selections/Invert
Tap the delete key.
Deselect.
Delete the template layer.
Highlight Rec 1 layer.
Click on it with your Magic Wand.
New Raster layer.
Copy and paste Paper 13 Into Selection.
Adjust/Add Remove Noise/Add Noise:
Uniform and Monochrome checked
Noise: 55%
OK
Deselect.
Delete the template layer.
Repeat the above step with Rec 2 & 3 layers.
Highlight Rec 1a layer.
Select All/Float/Defloat
New Raster layer.
Copy and paste Paper 10 Into Selection.
Deselect.
Delete the template layer.
Repeat the above step with Rec 2a & 3a layers.
Copy and paste your tube as a new layer.
Center it over the middle rectangle.
Duplicate the tube layer.
Free rotate Right 7 degrees.
Move into position over the right rectangle. In your layers pallet move it just above the right rectangle paper.
Highlight the paper layer.
Click anywhere outside of it with your Magic Wand.
Highlight the tube layer just above the paper.
Tap the delete key.
Repeat the above step accept Free rotate Left 7 degrees.
Add your embellishments. I used:
Bauble 1: Resize 40%
Bird 1: Resize 30%
Flower 4: Resize 35%/Duplicate/Resize 80%/Duplicate/Resize 80%/Duplicate/Resize 80%
Ribbon 5
Sparkles 1
Highlight your white background/
New Raster layer.
Select All.
Copy and paste a paper of choice Into Selection.
Deselect.
Apply the mask.
Merge Group.
Add your credits.
Add your name.
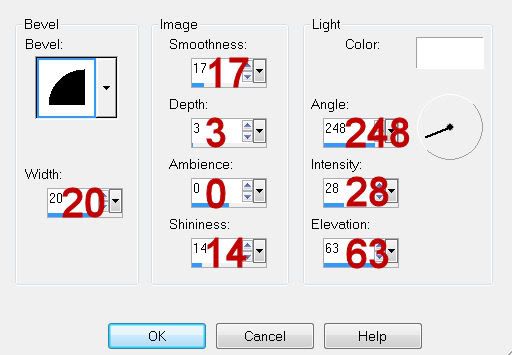
Give it a slight Inner Bevel:
 Resize all layers 80%.
I hope you enjoyed this tutorial.
I’d love to see your results and show it off in my gallery.
Email me!
Hugs,
Bev
Resize all layers 80%.
I hope you enjoyed this tutorial.
I’d love to see your results and show it off in my gallery.
Email me!
Hugs,
Bev
Resize all layers 80%.
I hope you enjoyed this tutorial.
I’d love to see your results and show it off in my gallery.
Email me!
Hugs,
Bev
No comments:
Post a Comment