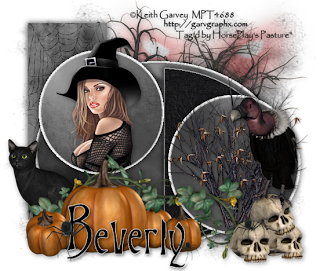
Clicking on the image will allow you to enlarge for bigger view.
Supplies
1 tube of your choice - I used the artwork of Keith Garvey here
Font of Choice - I used Burton’s Nightmare here
Gem's Mask 161 here
Creative by Nature Template 38 here
Eyecandy 4000 - Gradient Glow
“Black Widow” is a PTU tagger size scrap kit created by Cindy of Puddicat Creations and can be purchased at Lollipops n Gumdrops. You can visit her blog here.
Thank you Cindy for such a festive kit!
This tutorial was written assuming you have a working knowledge of PSP.
~♥~ Let’s get started ~♥~
Open up the template.
Shift + D.
Close out the original.
Image/Canvas size 650 x 550
OK
Highlight Raster 1 and flood fill white.
Delete the top 4 layers and Raster 8 layer.
Highlight Raster 2 layer.
Click on it with your Magic Wand.
Copy and paste Paper 6 as a new layer.
Resize 60%
Move into position.
Selections/Invert
Tap the delete key.
Deselect.
Delete the template layer.
Highlight Raster 3 layer.
Click on it with your Magic Wand.
New Raster layer.
Flood fill white.
Adjust/Add Remove Noise/Add Noise:
Uniform and Monochrome checked
Noise: 45%
OK
Deselect.
Delete the template layer.
Repeat the above step with Rasters 4 and 6.
Highlight Copy of Vector 1 layer.
Click on it with your Magic Wand.
New Raster layer.
Copy and paste Paper 11 Into Selection.
Deselect.
Delete the template layer.
Highlight Copy (2) of Vector 1 layer.
Click on it with your Magic Wand.
New Raster layer.
Copy and paste Paper 15 Into Selection.
Deselect.
Delete the template layer.
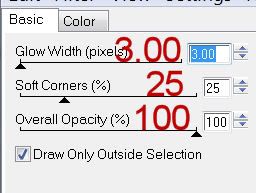
Apply Eyecandy 4000 - Gradient Glow:
 Highlight Copy of Vector 1 layer (the black circle).
Click on it with your Magic Wand.
Copy and paste Paper 10 as a new layer.
Move into position over the circle.
Selections/Invert
Tap the delete key.
Deselect.
Delete the template layer.
Highlight Copy of Vector 1 layer (the pink circle).
Click on it with your Magic Wand.
Copy and paste Paper 10 as a new layer.
Move into position over the circle.
Selections/Invert
Tap the delete key.
Copy and paste your tube as a new layer.
Position it over the circle.
Tap the delete key.
Deselect.
Delete the template layer.
Add your embellishments. I used:
Pumpkin 3: Resize 80%
Creepy Trees 3: Resize 65%
Trees 1: Resize 50%
Vulture 1
Cat 1: Resize 50%
Skulls 2: Resize 30%
Spooky Eyes: Resize 90%/Lower the Opacity to 36
Spider 1: Resize 25%/Mirror/Duplicate and resize as many times as you like.
Highlight your white background.
Select All.
Copy and paste a paper of choice Into Selection.
Deselect.
Apply the mask.
Merge Group.
Add your credits.
Add your name.
Resize all layers 80%
I hope you enjoyed this tutorial.
I’d love to see your results and show it off in my gallery.
Email me!
Hugs,
Bev

Just finished doing this tut, I loved it, thank you so much for your time in making tuts for us to use....huggss
ReplyDeleteYou're so welcome pms :)
ReplyDeleteHugs, Bev