Supplies
1 tube of choice - I used the artwork of Anna Marine whoch can be purchased from CDO. You must obtain a license to use.
Font of choice - I used CAC Shishoni Brush here
Weescotlass Mask 297 here
Divine Intentionz Template 268 here
Greg’s Factory Output Vol. II - Pool Shadow
Eyecandy 3.1 - Glow
“Garden Delights ” is a tagger size scrap kit created by Krissy of Krissy’s Scraps and can be purchased from her store Exquisite Scraps. You can visit her blog here.
This tutorial was written assuming you have a working knowledge of PSP.
~♥~ Let’s get started ~♥~
Open up the template.
Shift + D.
Close out the original.
Resize all layers 90%
Image/Canvas Size 700 x 500
Open up the background layer and flood fill white.
Delete the top 3 layers.
Highlight Large Circle layer.
Click on it with your Magic Wand.
New Raster layer.
Copy and paste Paper 10 Into Selection.
Deselect.
Delete the template layer.
Apply Eyecandy 3.1 - Glow:
Width: 5
Opacity: 100
Opacity Drop off: Fat
Color: White
Highlight Circle 1 layer.
Click on it with your Magic Wand.
New Raster layer.
Copy and paste Paper 9 Into Selection.
Deselect.
Delete the template layer.
Highlight Center Rectangle layer.
Click on it with your Magic Wand.
New Raster layer.
Copy and paste Paper 11 Into Selection.
Apply Greg’s Factory Output Vol. II - Pool Shadow:
Default settings.
Deselect.
Copy and paste Cloud 1 as a new layer.
Resize 40%
Position over the paper.
Copy and paste Cherry Tree 1 as a new layer about the paper layer.
Resize 60%
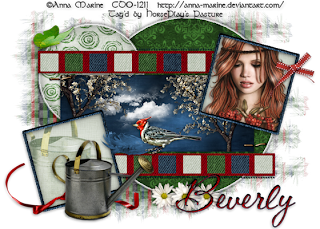
Move into position to one side of the rectangle - see my tag for reference.
Duplicate/Mirror
Highlight Center Rectangle template layer.
Click anywhere outside of it with your Magic Wand.
Highlight each of the tree layers and tap the delete key.
Deselect.
Delete the template layer.
Highlight Thin Rectangle 1 layer.
Click anywhere outside of it with your Magic Wand.
Copy and paste Paper 12 as a new layer over the template layer.
Resize 60%
Move into position.
Tap the delete key.
Deselect.
Delete the template layer.
Highlight Thin Rectangle 2 layer.
Repeat the above step.
Highlight Dotted Line layer.
Select All/Float/Defloat
New Raster layer.
Copy and paste Paper 11 Into Selection.
Deselect.
Duplicate/Merge Down.
Delete the template layer.
Highlight Frame Left layer.
Click on it with your Magic Wand.
New Raster layer.
Paste Paper 11 Into Selection.
Deselect.
Delete the template layer.
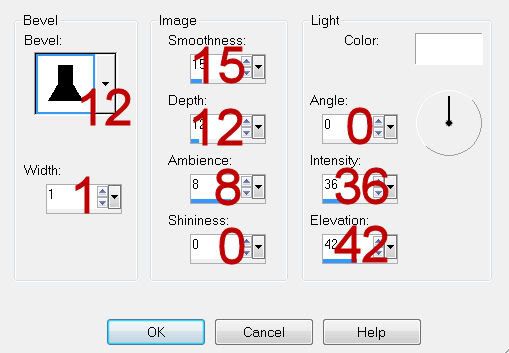
Give it a slight Inner Bevel:
 Highlight Frame Right layer.
Repeat the above step.
Highlight Frame Back layer.
Click on it with your Magic Wand.
New Raster layer.
Copy and paste Paper 3 Into Selection.
Deselect.
Delete the template layer.
Repeat the above step with the other Frame Back template layer.
Highlight the frame paper on the right.
Click anywhere outside of it with your Magic Wand.
Copy and paste your tube as a new layer.
Position over the paper.
Tap the delete key.
Deselect.
Highlight the frame back paper on the bottom.
Click anywhere outside of the paper with your Magic Wand.
Copy and paste Watering Can 1 as a new layer.
Resize 80%
Move into position - see my tag for reference.
Tap the delete key.
Deselect.
Paste the watering can again.
Resize 60%
Position in front of the frame.
Add your embellishments. I used:
Butterfly 1: Resize 25%
Staple 2: Resize 25% and 70%/Duplicate
Painted Bird 1: Resize 40%
Feather 1: Resize 40%
Ribbon 1: Resize 60%
Natural Bloom 3: Resize 25% and 80%/Duplicate/Flip/Resize 80%/Duplicate/Mirror
Highlight your white canvas.
New Raster layer.
Select All.
Copy and paste Paper 4 Into Selection.
Deselect.
Apply the mask.
Merge Group.
Add your copyrights.
Add your name:
Give it the same Inner Bevel.
I hope you enjoyed this tutorial.
I’d love to see your results and show it off in my gallery.
Email me!
Hugs,

No comments:
Post a Comment