Supplies
1 tube of choice - I used the beautiful artwork of Zindy S.D. Nielson which can be purchased from her shop here. You must have a license to use.
Font of choice - I used Before the Rain here.
Vix Mask 451 here
Dee's Sign Post Window Template here -
You can find it under Wednesday July 24, 2013
"Winter Dreams" is a tagger size scrap kit created by Julie of Bits n Bobs and can be purchased at any of her stores here.
This tutorial assumes you have a working knowledge of PSP.
~♥~ Let's get started ~♥~
Open up the template.
Shift + D.
Close out the original.
Resize all layers 90%
Image/Canvas Size
700 x 600
OK
Highlight bg layer and flood fill white.
Delete the top 4 layers.
Highlight Green Square layer.
Click on it with your Magic Wand.
New Raster layer.
Copy and paste Paper 8 Into Selection.
Deselect.
Delete the template layer.
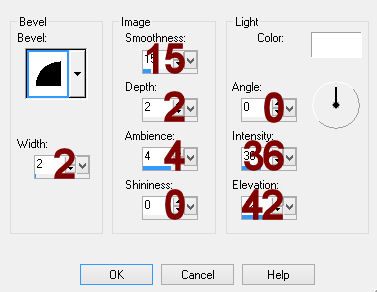
Give the paper a slight Inner Bevel:

Highlight Dashed Square layer.
Select All/Float/Defloat
New Raster layer.
Flood fill with #95b5cb
Deselect.
Delete the template layer.
Highlight Large Plum Circle layer.
Copy and paste Frame 8 as a new layer and position it over the top of the circle layer - see my tag for reference.
Duplicate the frame and position it over the lower part of the circle.
Delete the template layer.
Highlight Light Green Rectangle layer.
Click anywhere outside of it with your Magic Wand.
Copy and paste Paper 1 as a new layer.
Move into a position you like.
Tap the delete key.
Deselect.
Delete the template layer.
Give it the same slight Inner Bevel.
Highlight Pink Oval layer.
Click on it with your Magic Wand.
New Raster layer.
Copy and paste Paper 3 Into Selection.
Deselect.
Delete the template layer.
Give it the same slight Inner Bevel.
Duplicate the paper layer.
Change the Properties to Multiply.
Highlight White Rectangle layer.
Adjust/Add Remove Noise/Add Noise:
Gaussian and Monochrome checked
Noise: 33%
OK
Repeat the above step with Circles White layer.
Highlight Rectangle layer.
Click on it with your Magic Wand.
New Raster layer.
Copy and paste Paper 7 Into Selection.
Deselect.
Delete the template layer.
Highlight Light Green Rectangle layer.
Click anywhere outside of it with your Magic Wand.
Copy and paste Paper 3 as a new layer.
Resize 70%
Tap the delete key.
Deselect.
Delete the template layer.
Give it the same slight Inner Bevel.
Highlight Top Pink Strip layer.
Click on it with your Magic Wand.
New Raster layer.
Copy and paste Paper 9 Into Selection.
Deselect.
Delete the template layer.
Give it the same slight Inner Bevel.
Repeat the above step with Bottom Pink Strip layer.
Highlight Center Plum Circle layer.
Merge Down.
Merge Down.
All 3 circle should now be on the same layer.
Click anywhere outside of them with your Magic Wand.
Copy and paste Paper 1 as a new layer.
Resize 70%
Move into a position you like.
Tap the delete key.
Deselect.
Delete the template layer.
Copy and paste your tube as a new layer.
Add the elements. I used:
El 30: Resize 70%/Duplicate
El 27: Resize 40%/Duplicate
El 41: Duplicate 3x's/to one of them, mirror and flip
El 23: Resize 50%
Highlight your blank canvas.
New Raster layer.
Select All.
Copy and paste Paper 9 Into Selection.
Deselect.
Apply the mask.
Resize 105%
Add your credits.
Add your name:
Foreground and Background: #454545
Stroke: 1.0
Type your name.
Convert to Raster layer.
Close out your white background.
Merge Visible.
Resize to your choice.
Save your tag.
I hope you enjoyed this tutorial as much as I did creating it for you.
I'd really love to see your results.
Email me!
Hugs,
Bev


No comments:
Post a Comment